VTKD User Manual 1.2.34

Full tutorial playlist here.
1. Introduction to VTKD
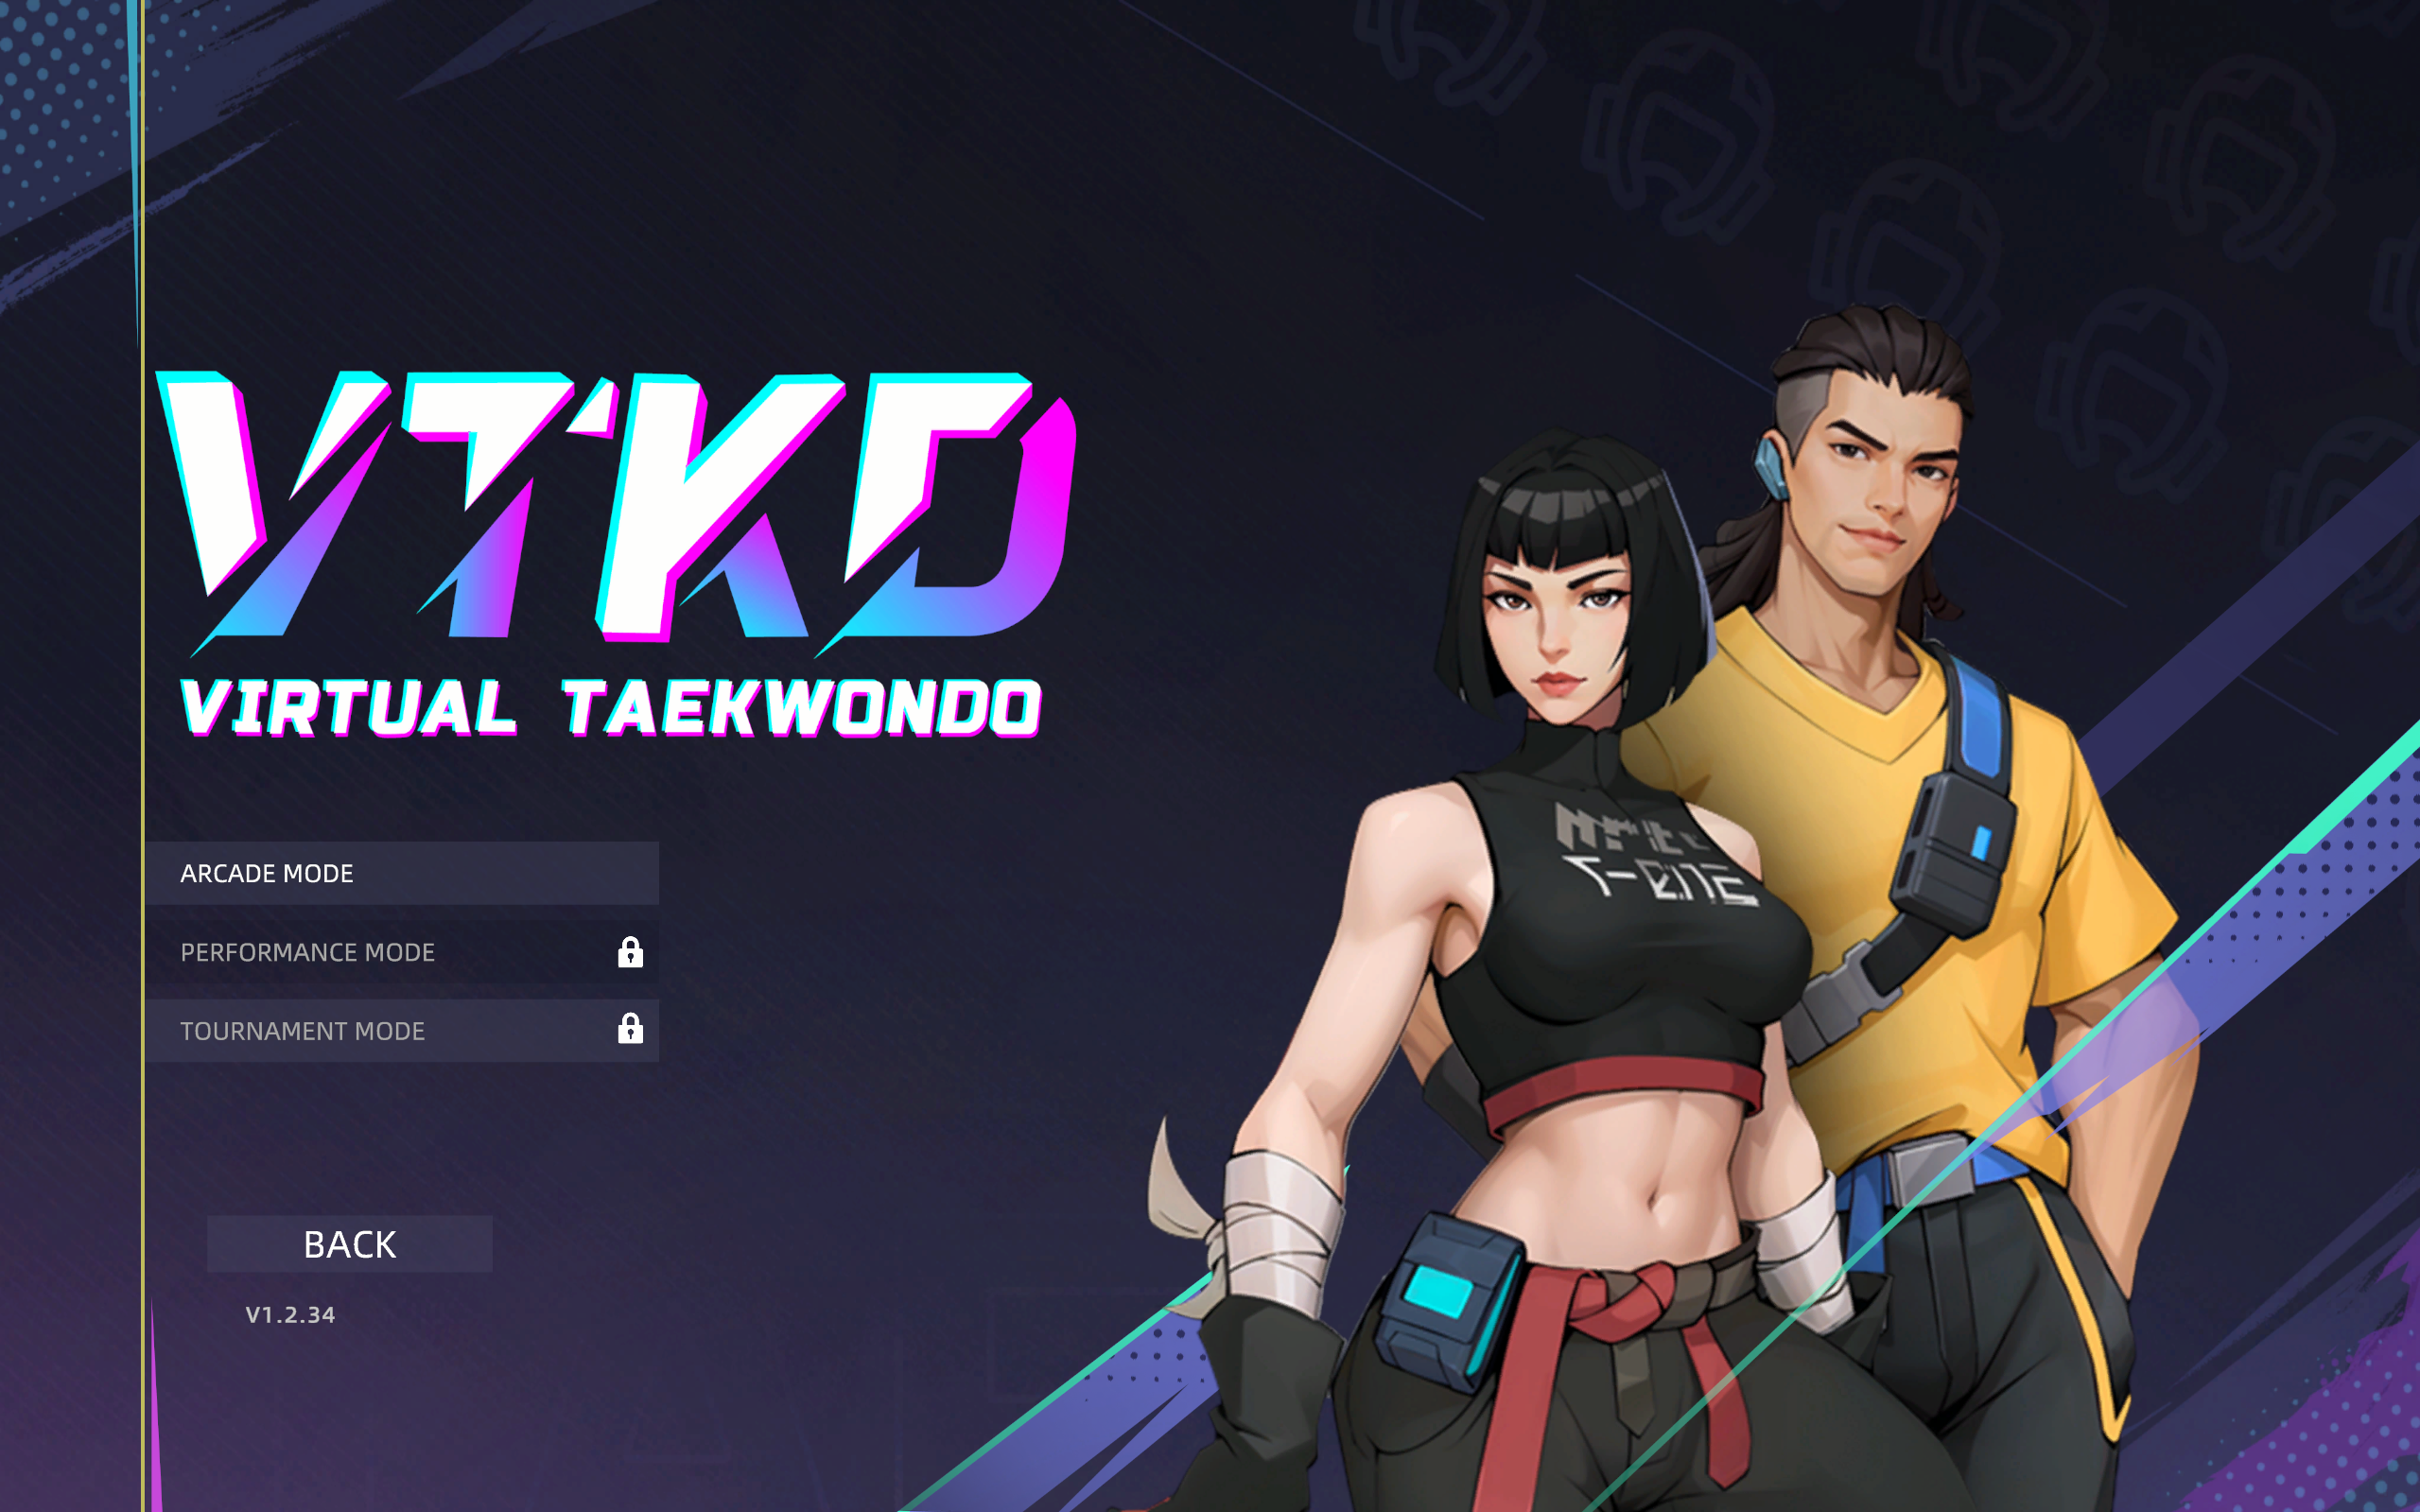
What is VTKD?
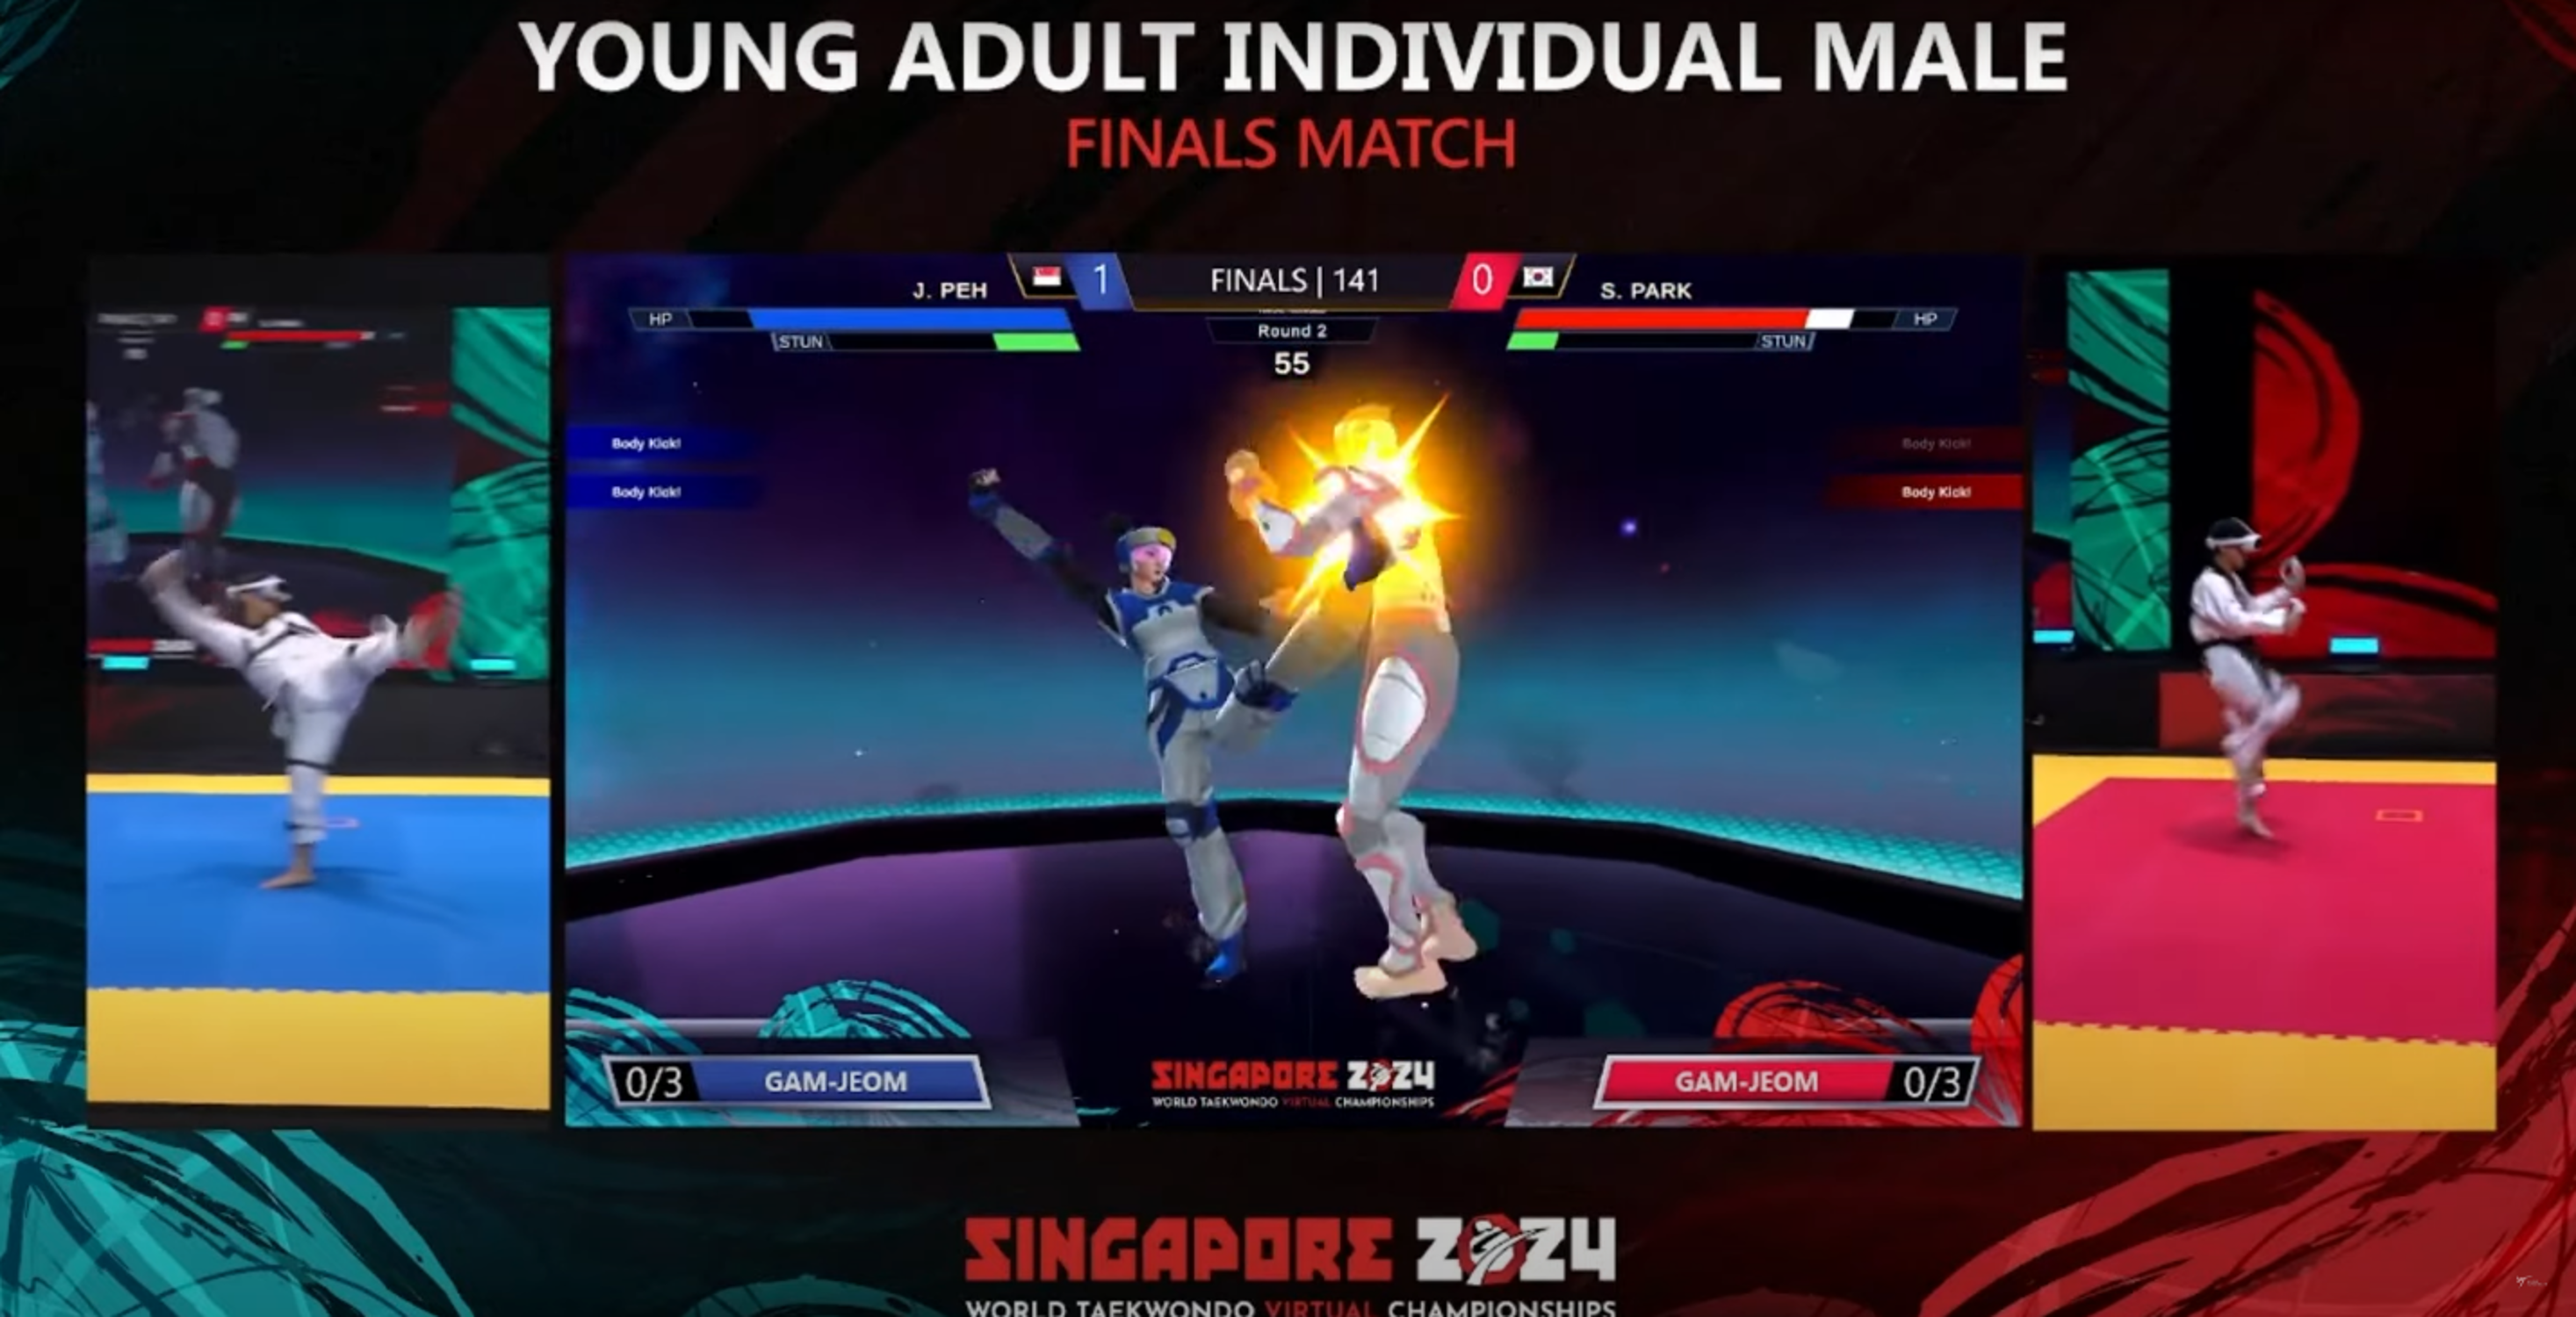
VTKD is a non-contact virtual sport game designed to simulate Taekwondo in a digital format. Players use a VR headset and AXIS motion tracking technology, allowing their physical movements to control their in-game avatars. The gameplay is similar to traditional fighting games like Street Fighter or Tekken, where rounds are won by knocking out the opponent or having a higher amount of health.
Key Features:
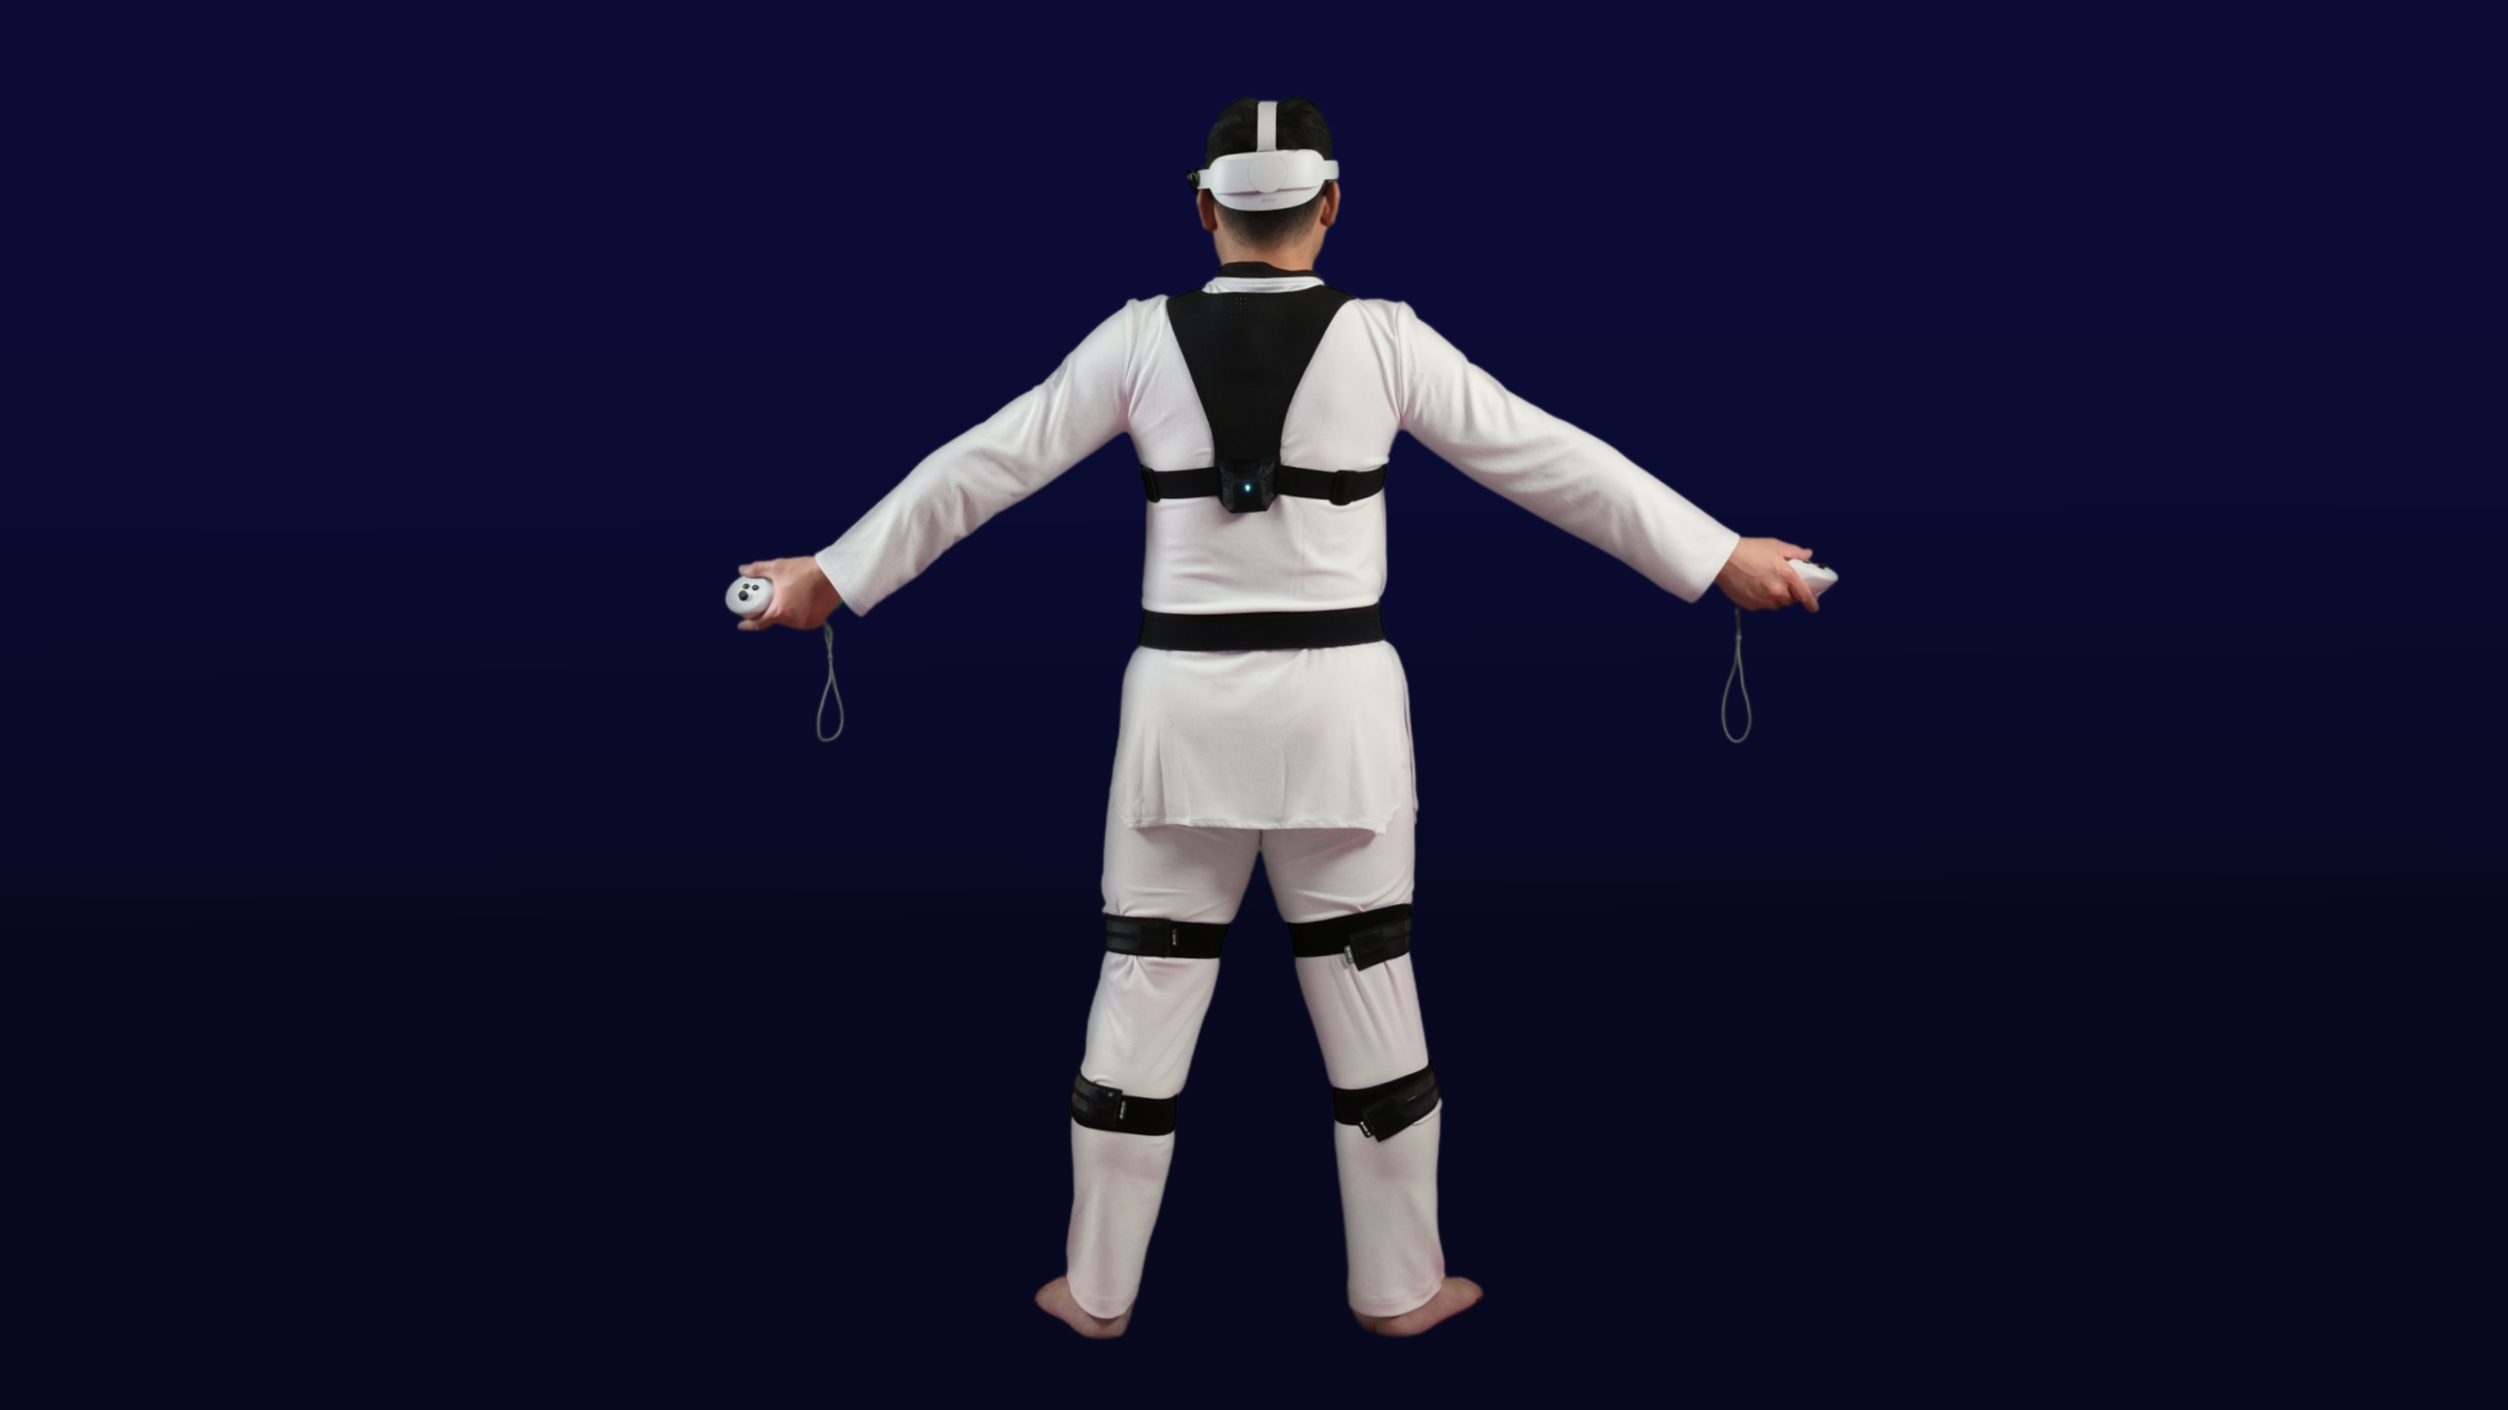
- Motion Tracking: AXIS nodes are placed on the spine, thighs, and shins to capture movements, particularly kicks, ensuring precise gameplay in a one-on-one format.
- Game Standard Format:
- Rounds last 60 seconds.
- Matches follow a best-of-three structure.
- The play area is a 4x4 meter space.
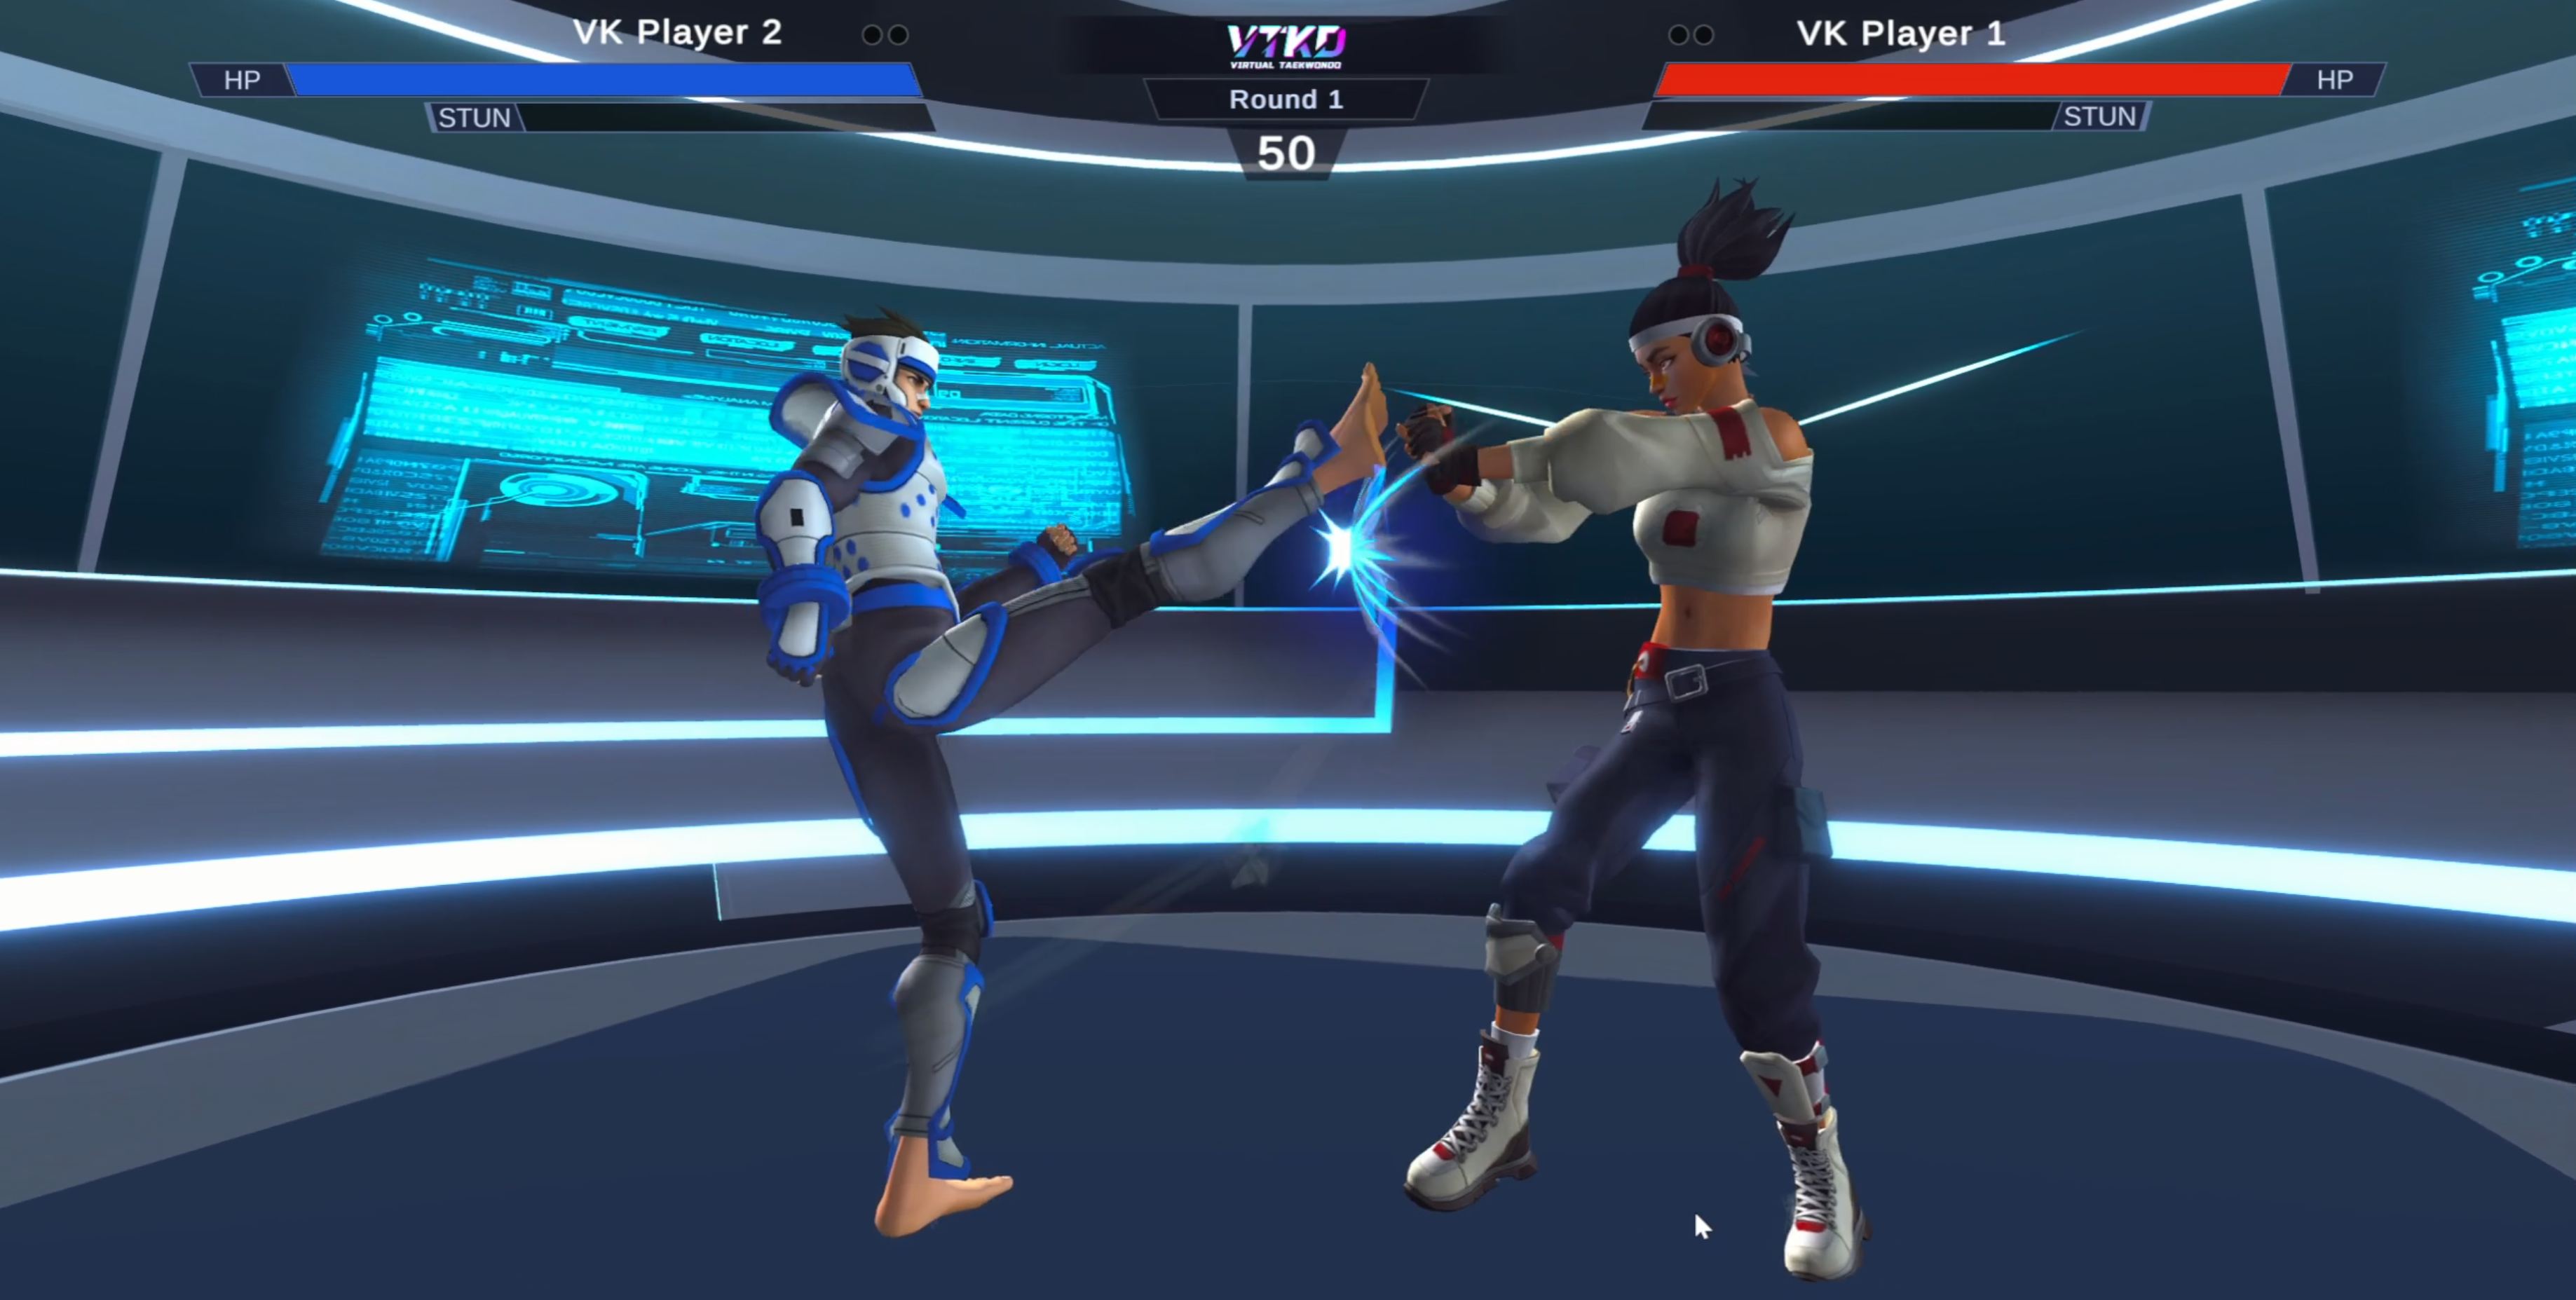
Health Bar
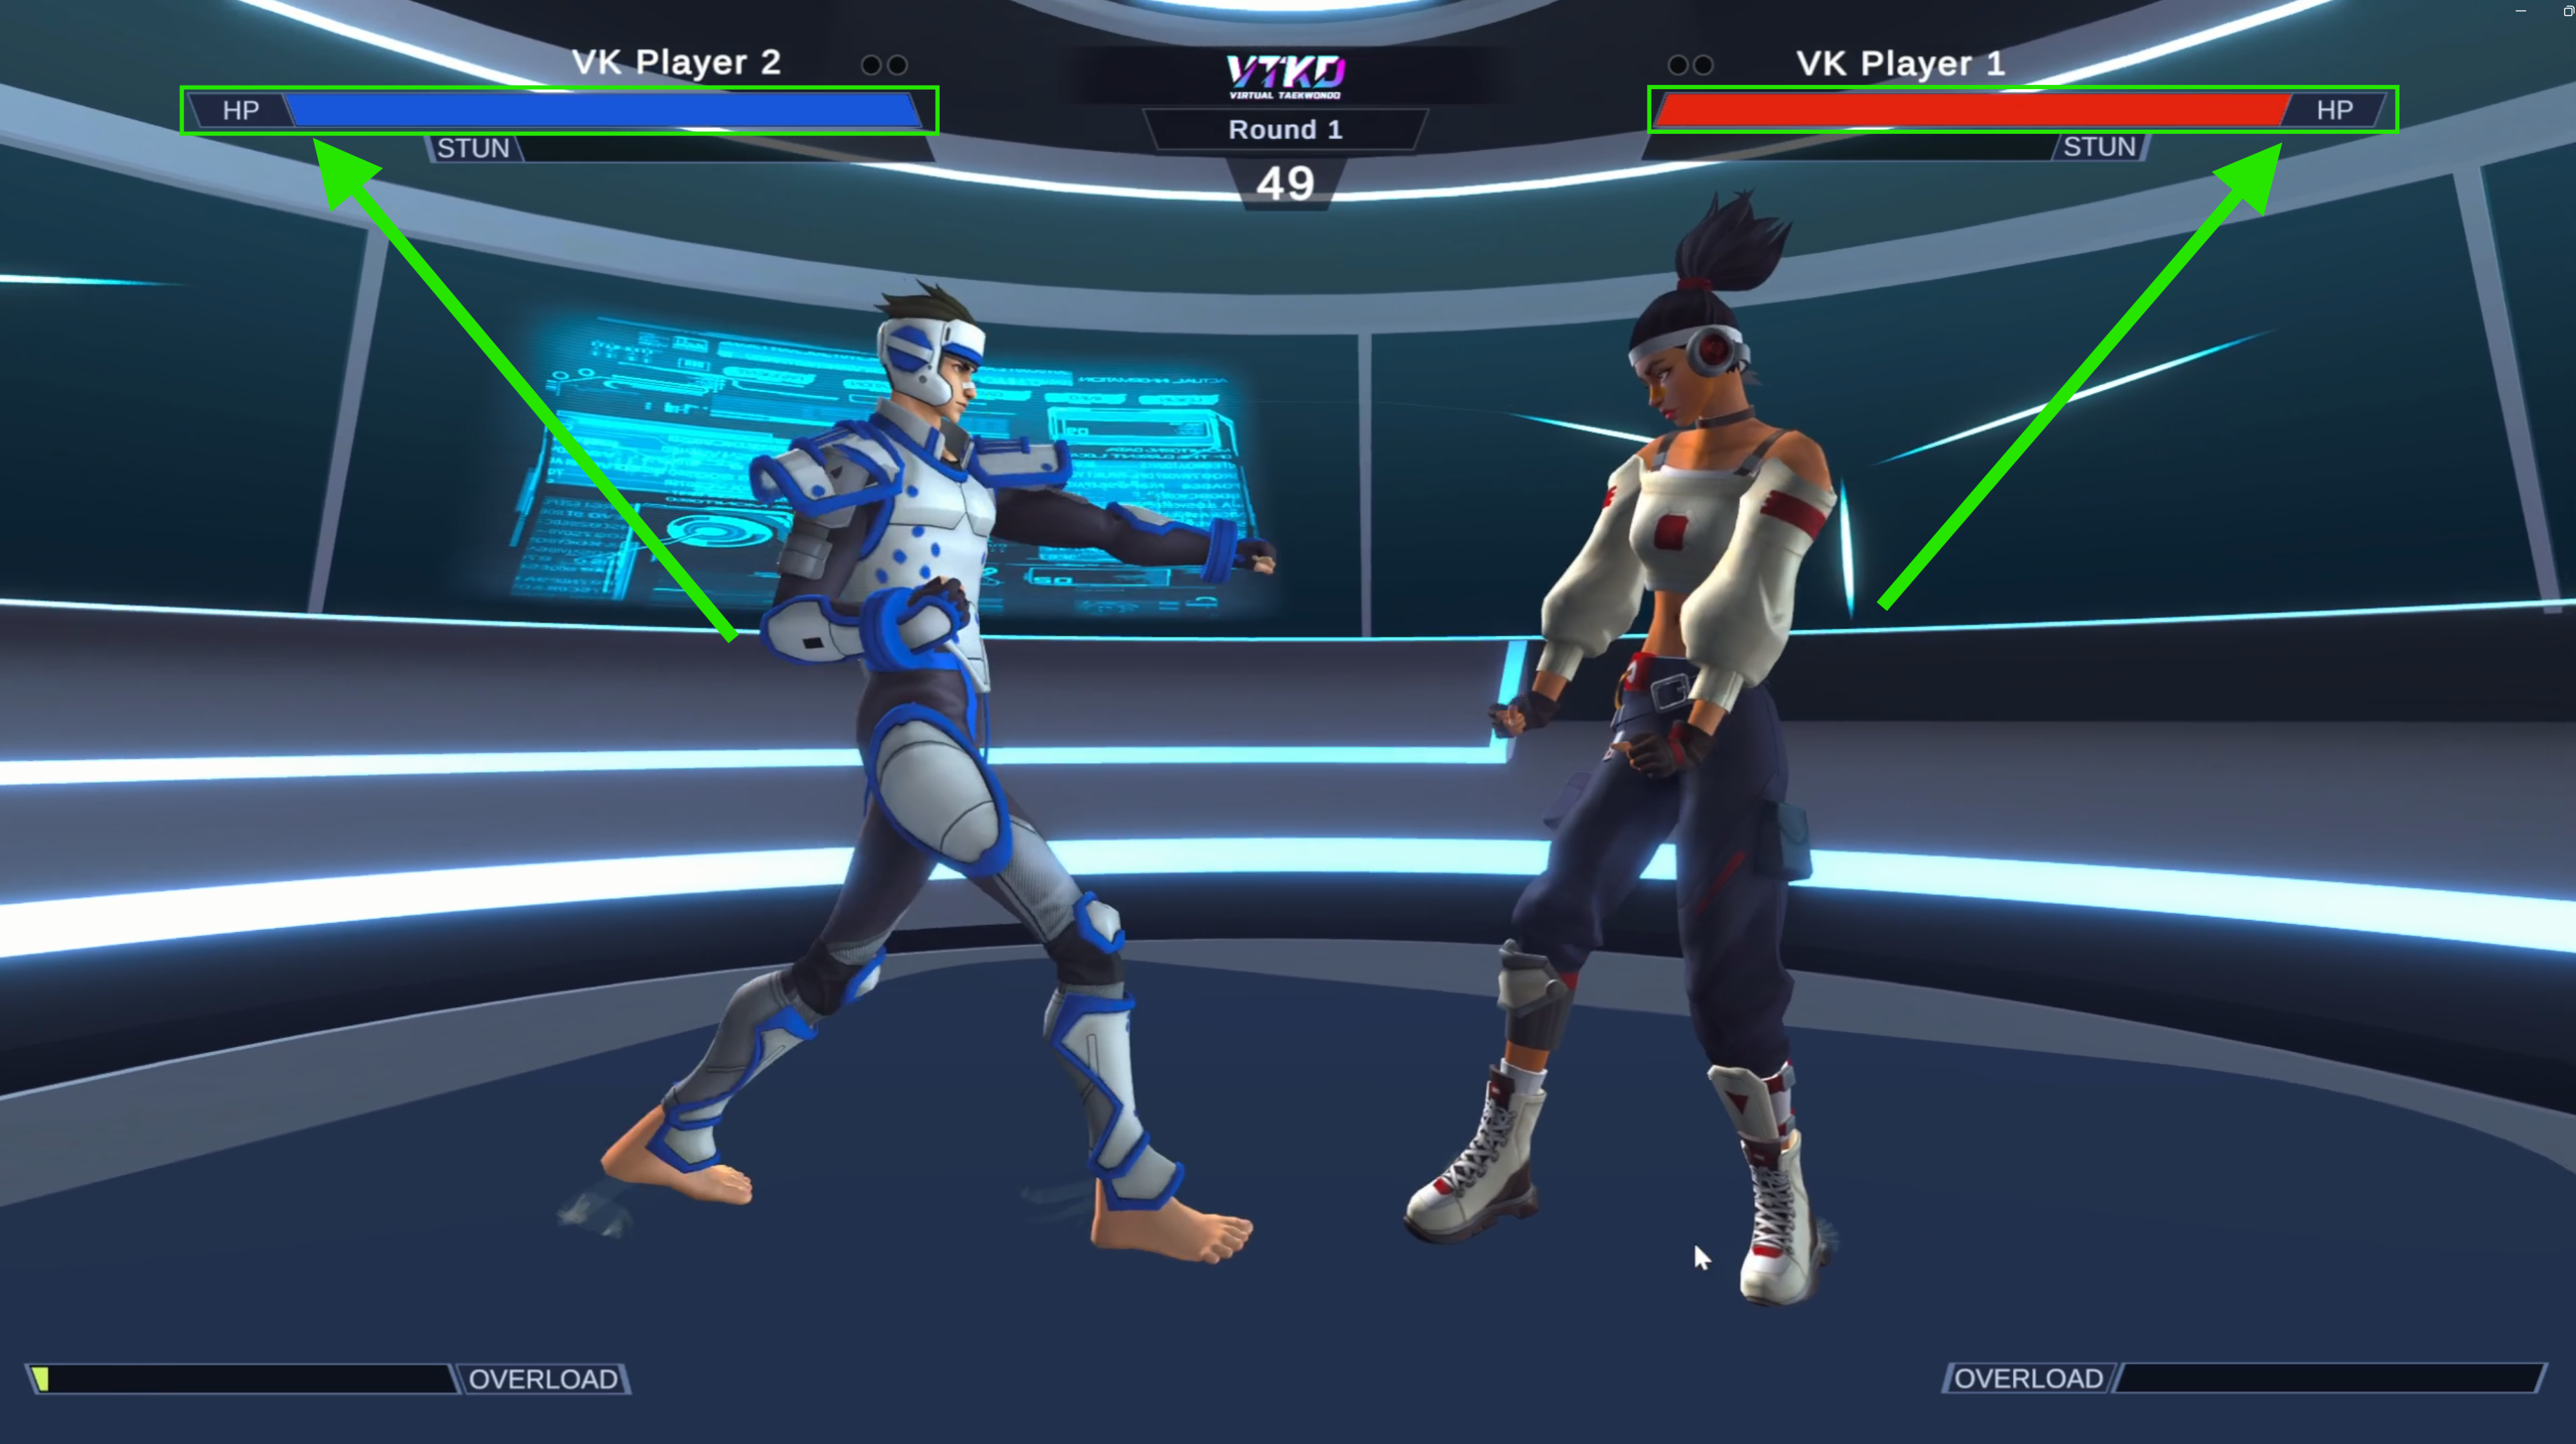
Each player has a Health Bar that matches their assigned color: the Blue player has a Blue Health Bar, and the Red player has a Red Health Bar.
On the Game Master's screen, each player's health is displayed above their respective character.
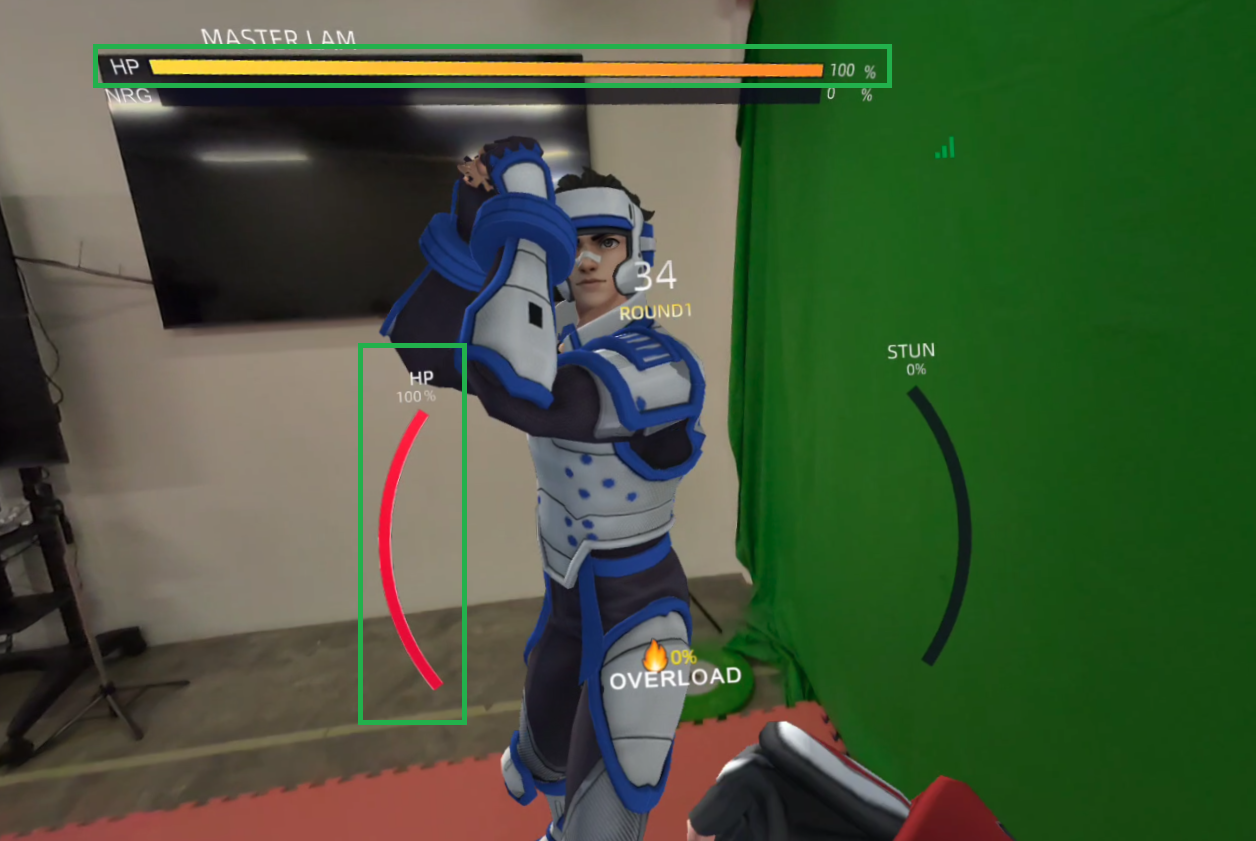
In the player's VR view, the opponent’s health is shown above the opponent, while the player's own health is displayed on the left side of the screen. The Health Bar decreases whenever the opponent successfully lands a strike on the body or head.
Strike
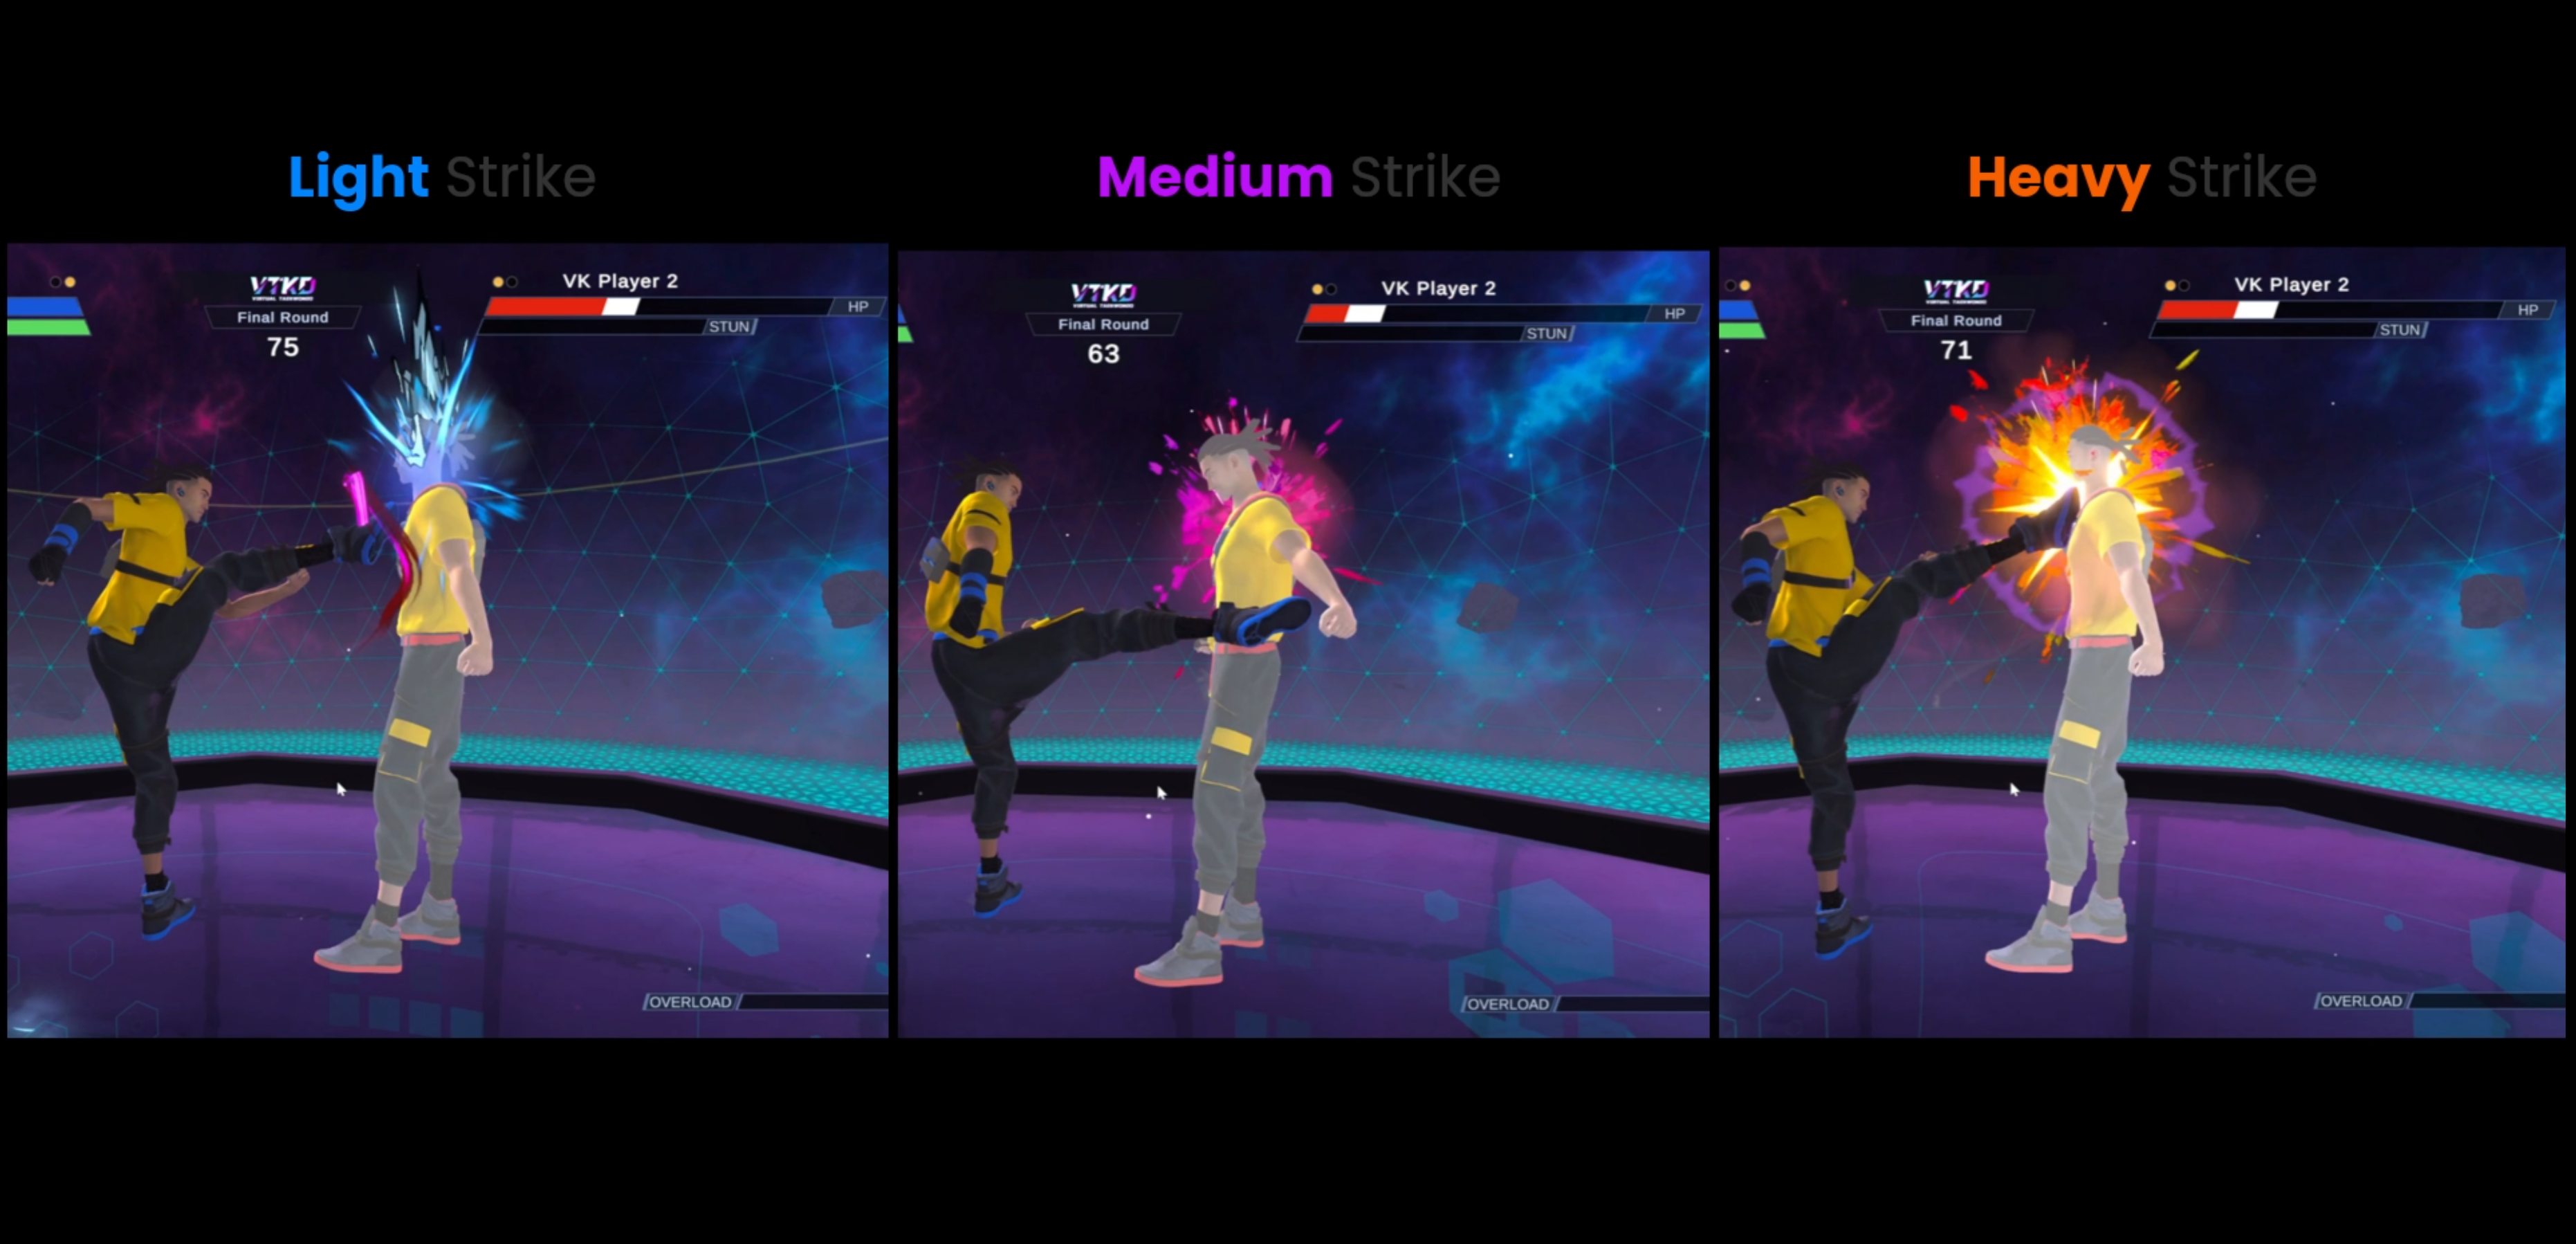
Attacking mechanics in VTKD.
Attacks can target the body (upper torso) and head. A successful hit to the body or head will damage the opponent.
There are three levels of damage—light, medium, and heavy. The damage type is determined by the acceleration of a successful strike. A strike must meet a minimum acceleration threshold; if not, no damage is dealt.
Head strikes deal double the damage of body strikes for each damage type. Only kicks cause damage; punches to the opponent’s body or head do not inflict any damage.
Block
Defending mechanics in VTKD. Players can block an opponent’s attack by bringing the forearm close to the body, raising the knee or combine both actions for enhanced defense. When a block is successful, players receive both visual and audio feedback.
A successful block reduces the opponent’s stun meter if it is not already full.
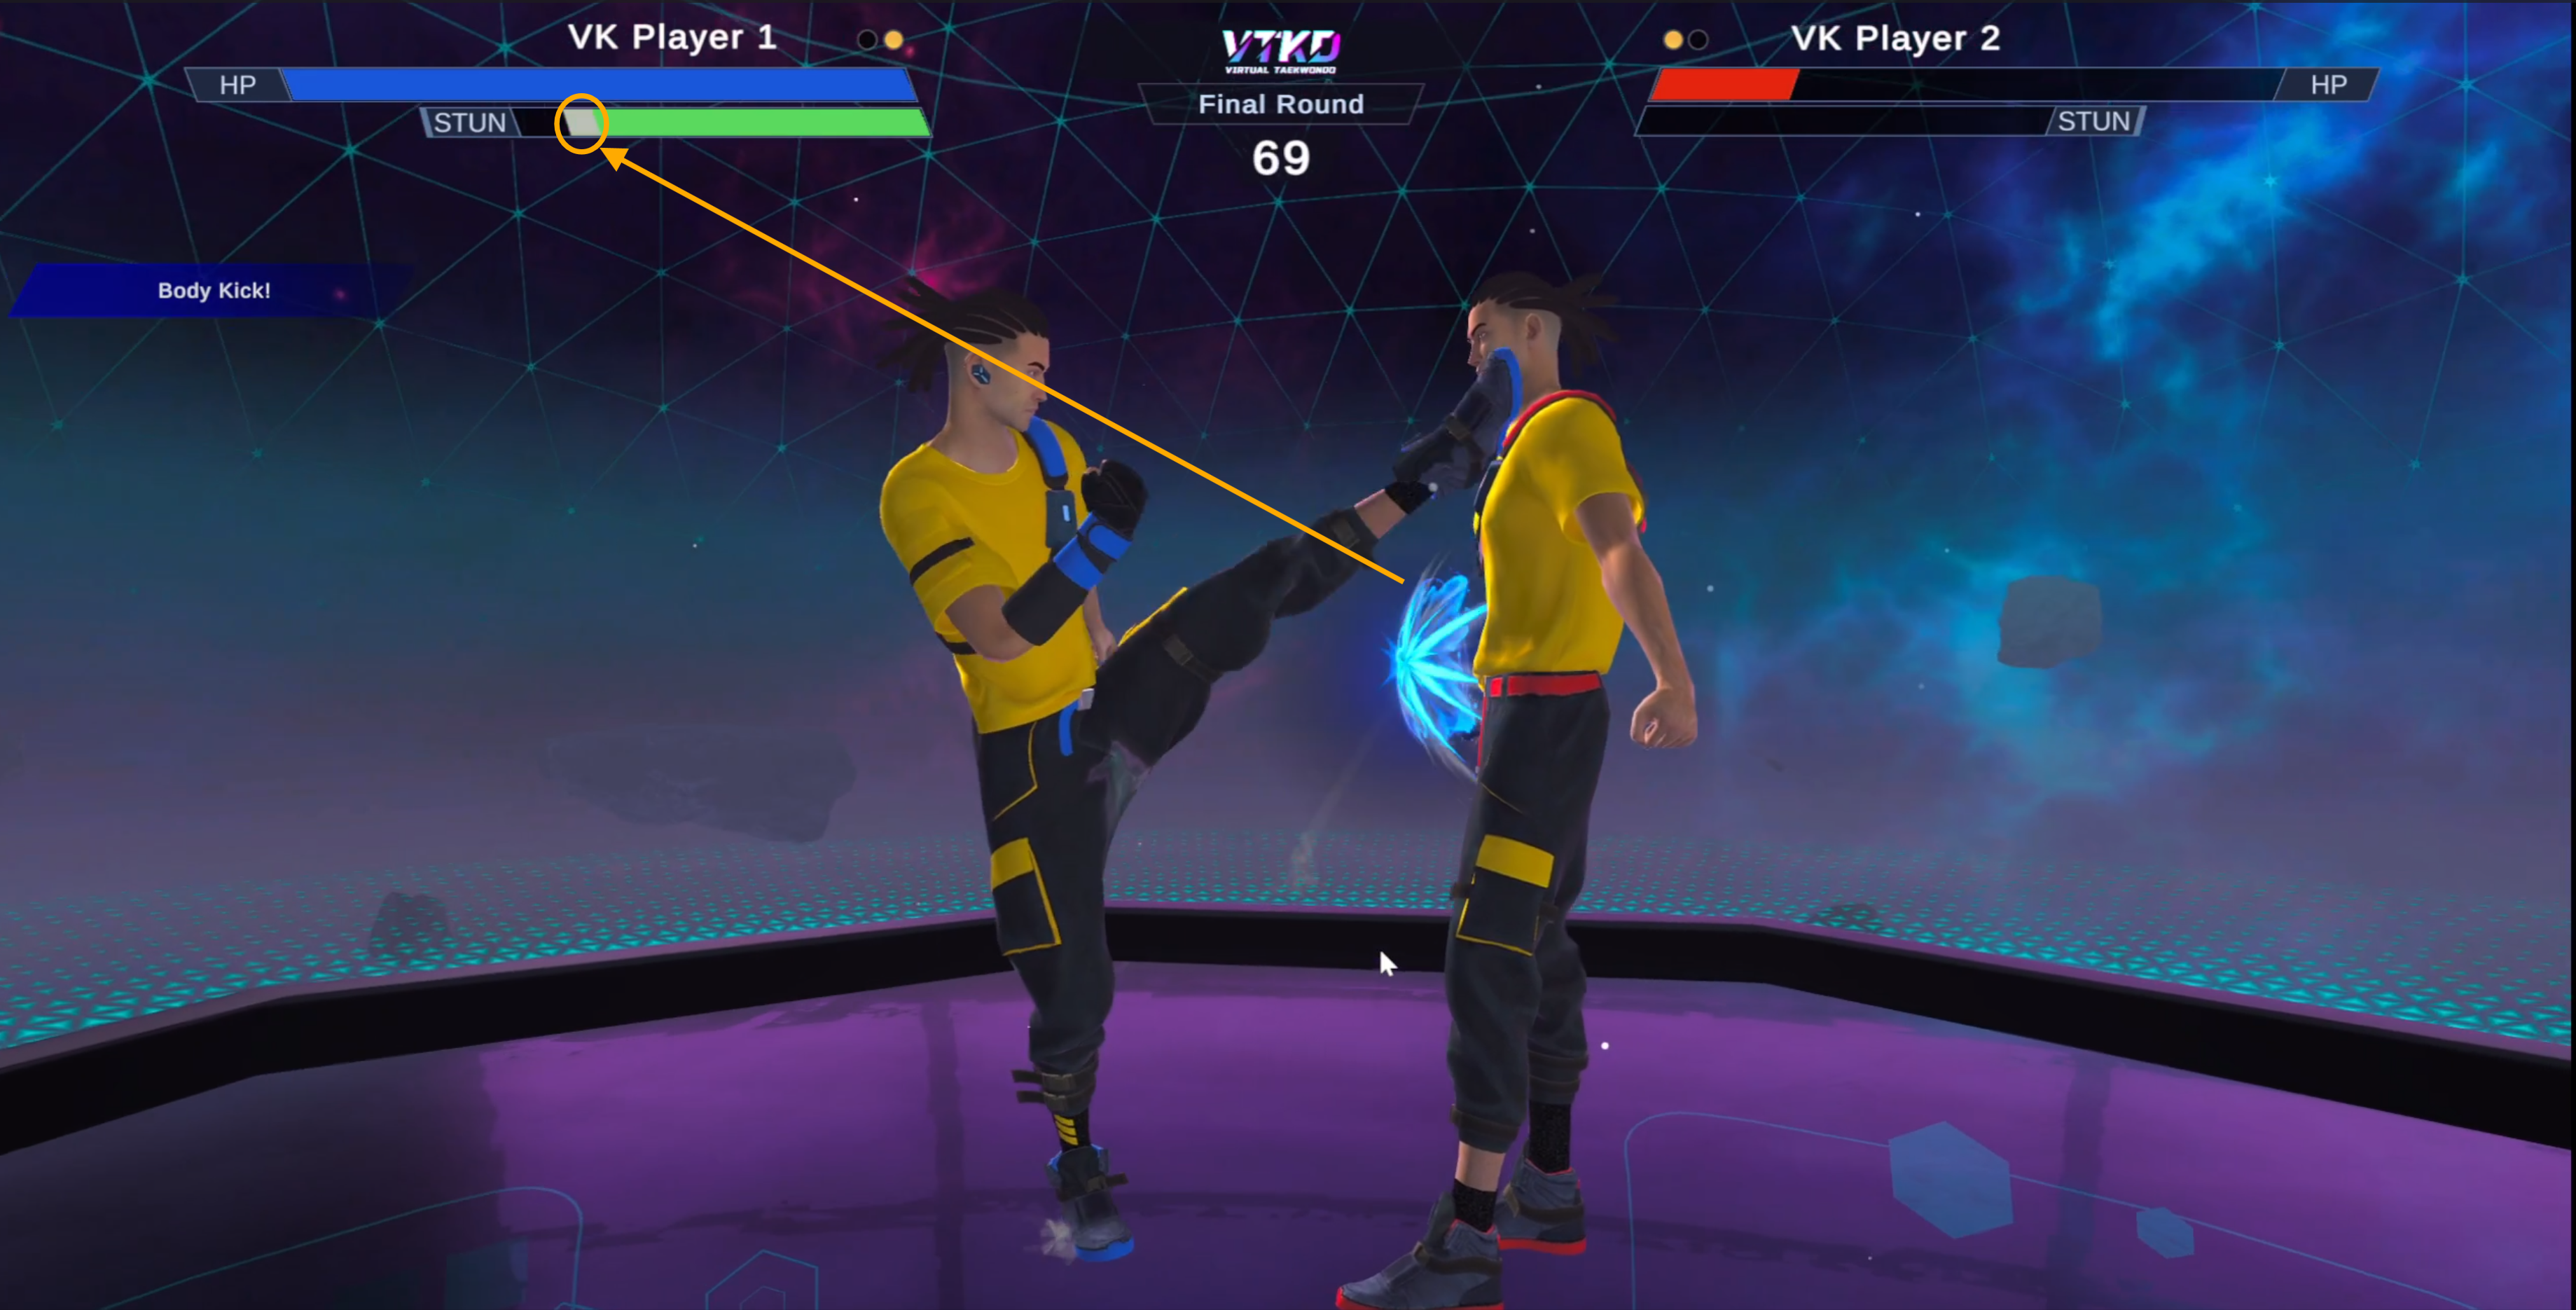
Stun
Immobilizing mechanics in VTKD.
A player can build up their stun power by successfully landing strikes (kicks or punches) on their opponent. Once the stun power is fully charged, the opponent can be stunned.
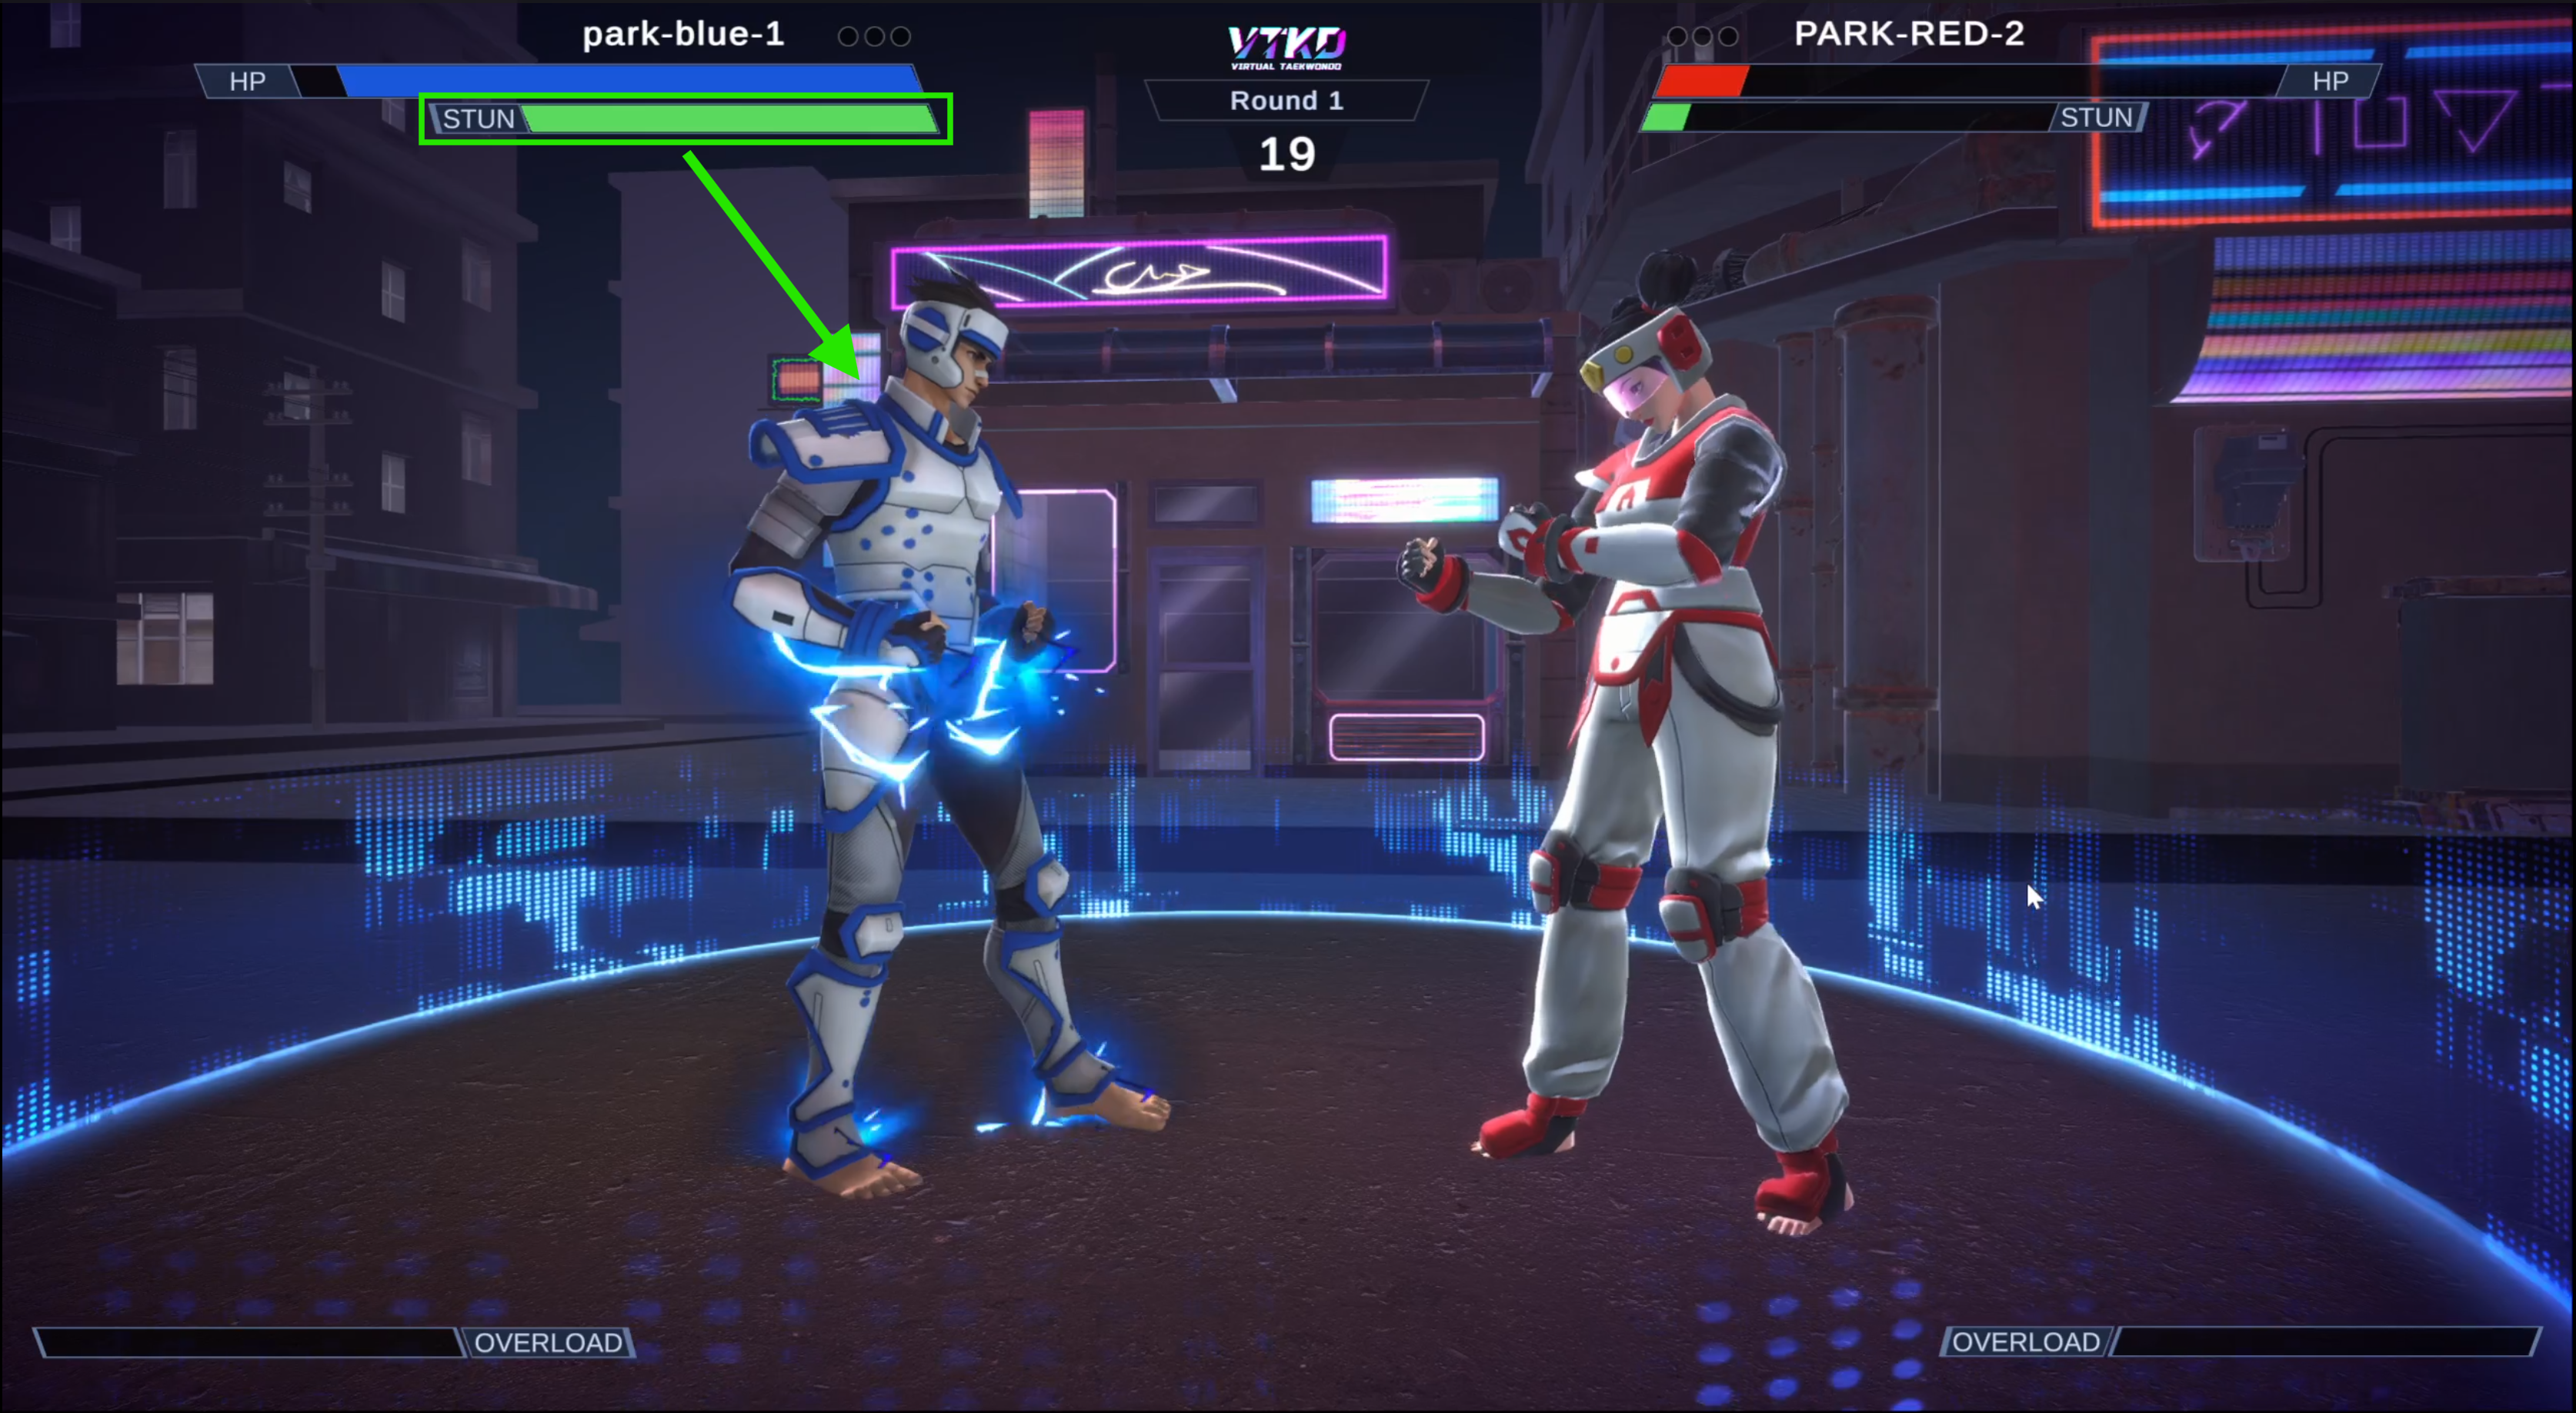
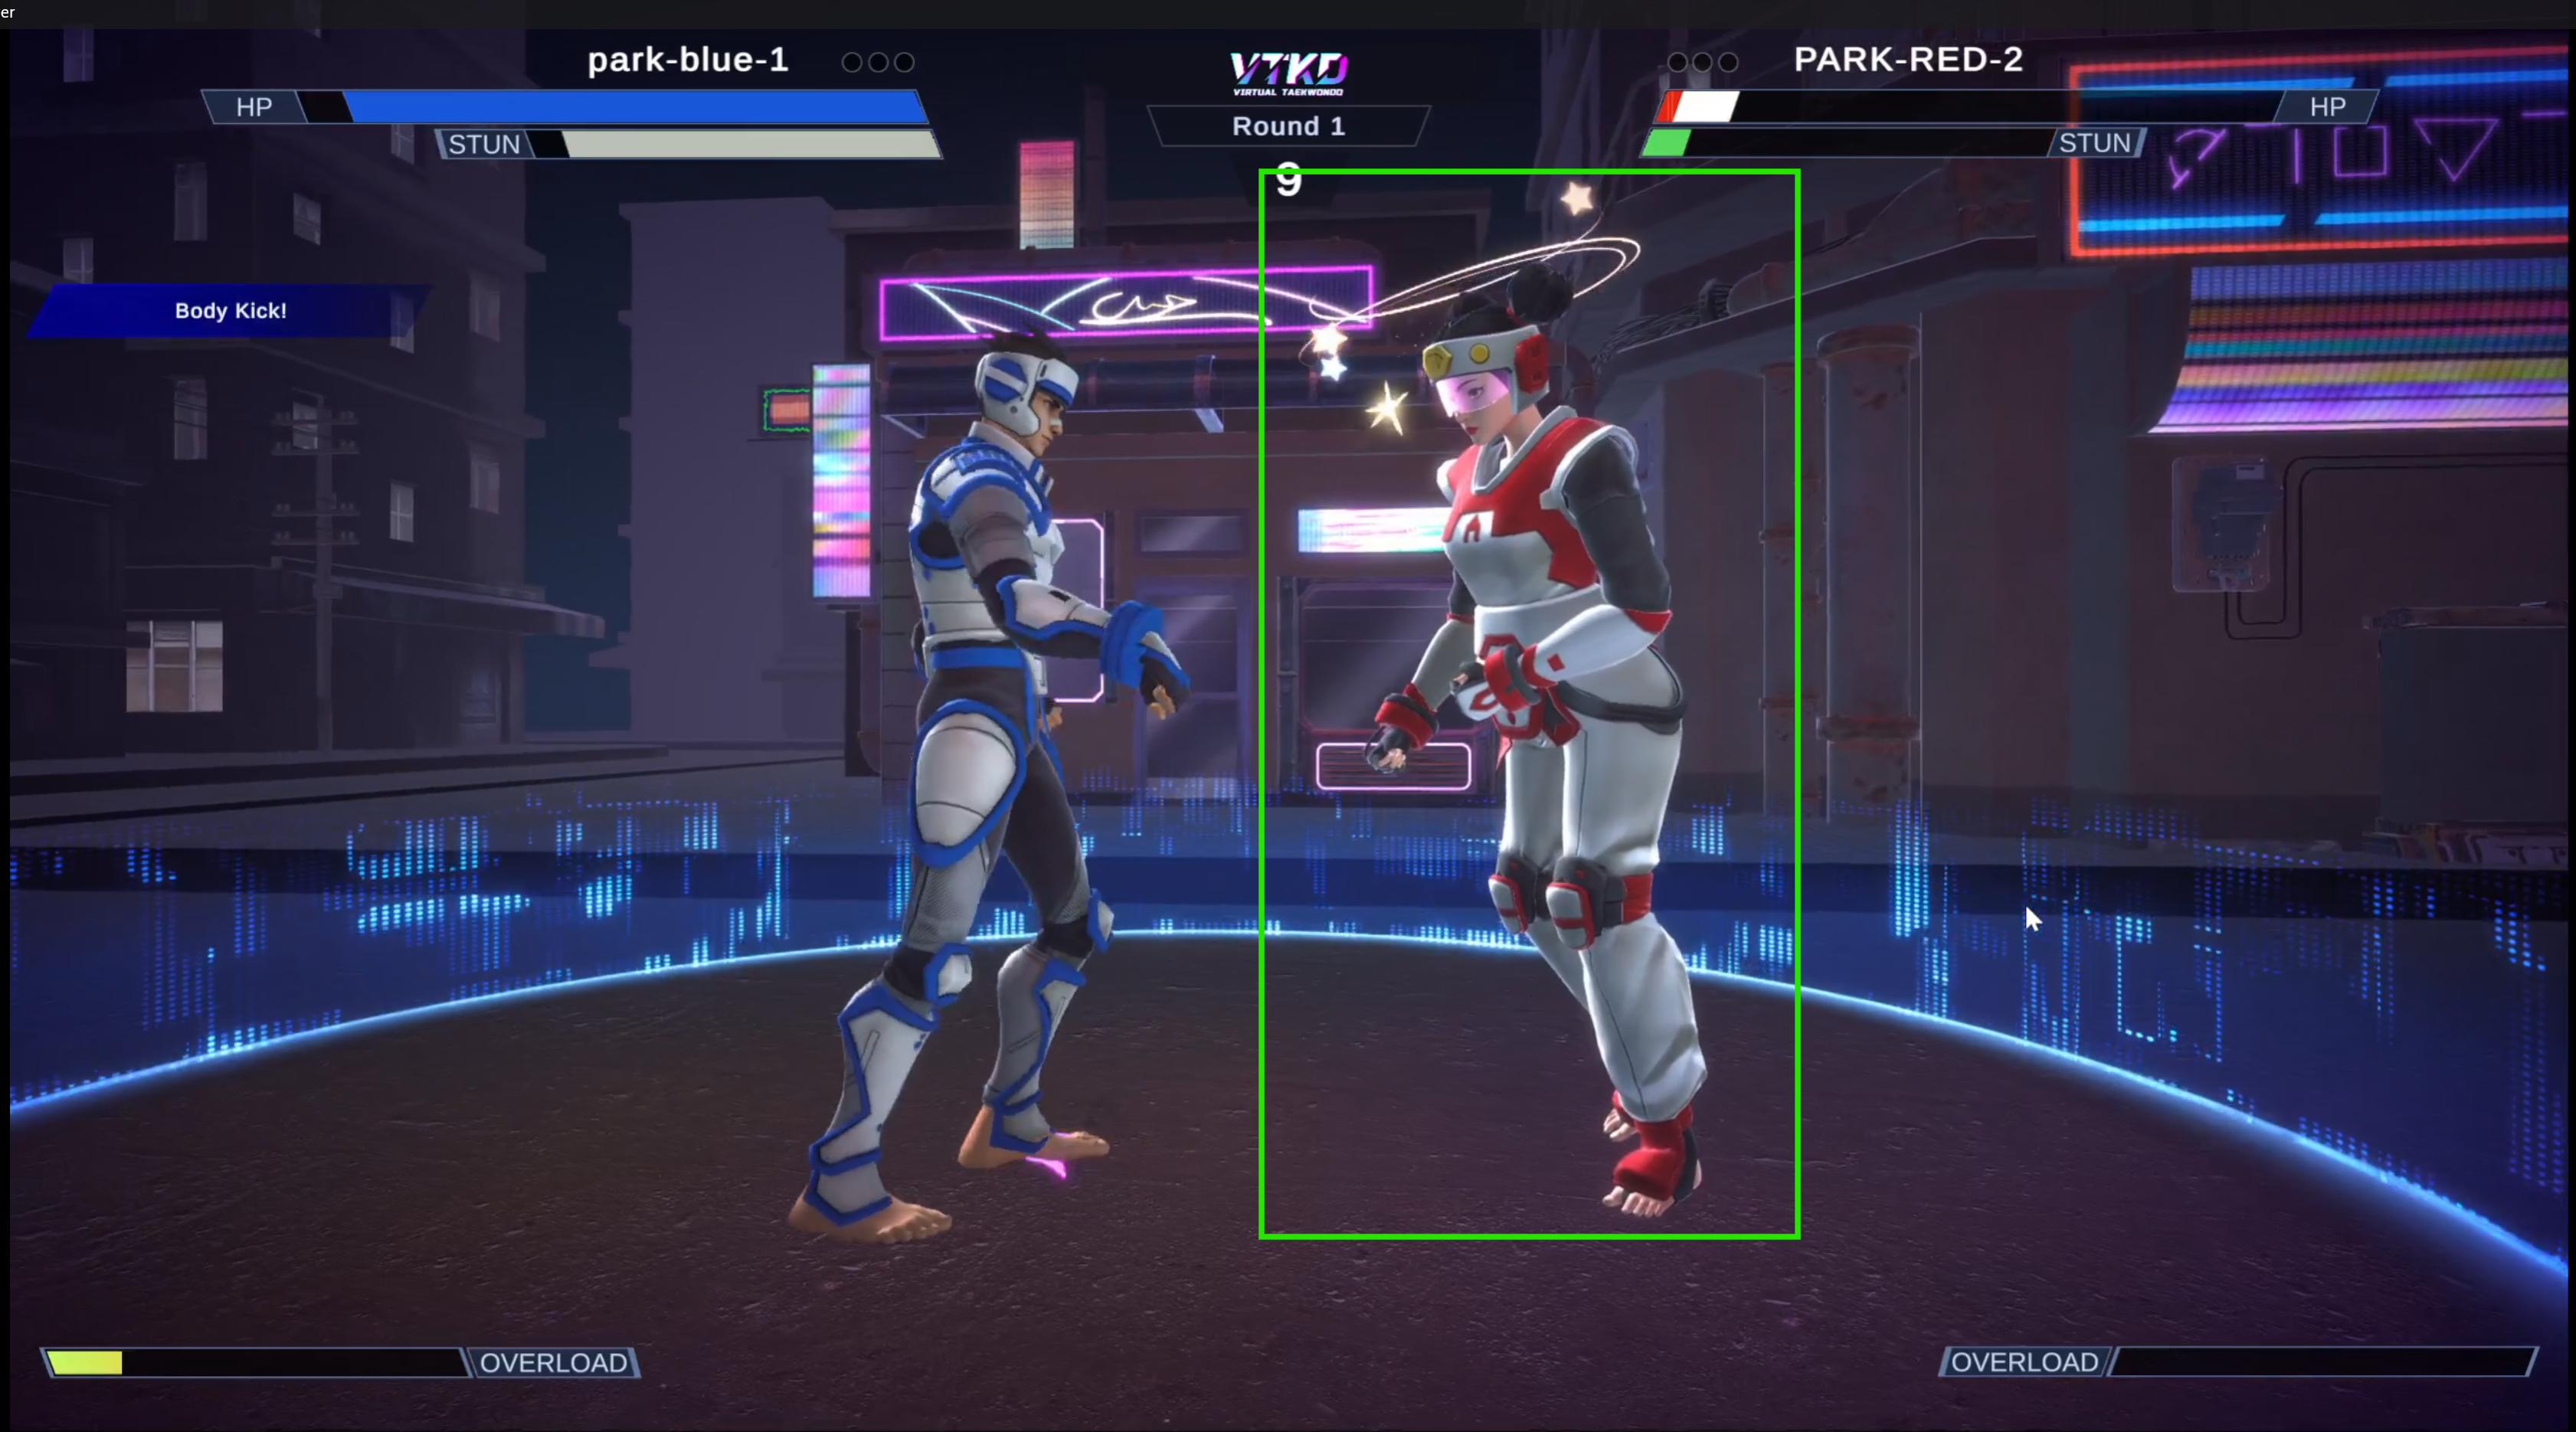
When stunned, the opponent is immobilized for 3 seconds and cannot defend themselves. During this time, the opposing player can deal damage freely to the stunned player. After 3 seconds, the stunned player regains control and can resume gameplay as normal. The opponent’s stun charge can be gradually reduced by successfully blocking their attacks.
Break ("Kalyeo")
There are two different separation mechanics in VTKD.
Automatic Break
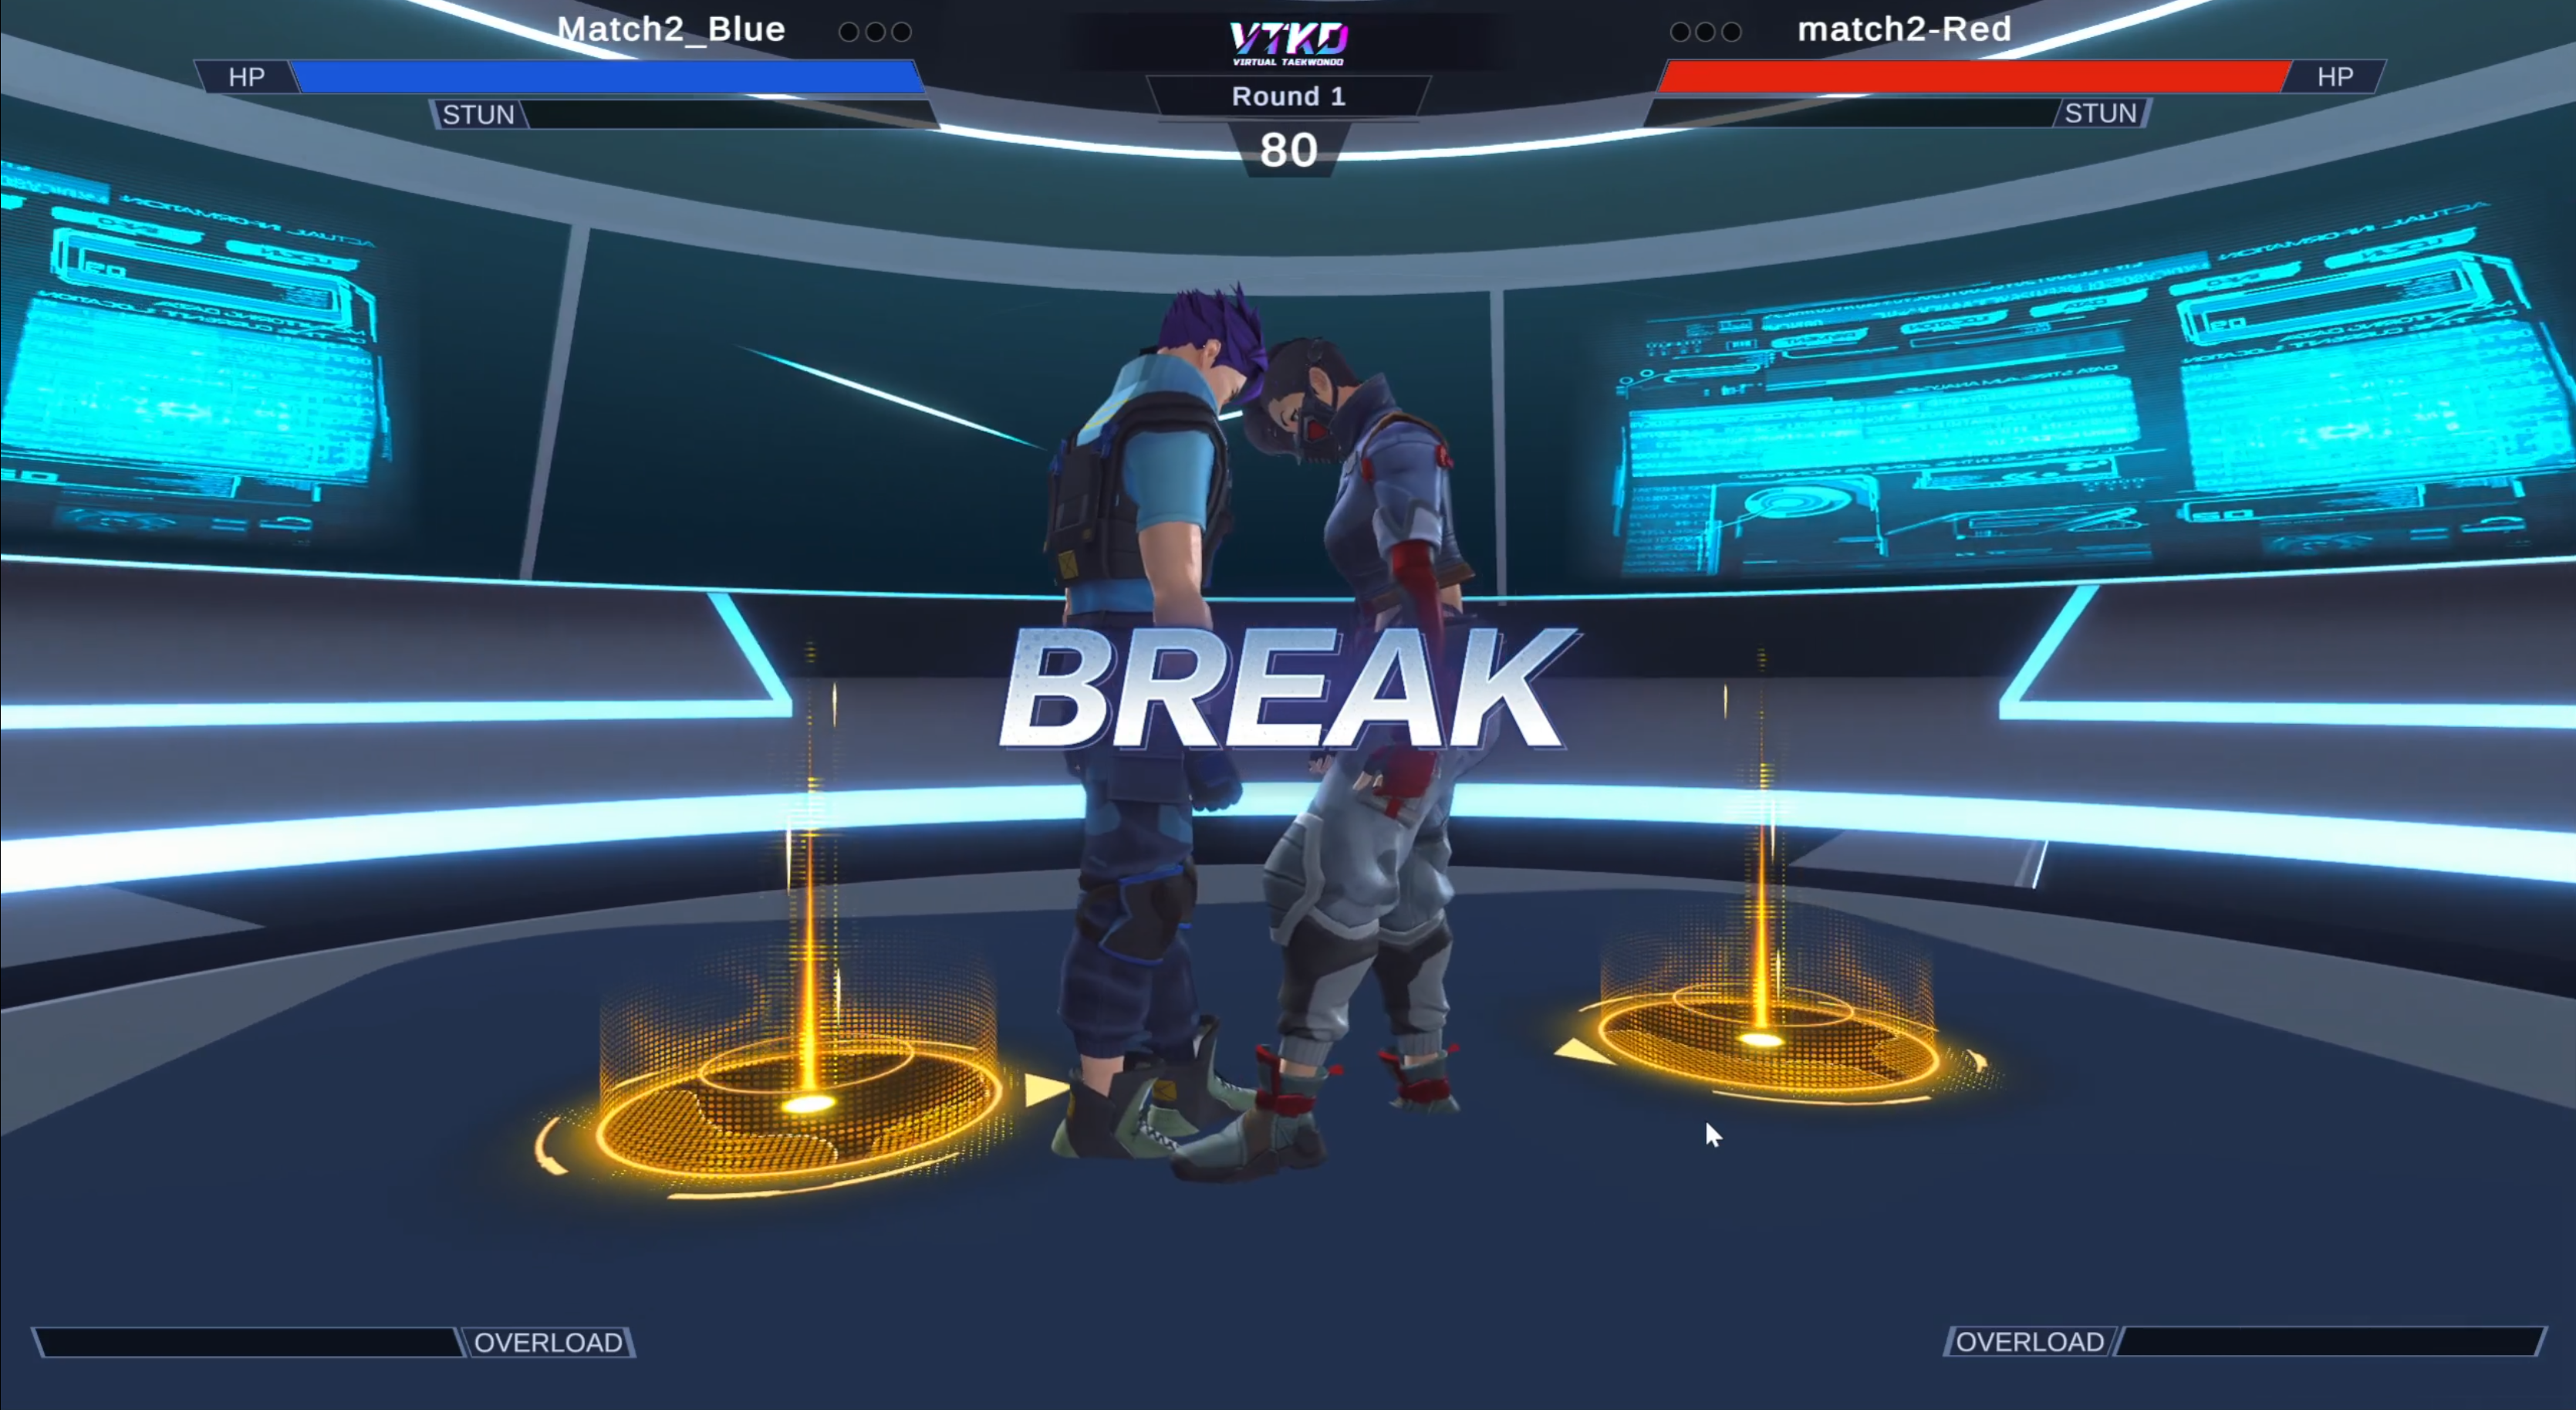
This break is triggered automatically when the players are too close to each other, pausing the game; to resume, both players must return to their designated starting points, marked by a yellow circle visible only in their VR headset.
Referee Timeout
This break is manually triggered by Game Master; players are required to return to their starting points; the Game Master then manually resumes the game when ready.
Boundary Damage
A function that can be toggled in the settings, the boundary damage is an in-game feature where the boundary will start shrinking if neither player lands a hit nor block an attack after 3 seconds. It will continue to shrink until it reaches a minimum size and will only reset to its original size when one player makes contact with the other.
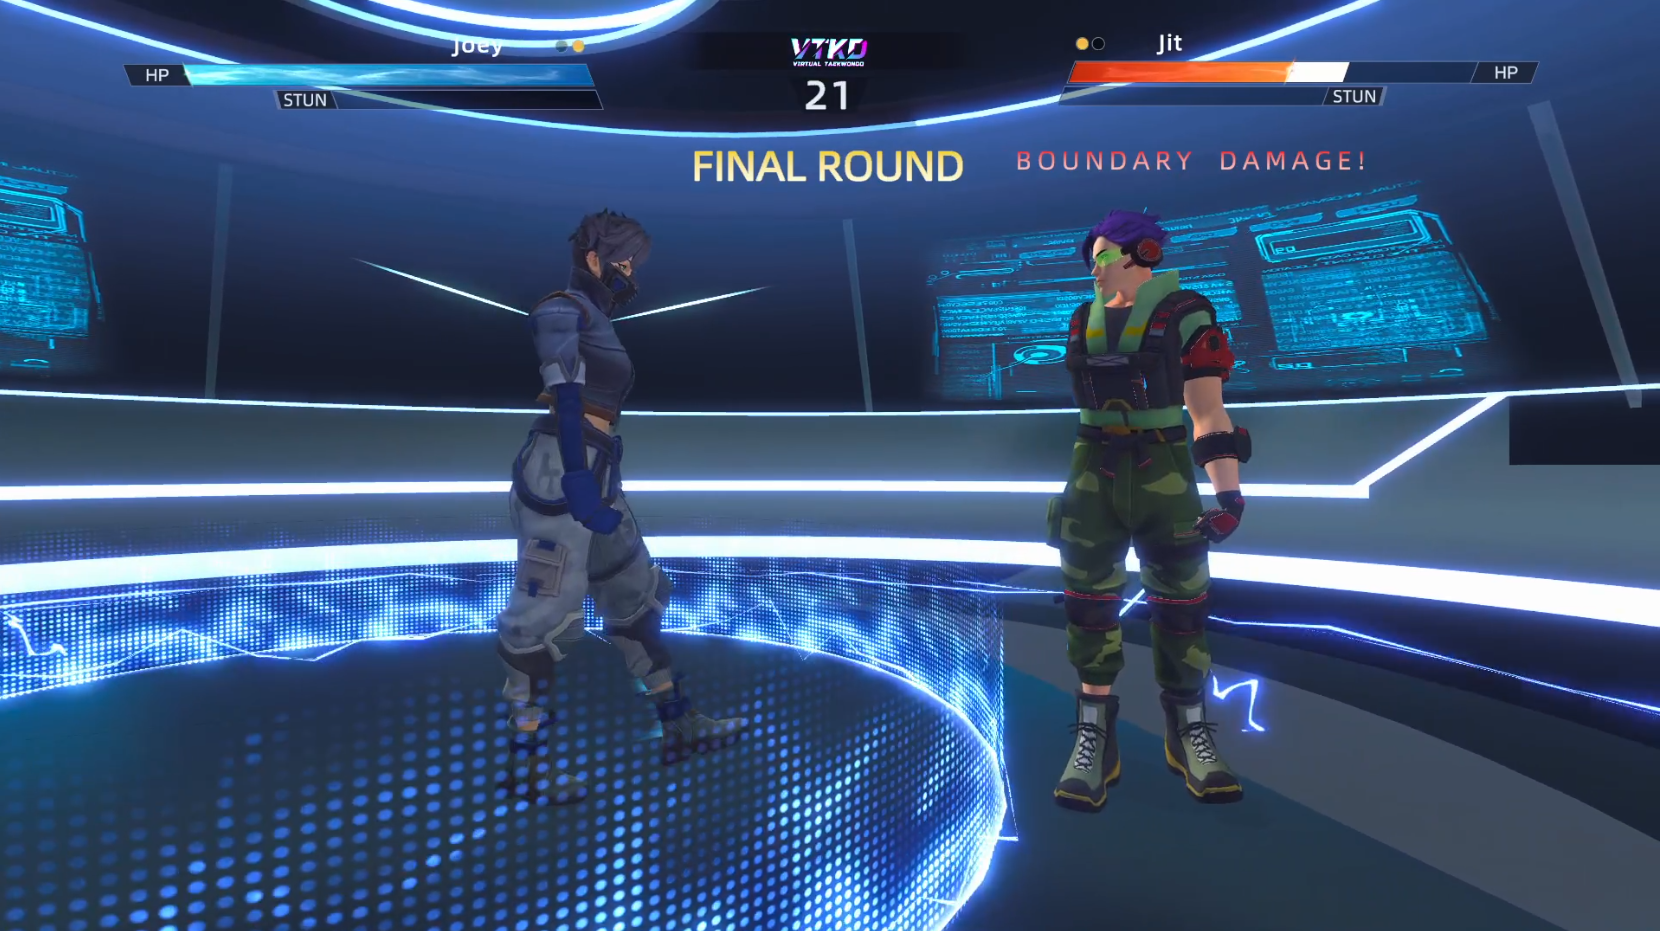
If a player steps outside the shrinking boundary, they are penalised with a health deduction of 100 to 150 health points. Health continues to be deducted each second the player is outside of the shrinking boundary, until the player either steps back within the boundary, or makes contact with the opponent which resets the boundary to its original size. This function encourages continuous engagement between players.
Results Screen
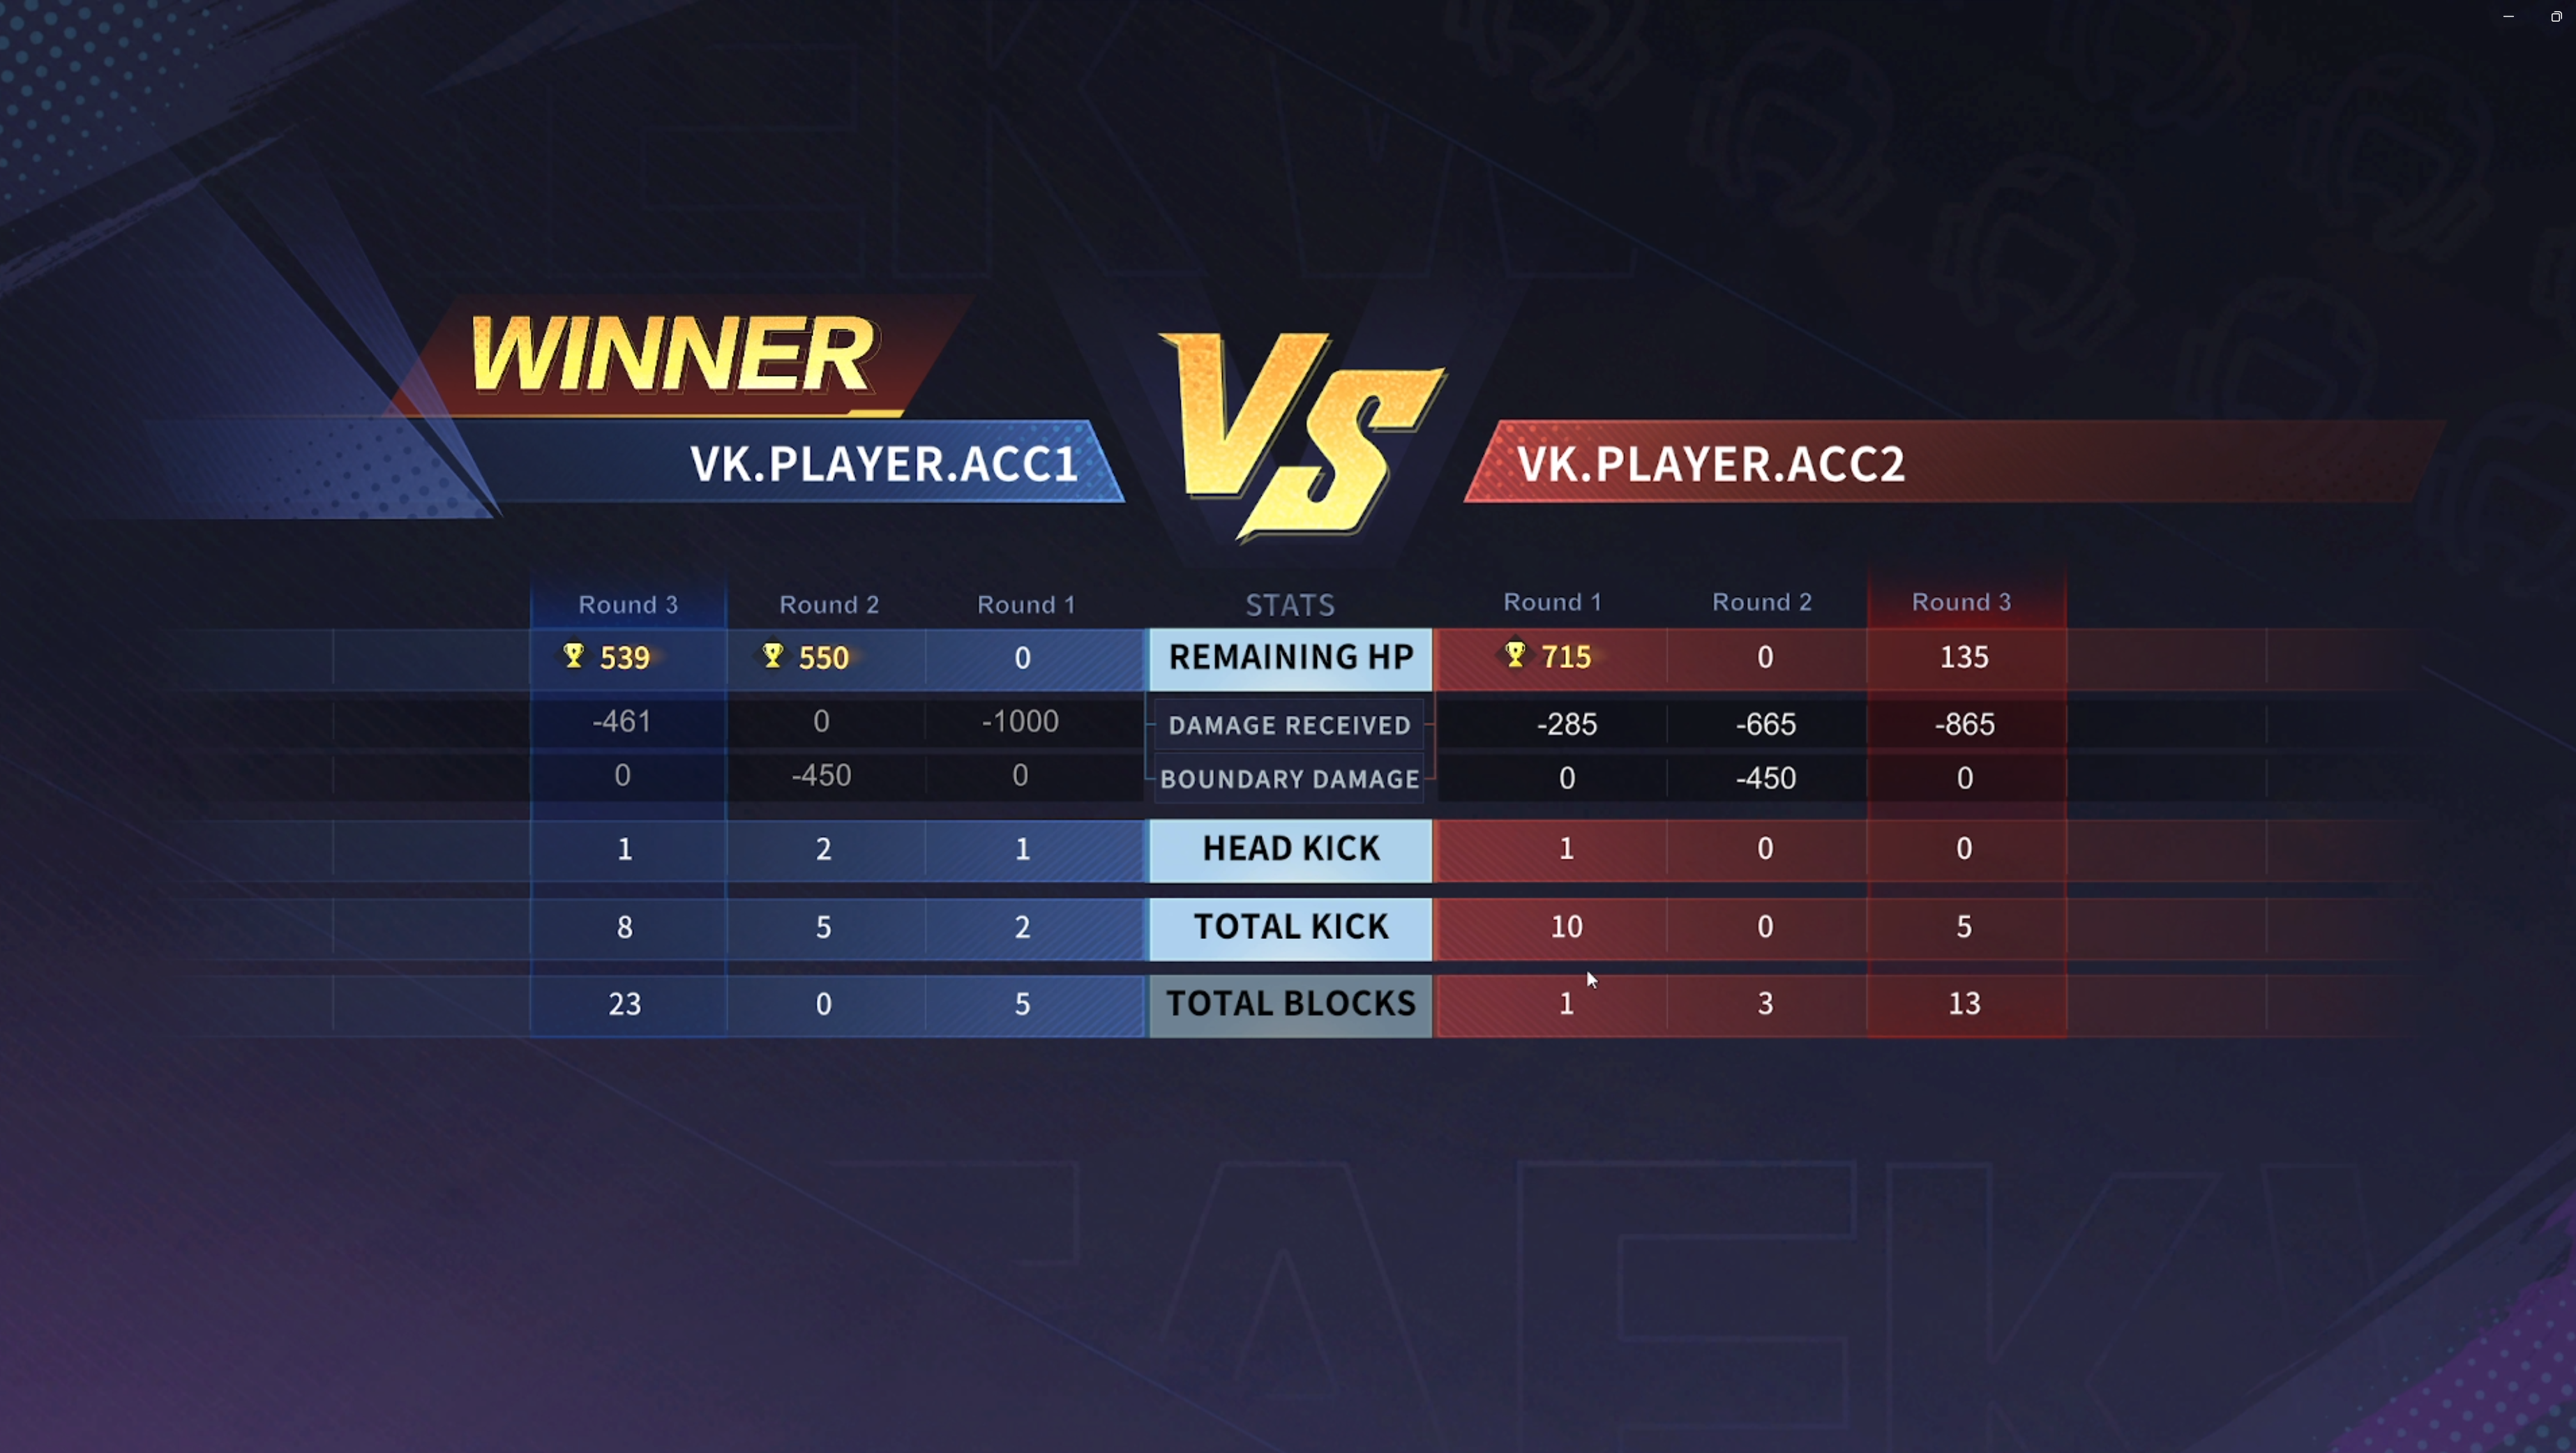
The results screen declares the winner of each round, which is primarily determined by the Health Bar.
Results Screen are shown in two stages: Intermission (after each round) and Final Result (after the final round).
A trophy will appear on the winning player’s remaining HP after each round. In the final round, a "Winner" text appears next to the winning player’s name.
A player can win a round by one of three methods:
- knocking out the opponent by reducing their HP to 0,
- retaining more HP than the opponent at the end of the round, or
- winning by specific draw criteria (explained later).
The results screen also displays game statistics important for tie-breaker situations.
- Total Damage is the damage dealt to the opponent,
- Head Kicks refers to successful kicks to the head;
- Total Kicks refers to number of successful kicks to the body and head combined;
- Total Blocks refers to number of successful blocks;
- Boundary Damage refers to damage received from stepping out of boundary.
Win Criteria When Match Ends in a Draw
When both players finish the round with the same HP, the following criteria are used to determine the winner and in order:
- The player with the most headshots wins the round.
- The player with the fewer number of kicks wins the round.
- The player who landed the last successful hit wins the round.
Some Examples:
Round 1: Both players have the same HP, a player wins due to fewer total kicks.
Round 2: Both players have the same HP, a player wins due to more headshots.
-----------------------------------------------------------------
2. Important Information
The following must be fulfilled before proceeding with the rest of the manual.
- You have the required hardware that includes the following, see more details on Hardware Requirements (3a) below.
- A computer/laptop (refer to specs below)
- AXIS motion trackers (two standard AXIS units or three AXIS lite units)
- PICO4/PICO 4 Ultra VR headset (two units)
- You have registered your warranty for all devices: Warranty Registration
- You have a VTKD portal System Operator account to set up a Game Master account and to download the VTKD application.
- You have a stable internet connection and a dedicated router.
- All VR headsets are charged to at least 80%.
- All AXIS units are charged for at least 2 hours.
-----------------------------------------------------------------
3. Requirements
a. Hardware Requirements
Below are the requirements to run 1 VTKD court which consists of 2 VR players.
AXIS full-body Tracking System
Two units of standard AXIS OR three units of AXIS lite, must consists of
- 10 x AXIS nodes.
- 2 or 3 x charging docks.
- 2 x USB A or USB C dongles.
- 2 x dongle adapters.
- AXIS straps and node holders for all AXIS nodes.
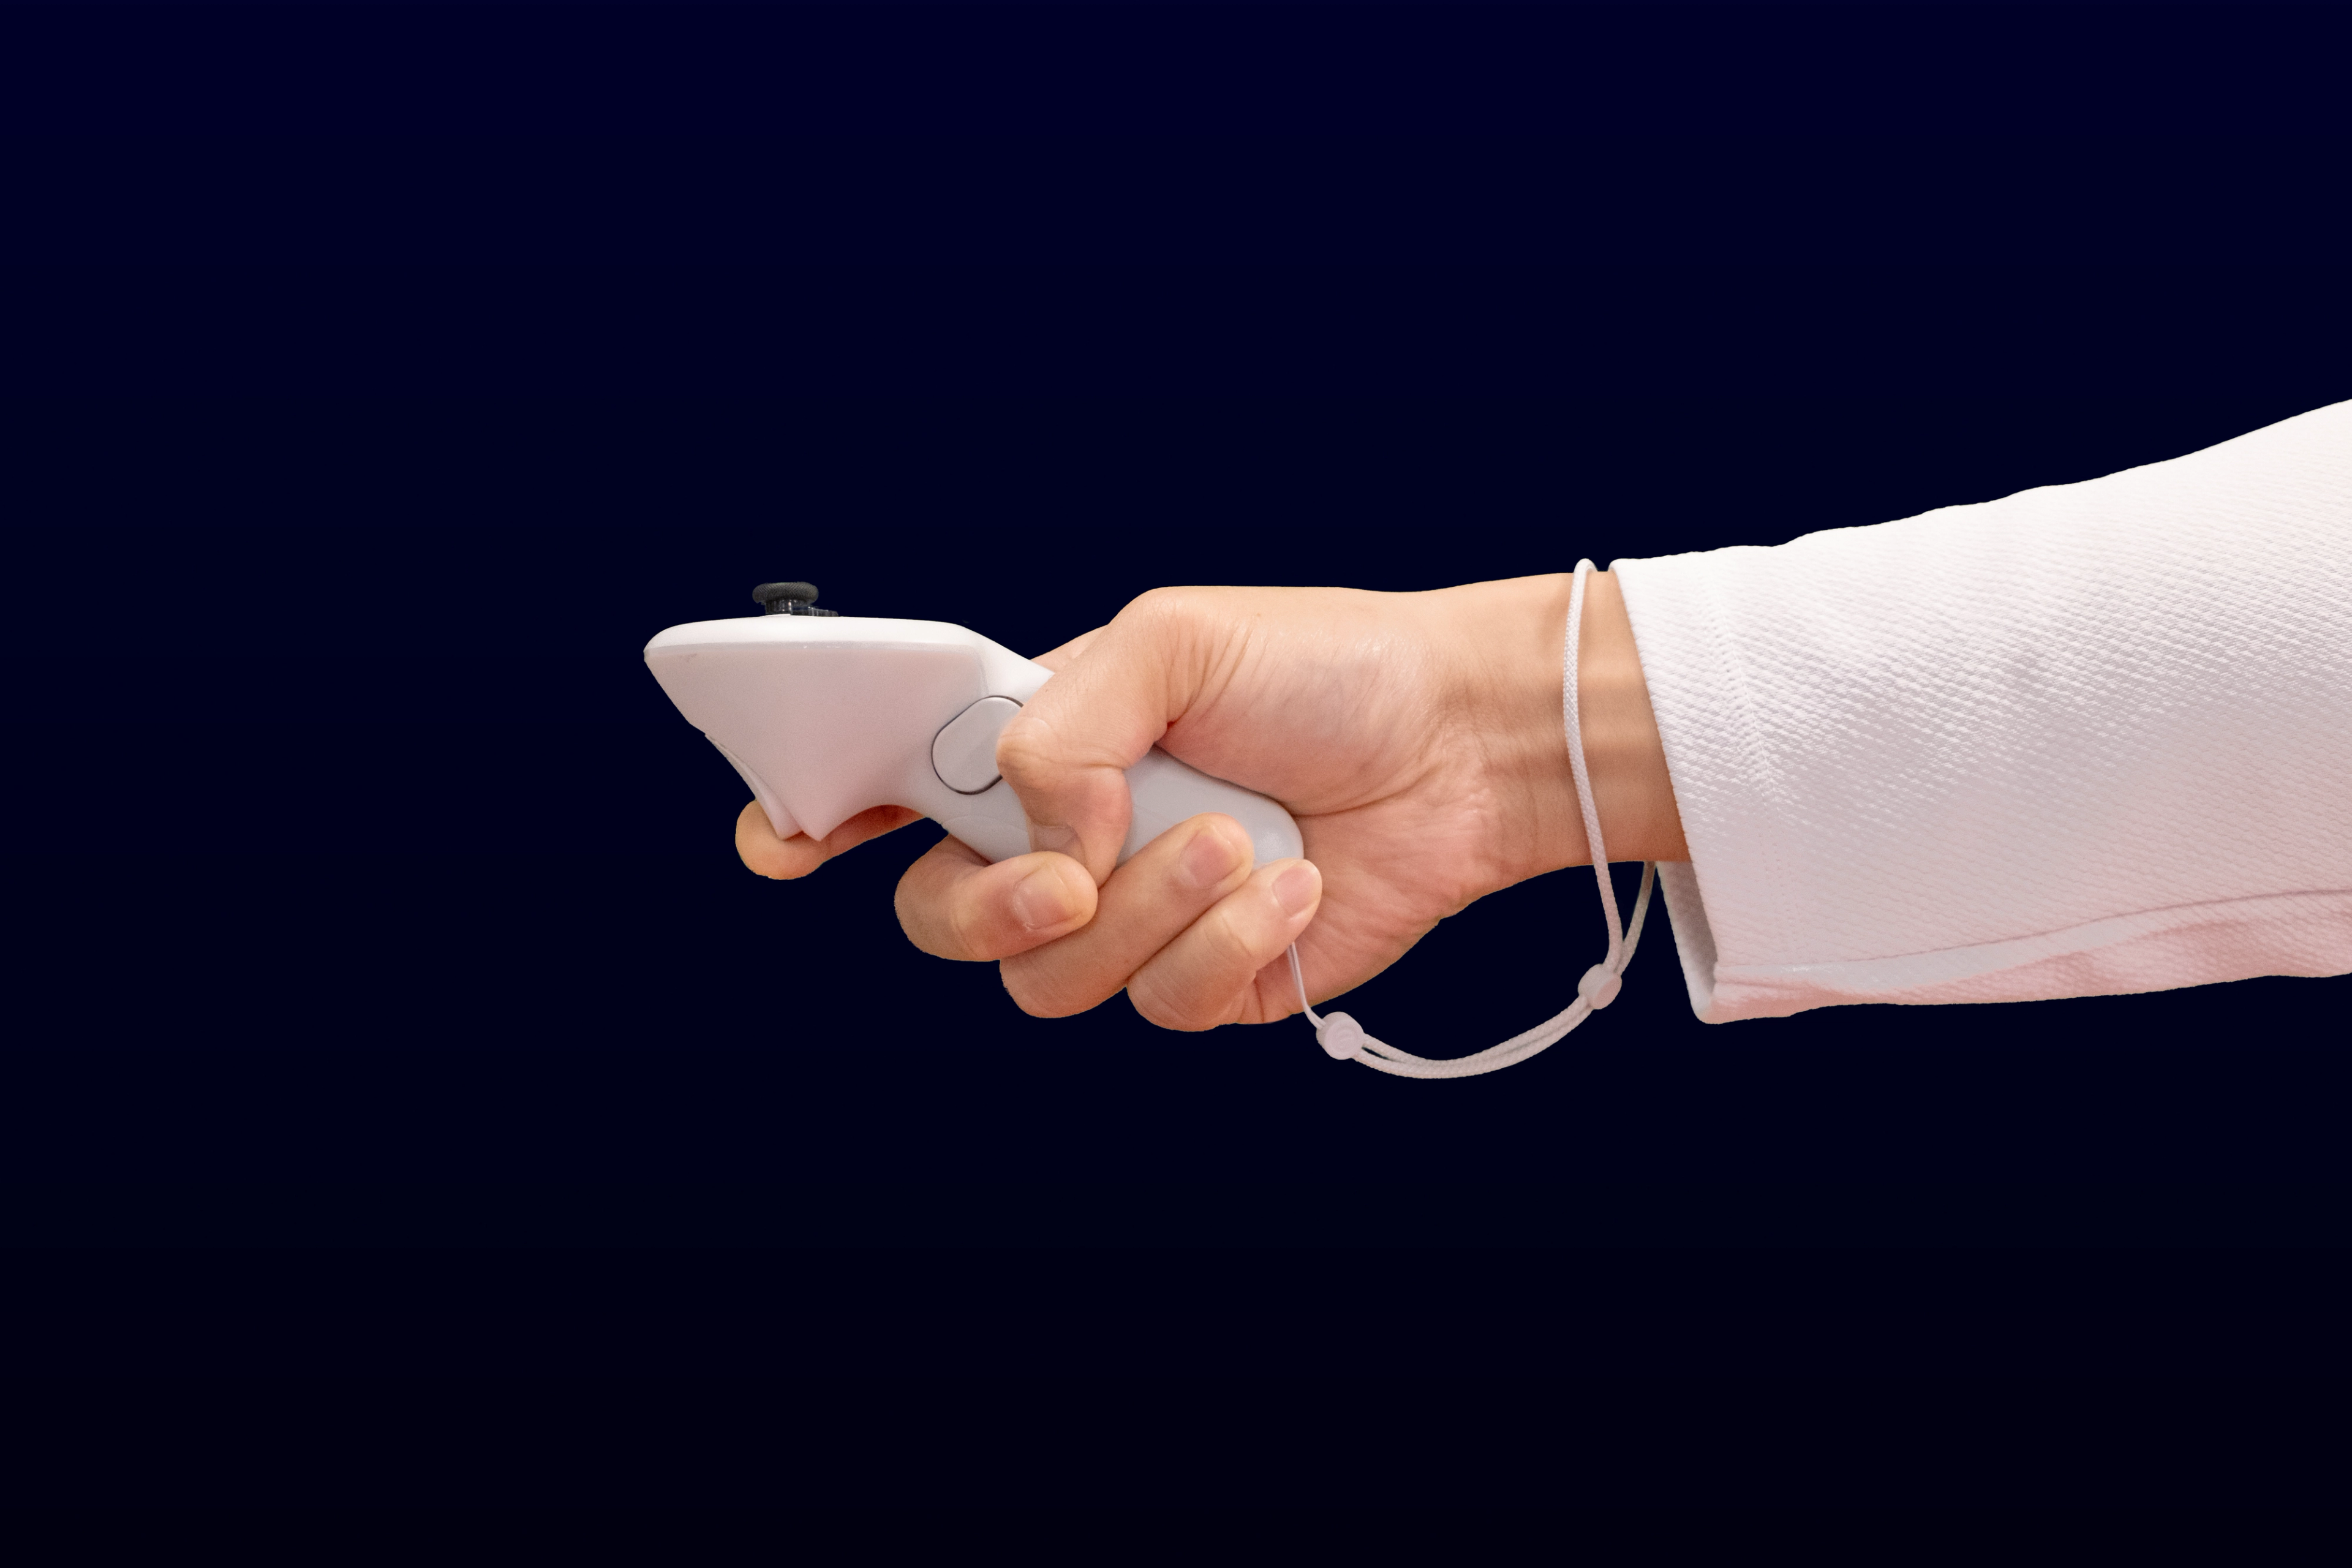
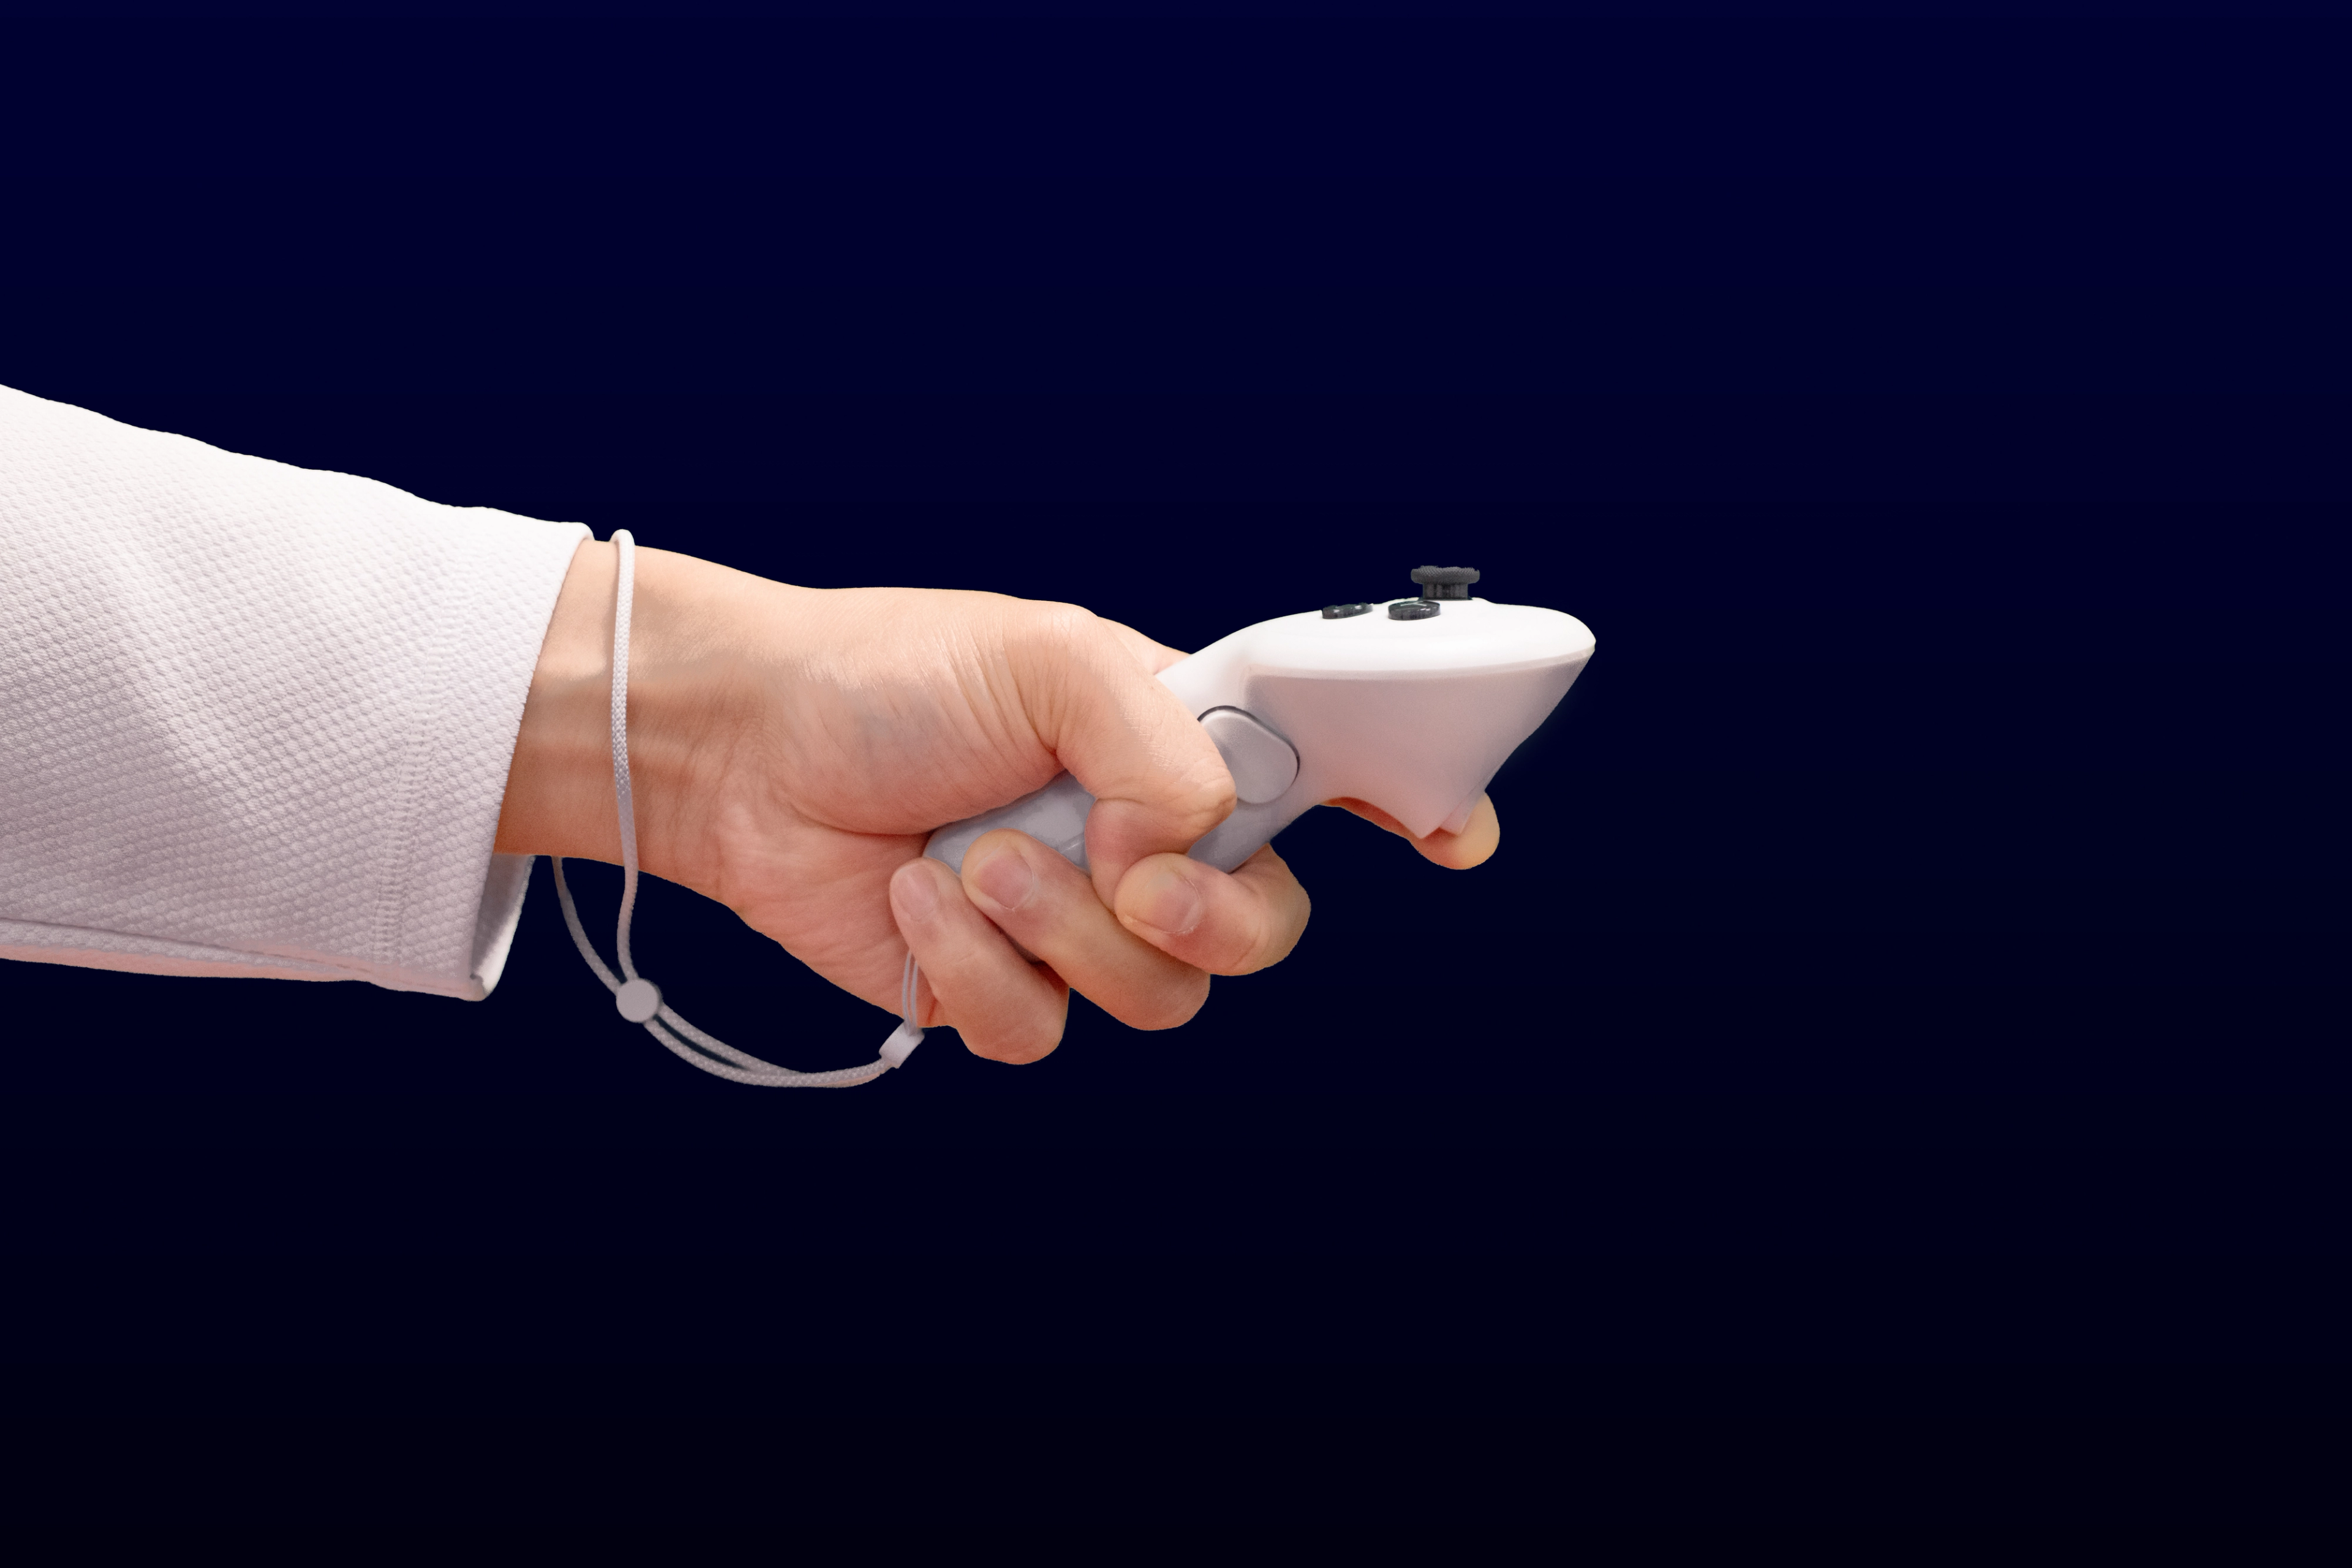
VR headset
2 units of VR headsets with controllers.
Compatible PICO models:
- PICO 4
- PICO 4 Ultra
Laptop or Desktop PC for Game Master (GM)
Refer to the required specifications here under 'other required hardware'.
-----------------------------------------------------------------
b. Software Requirements
- AXIS Control Center (installed on PC). You can find the download link here.
- VTKD PC Application for Game Master and Spectator (installed on PC). You can download it on the VTKD portal after logging in.
- VTKD Android Application for VR players (installed on PICO VR headsets). You can download it on the VTKD portal after logging in.
-----------------------------------------------------------------
c. Other Requirements
Physical Playing Space
Between 40 to 50sqm open space with no pillars or large objects.
4m x 4m play area for each player with a divider between them.
Refer to the Site Assessment Manual to test and verify that the location is suitable for use.
Additional Hardware for Spectator
Laptop or Desktop PC that has similar specifications as GM.
External display (monitor, TV, or projector) for spectator feed.
-----------------------------------------------------------------
4. Setting Up
a. Account Setup & Build Download
Account type and functions
Below are the 2 different account types and their functions.
*Please be advised that subscription fees may apply in the future.
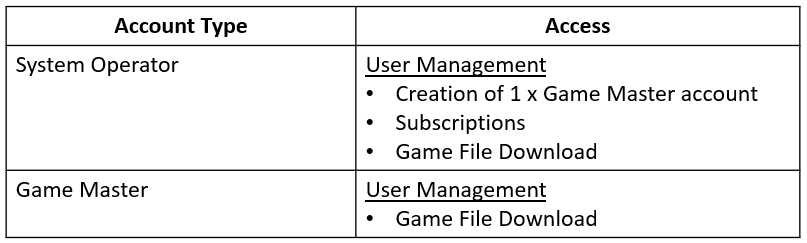
Minimum accounts needed to run 1 VTKD court:
- 1 x System Operator account
- 1 x Game Master account
Activating System Operator account
An email with a one-time-password (OTP) will be sent to your email address that you provide to your local distributor.
*You will not be able to run VTKD without a system operator account.
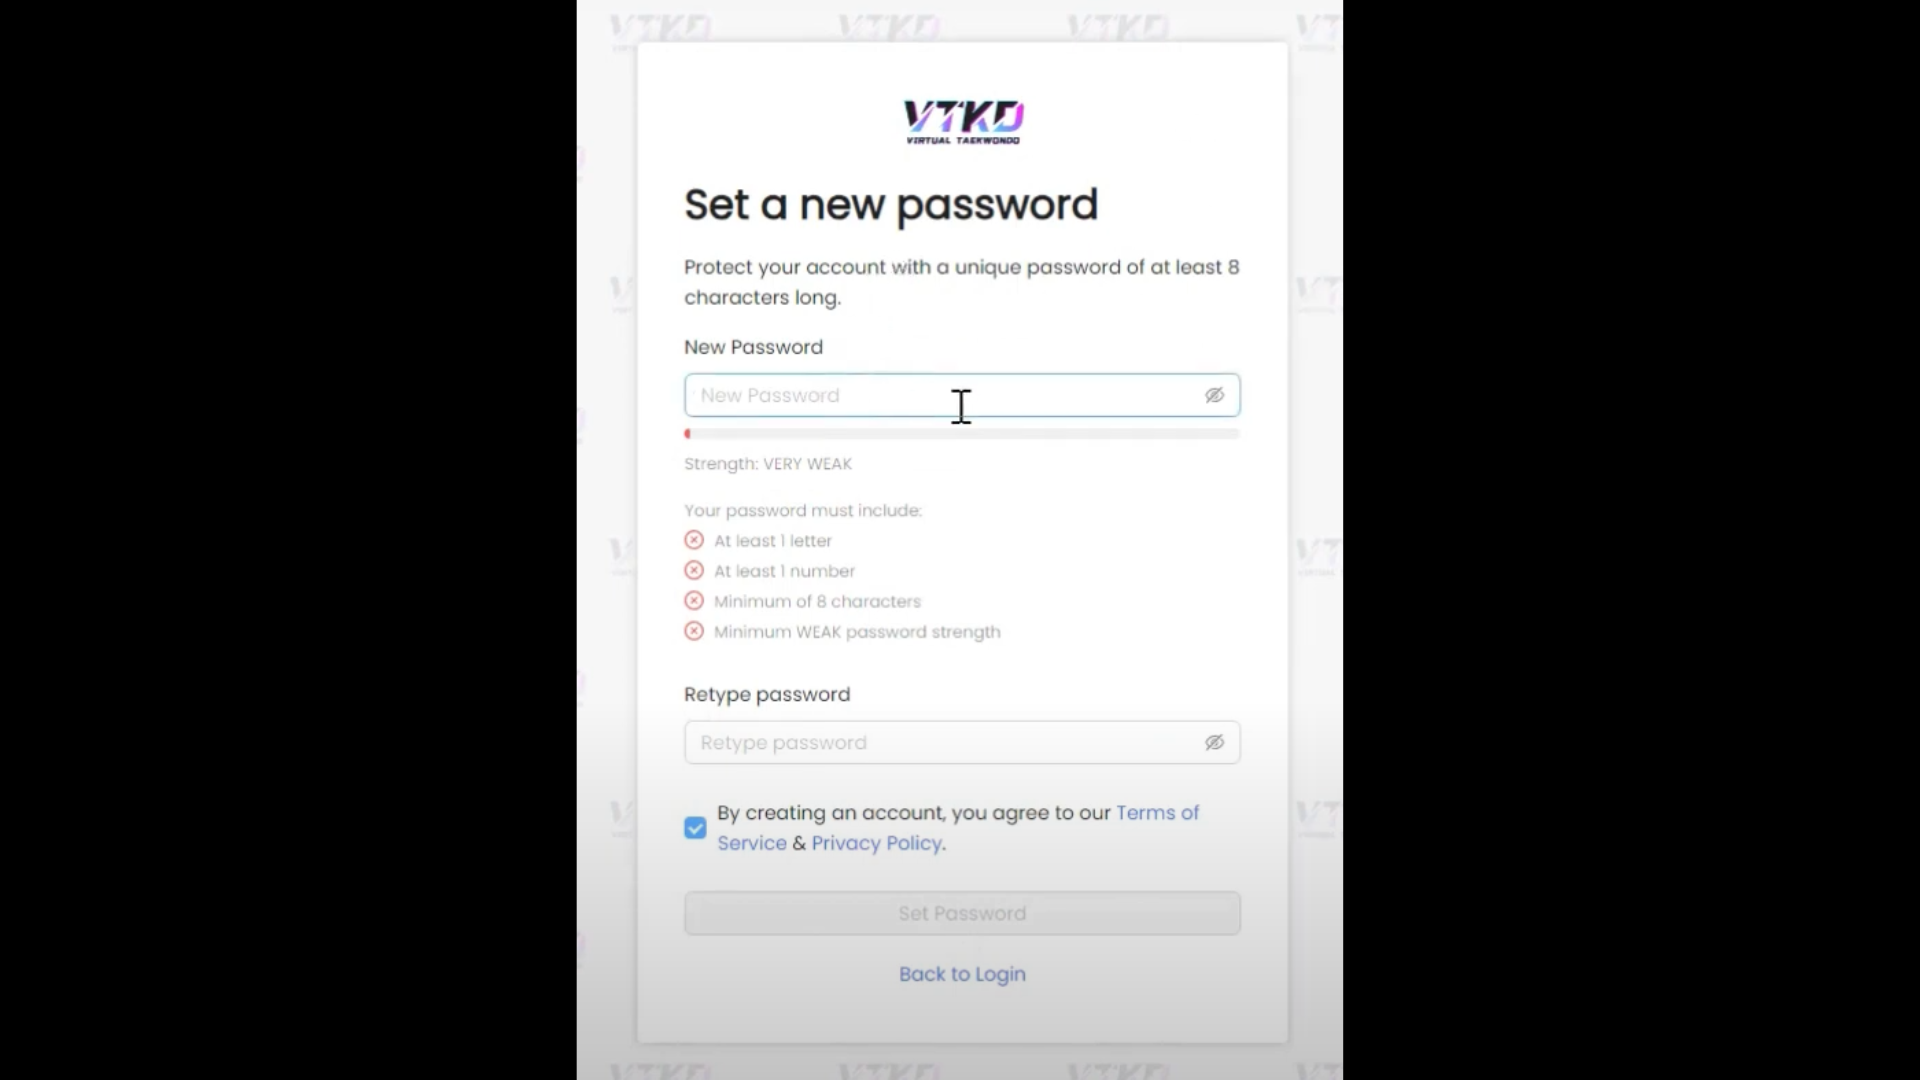
You are required to change your password to activate your account. Click on ‘Change’ and you will be redirected to the portal site.
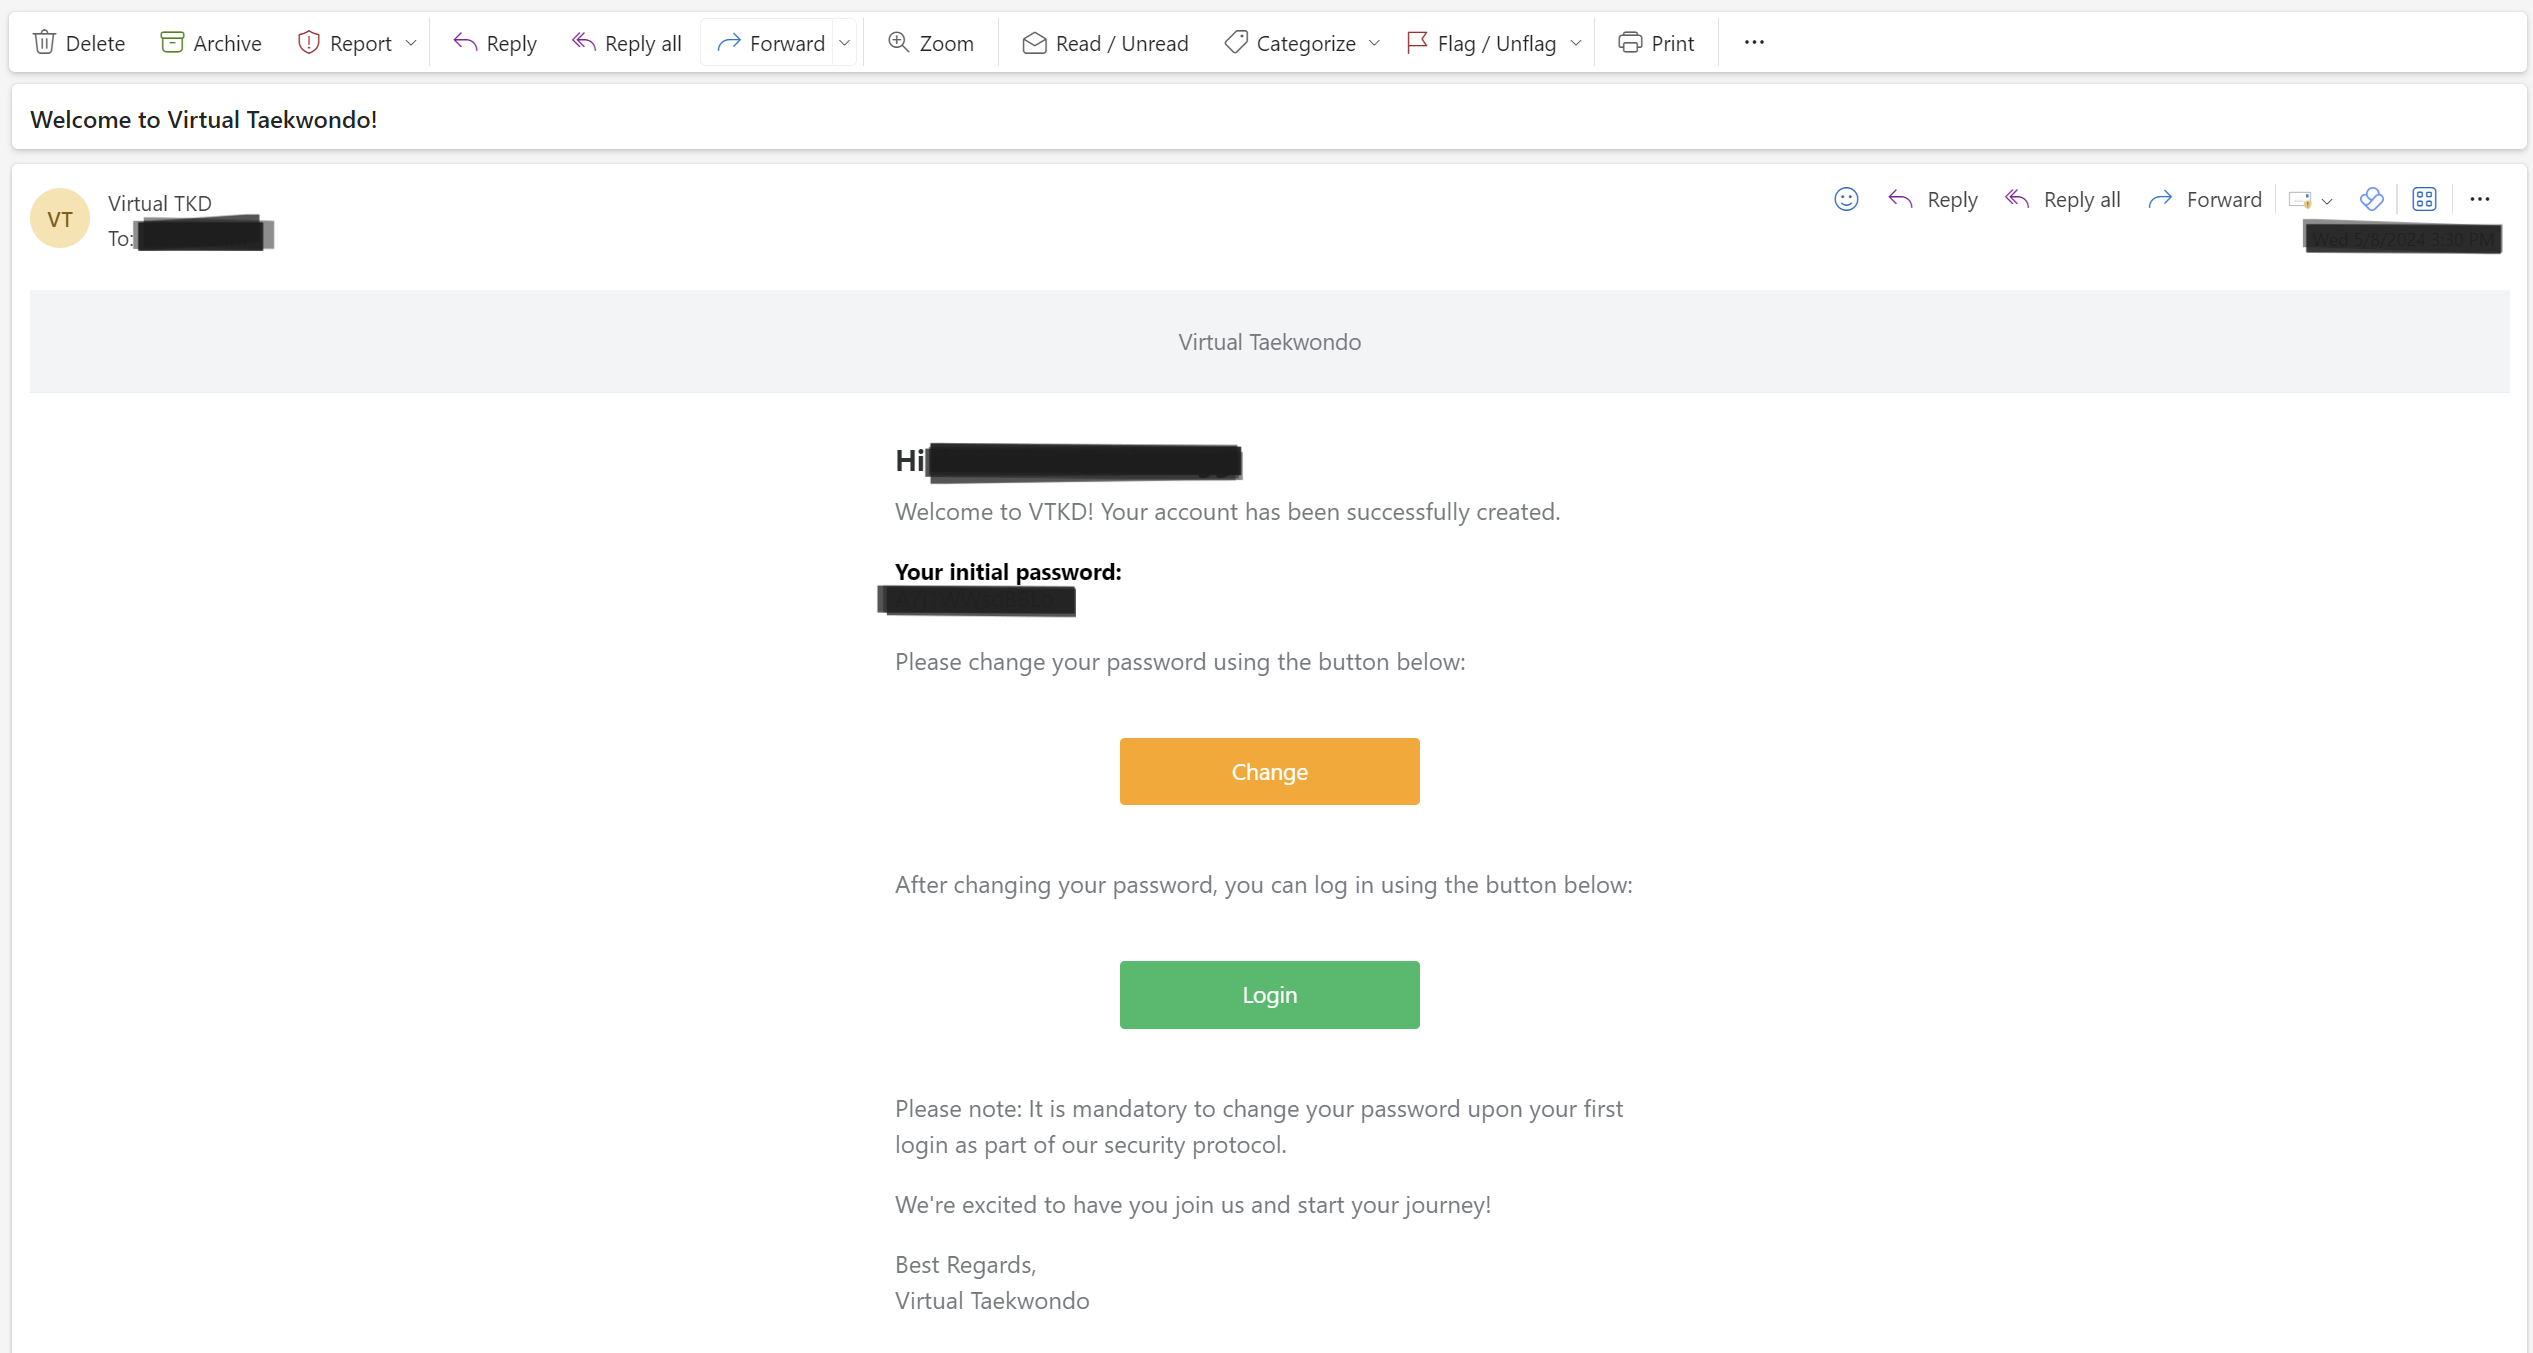
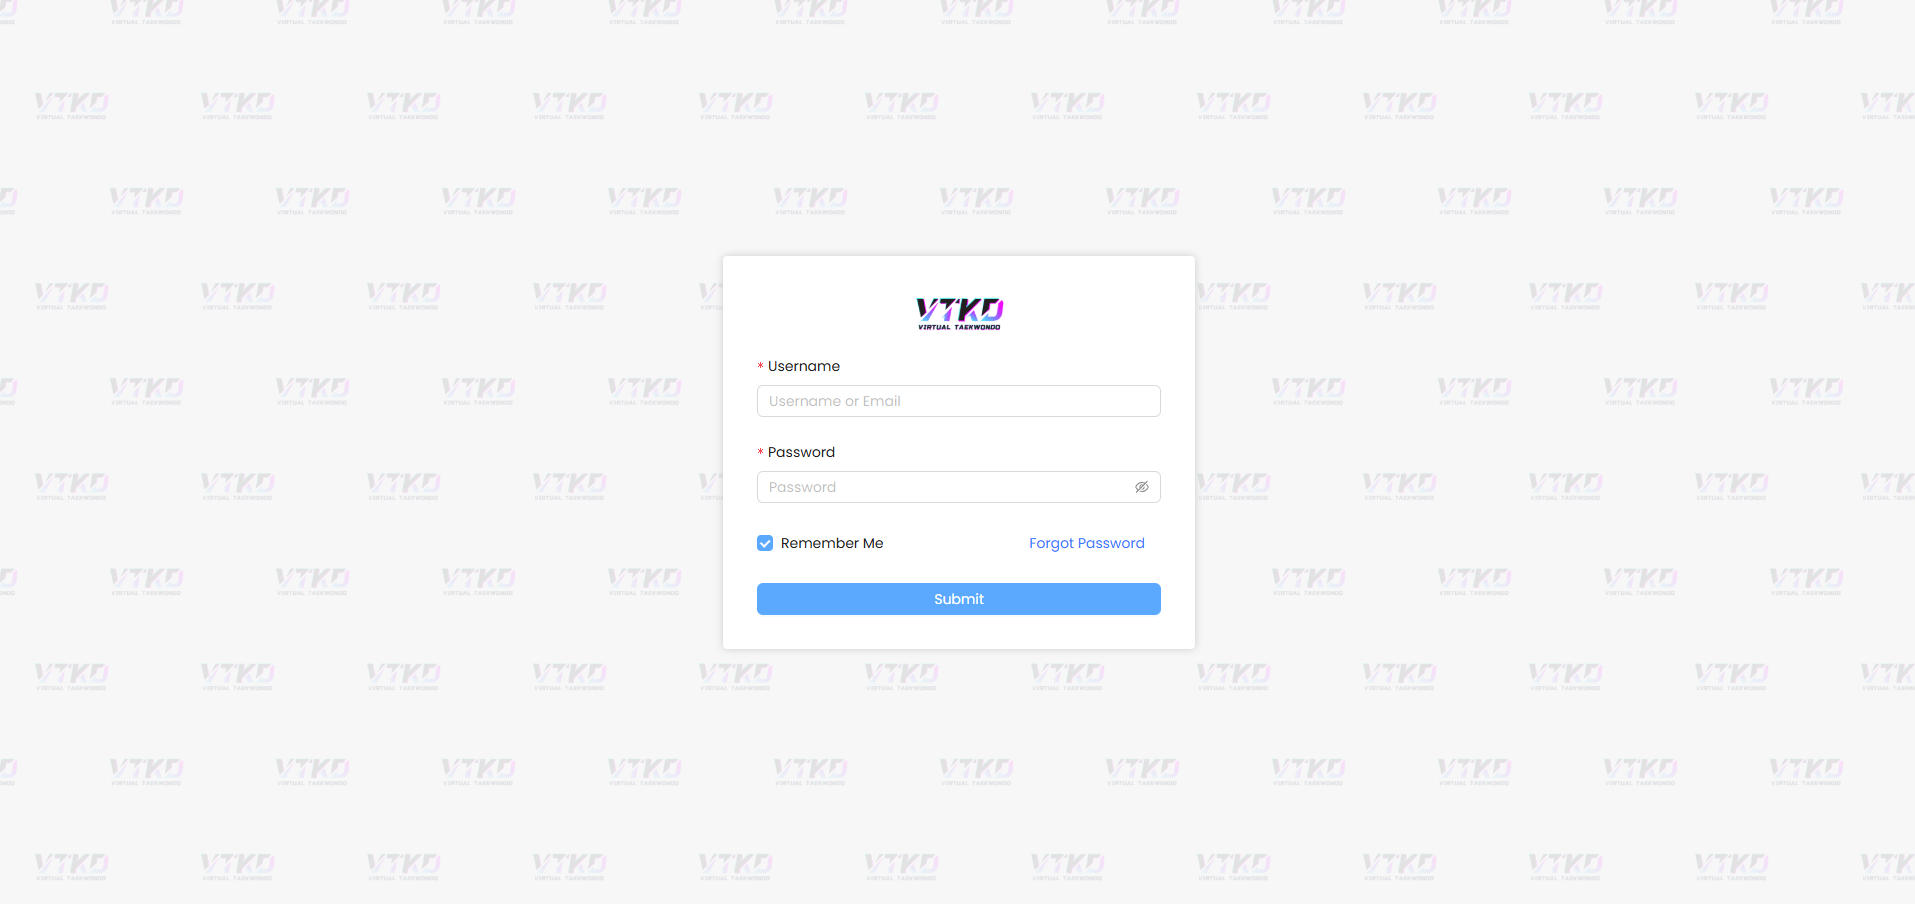
Login with your email and OTP.
Change your password to activate your account.
You will be redirected to the login page to re-login with your new password as a System Operator.
Activating Game Master account
1 x GM account will be created for you by the administration. Each System Operator account is entitled to 1 GM account and it is used to log in to the VTKD Game application.
A username and one-time password (OTP) will be issued to you.
Log in to the VTKD portal with your GM username and OTP.
Change your password to activate your account.
You may now re-login your GM account in the portal.
Do this before attempting to login to the VTKD game application on your computer.
Video reference:
Game file download (PC & VR)
There are 2 different downloadable files on the portal that are required for VTKD.
VTKD Software –
- VR Download
- PC Download
Login to VTKD Portal using the System Operator account (login with email) or Game Master (login with username) account.
Select the Organizations tab on the left sidebar, followed by Game Files Download.
Click on both the VR Download and PC Download to download the VTKD application files. The latest version will always be on the topmost of the page. Both files will be downloaded to your default downloads folder (e.g. C:\Users\User\Downloads).
VR Download – “Android-PICO…”
PC Download – “vtkdu-installer…”
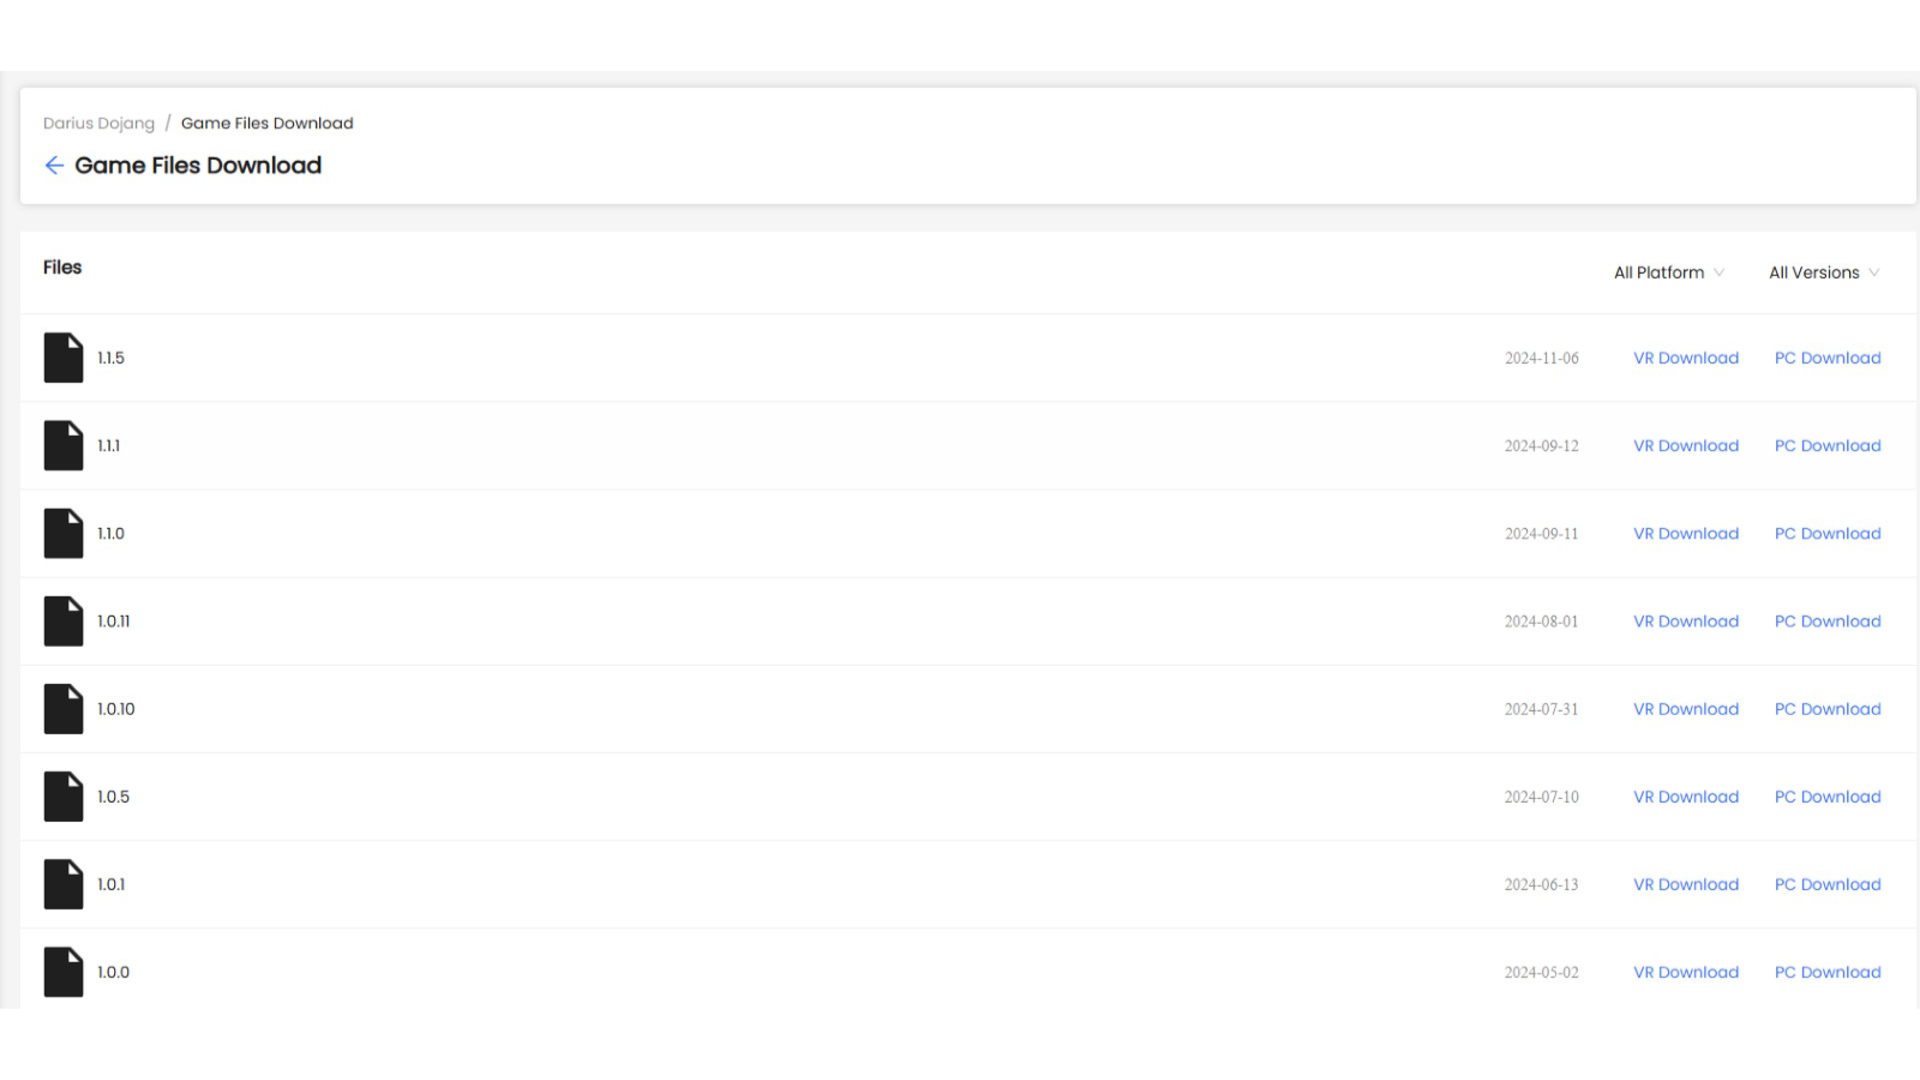
Drag the downloaded files onto your desktop to follow the upcoming steps.
(DO NOT move your downloaded files into other folders)
Video reference:
-----------------------------------------------------------------
b. PICO Setup
1. Charge your PICO headset
- Have at least a battery percentage of 80% to set up your PICO
2. Power On PICO:
- Hold the power button located on the right side of the PICO headset until it starts up (LED light will turn blue).
3. First-Time Setup:
- Complete the PICO initial setup.
- This includes creating a PICO account for VR access.
Pico 4 - https://www.picoxr.com/sg/blog/pico-4-setup
Video reference:
Pico 4 Ultra
Video reference:
You may refer to the official PICO User Guide here.
4. PICO System Update:
- Always update to the latest system update.
- A system update pop-up should appear when logged in to the PICO account.
- If the pop-up does not appear, you can locate the System Update in settings under ‘General’ >‘System Update’.
- Once the System Update file is downloaded, click ‘Update Now’ to install it.
- The PICO will reboot to apply the update.
5. Boundary and Controller Update:
- Confirm the play boundary warning. Select the Custom boundary and draw your play area (recommended 4x4m).
- A controller update pop-up should appear. Ensure both controllers are powered on before clicking ‘Update Now’.
Video Reference:
6. Enable Developer Options (*The Developer option is required to install the Virtual Taekwondo application into the VR headset):
- Navigate to: General > About > Software Information.
- Use the controller trigger to click 8 times quickly on ‘Software Version’ to enable the ‘Developer’ tab.
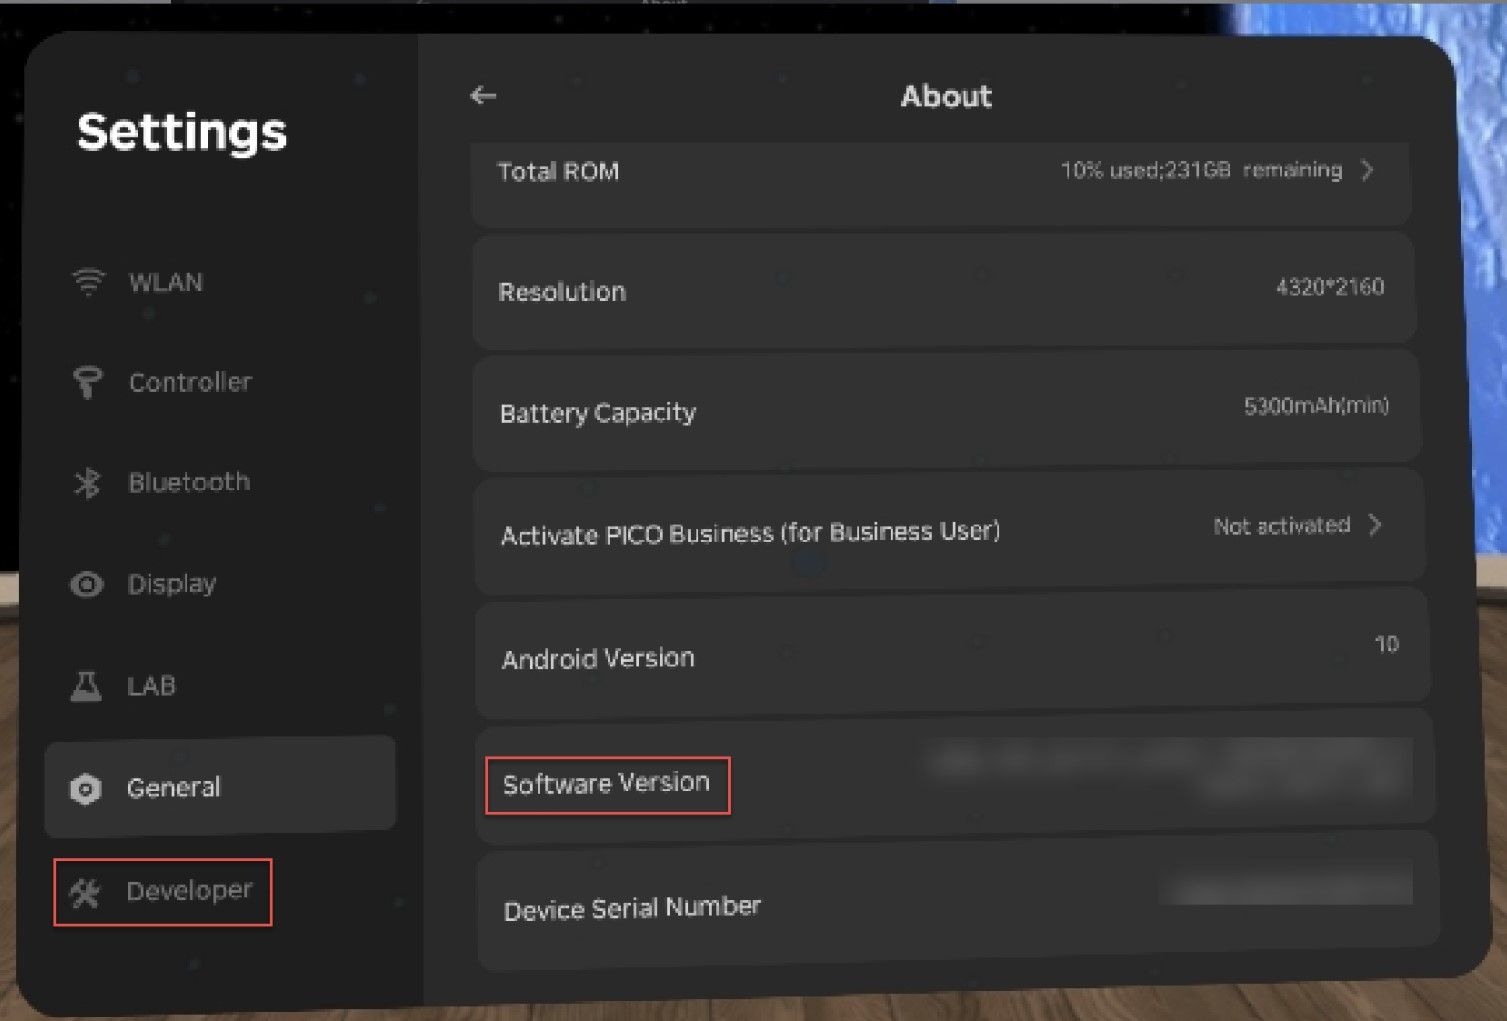
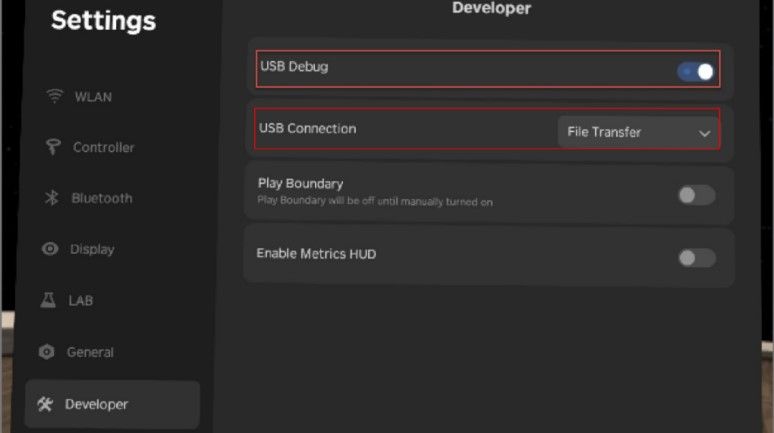
- Go to the ‘Developer’ tab and enable ‘USB Debug’.
- Ensure the USB Connection is set to ‘File Transfer’.
Video reference:
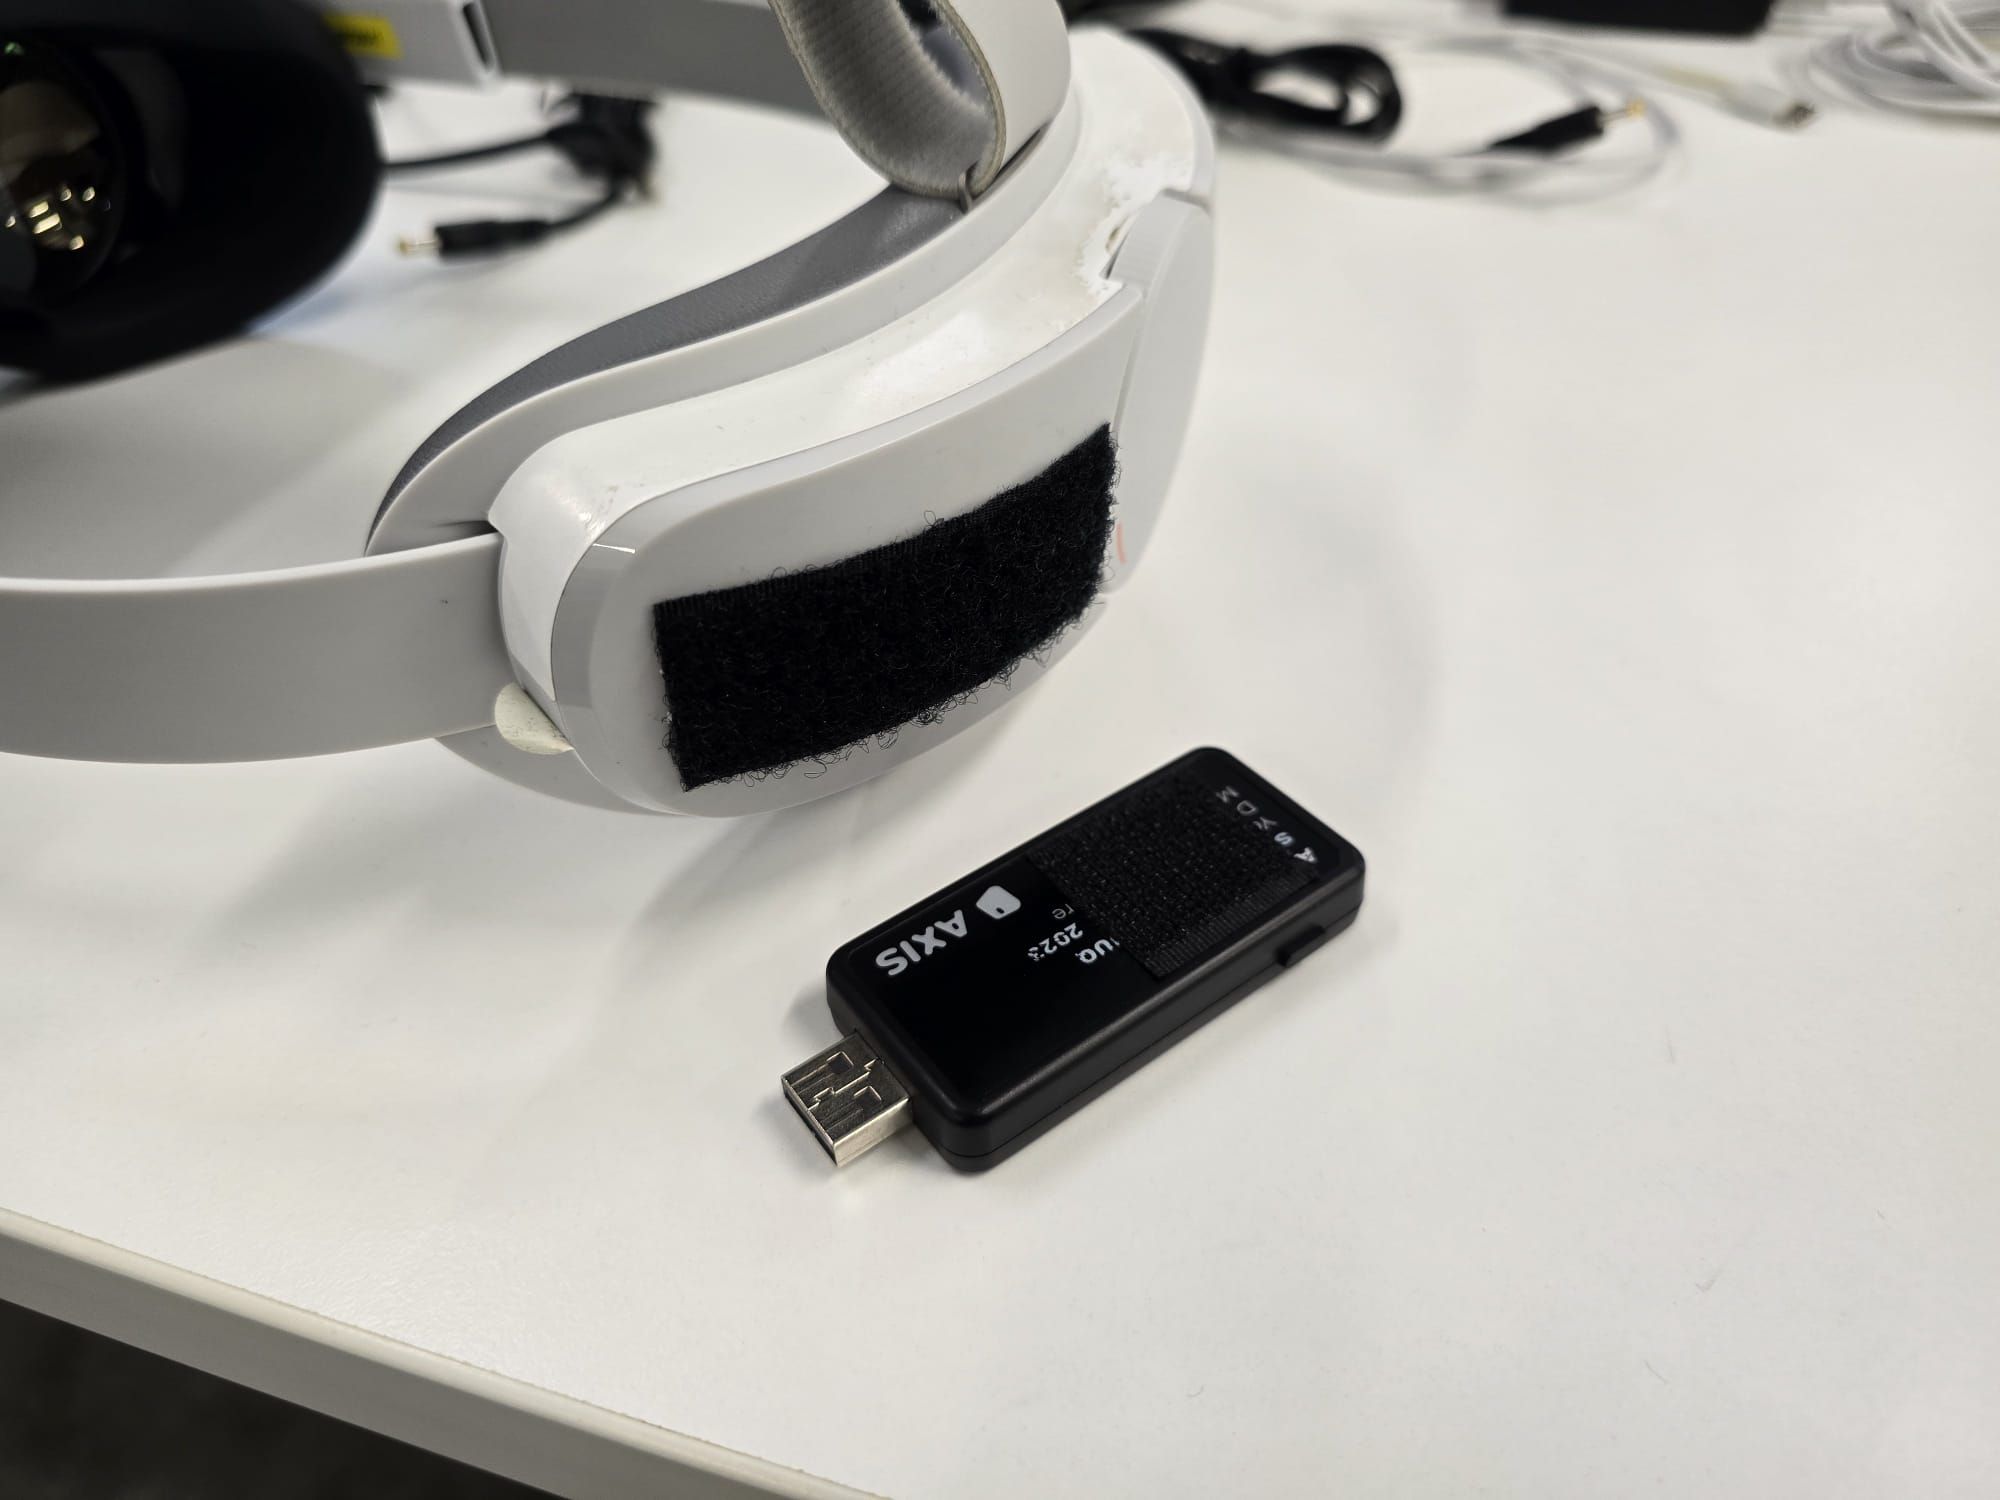
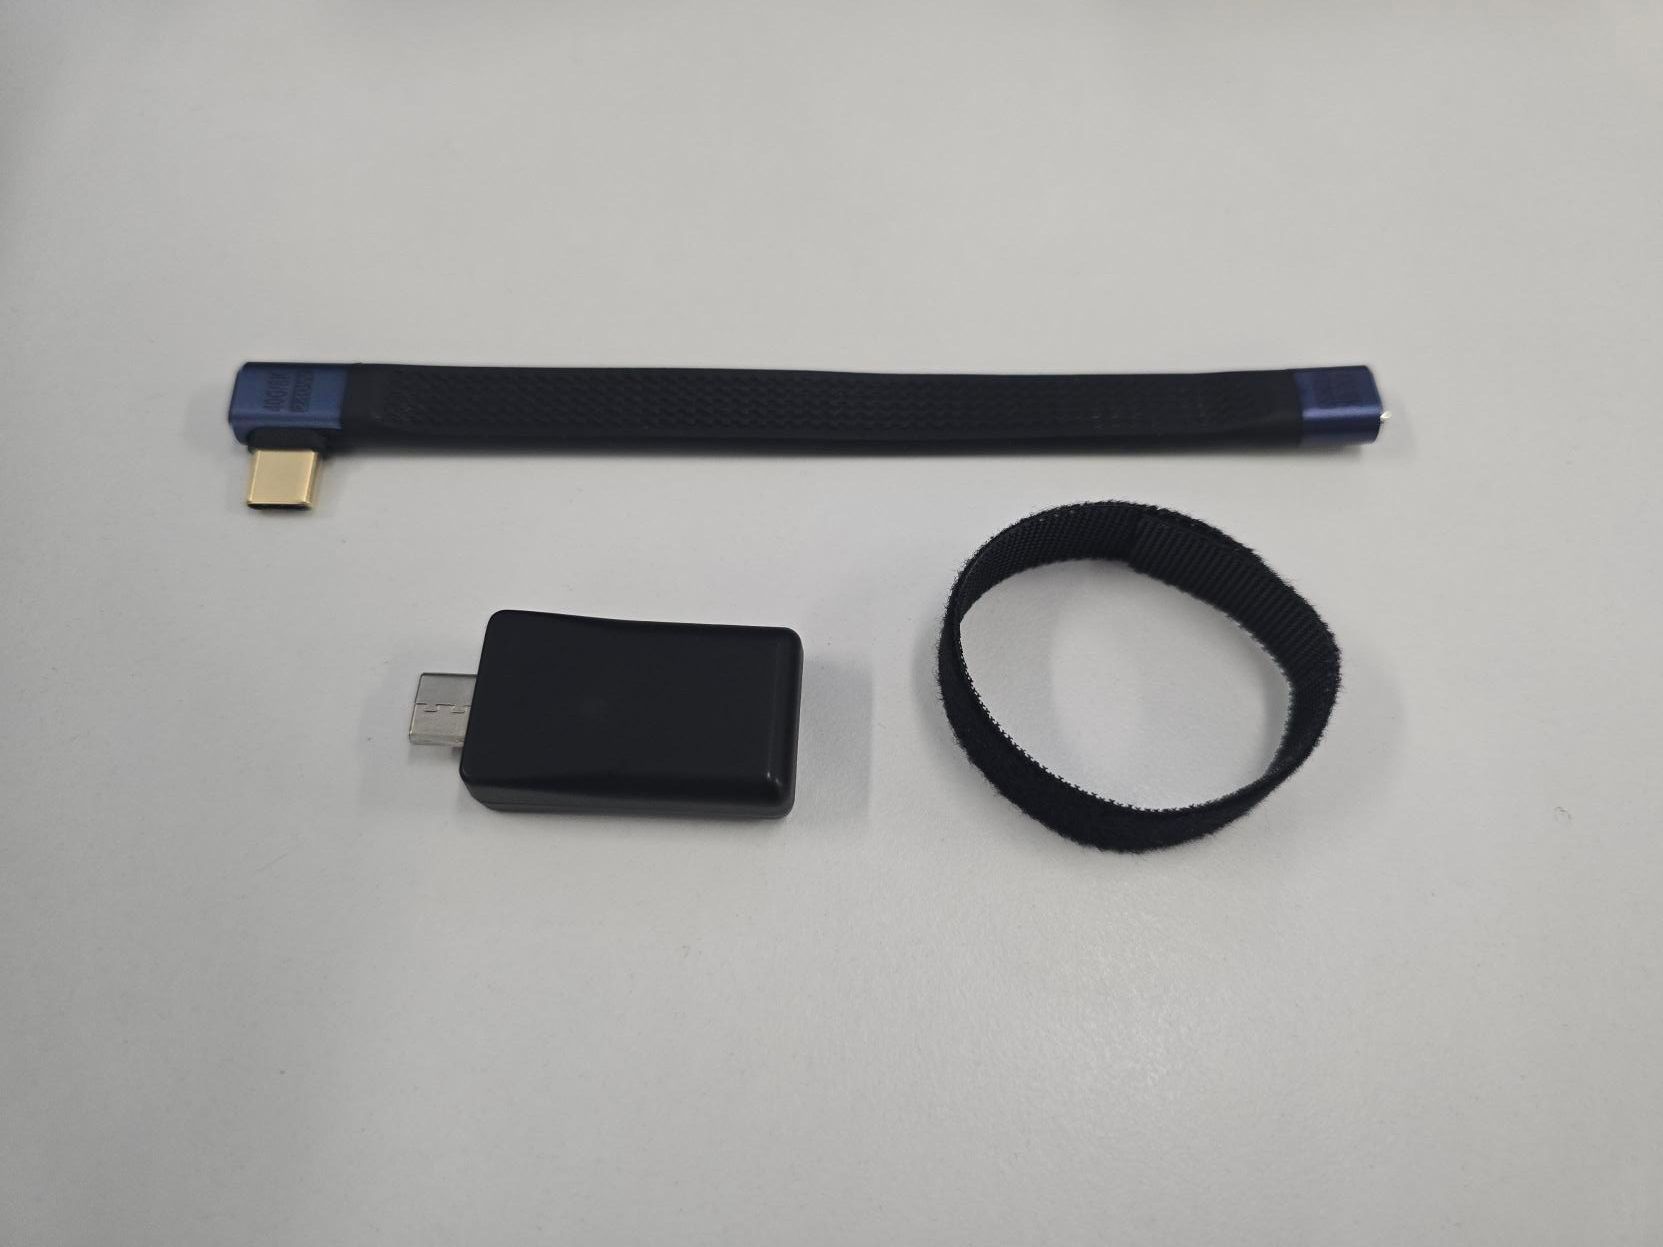
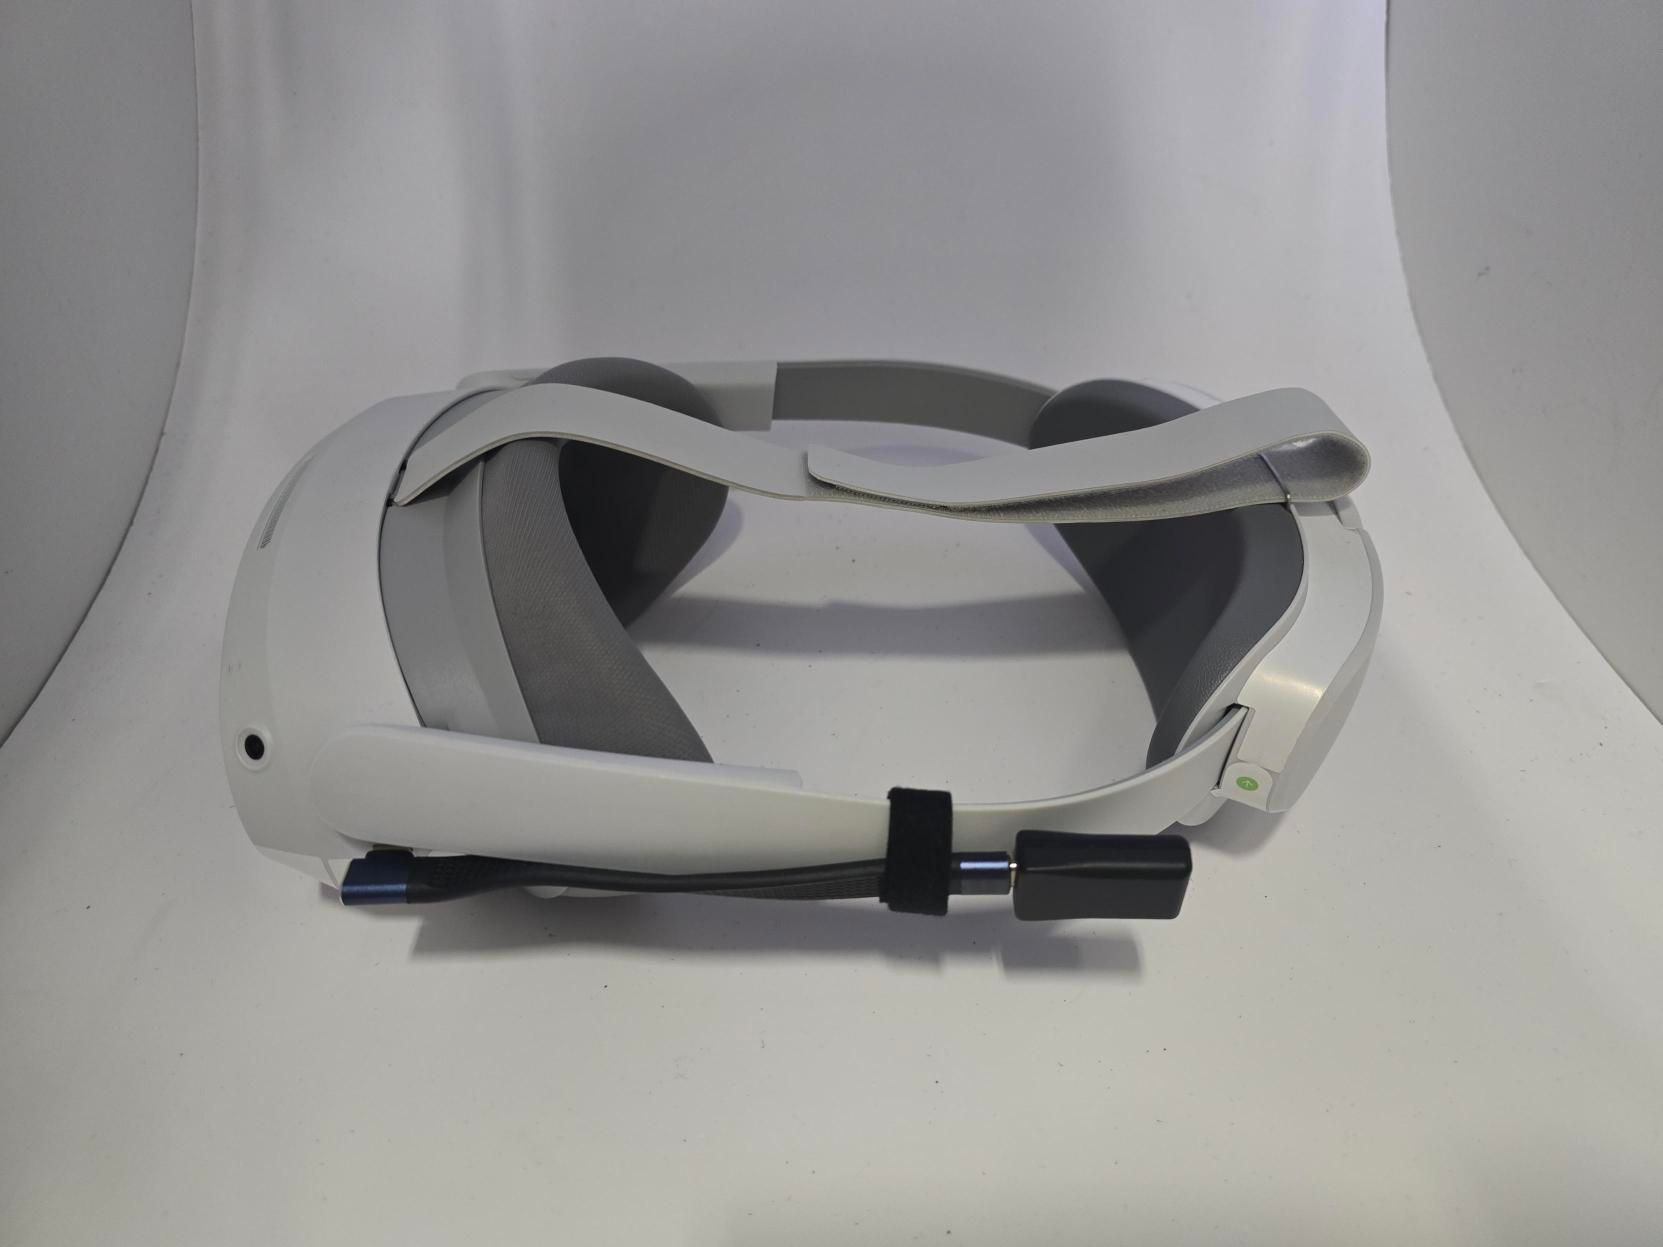
7. Putting on dongle attachment
AXIS Standard USB-A dongle attachment:
- Version 1 - Overhead dongle sleeve
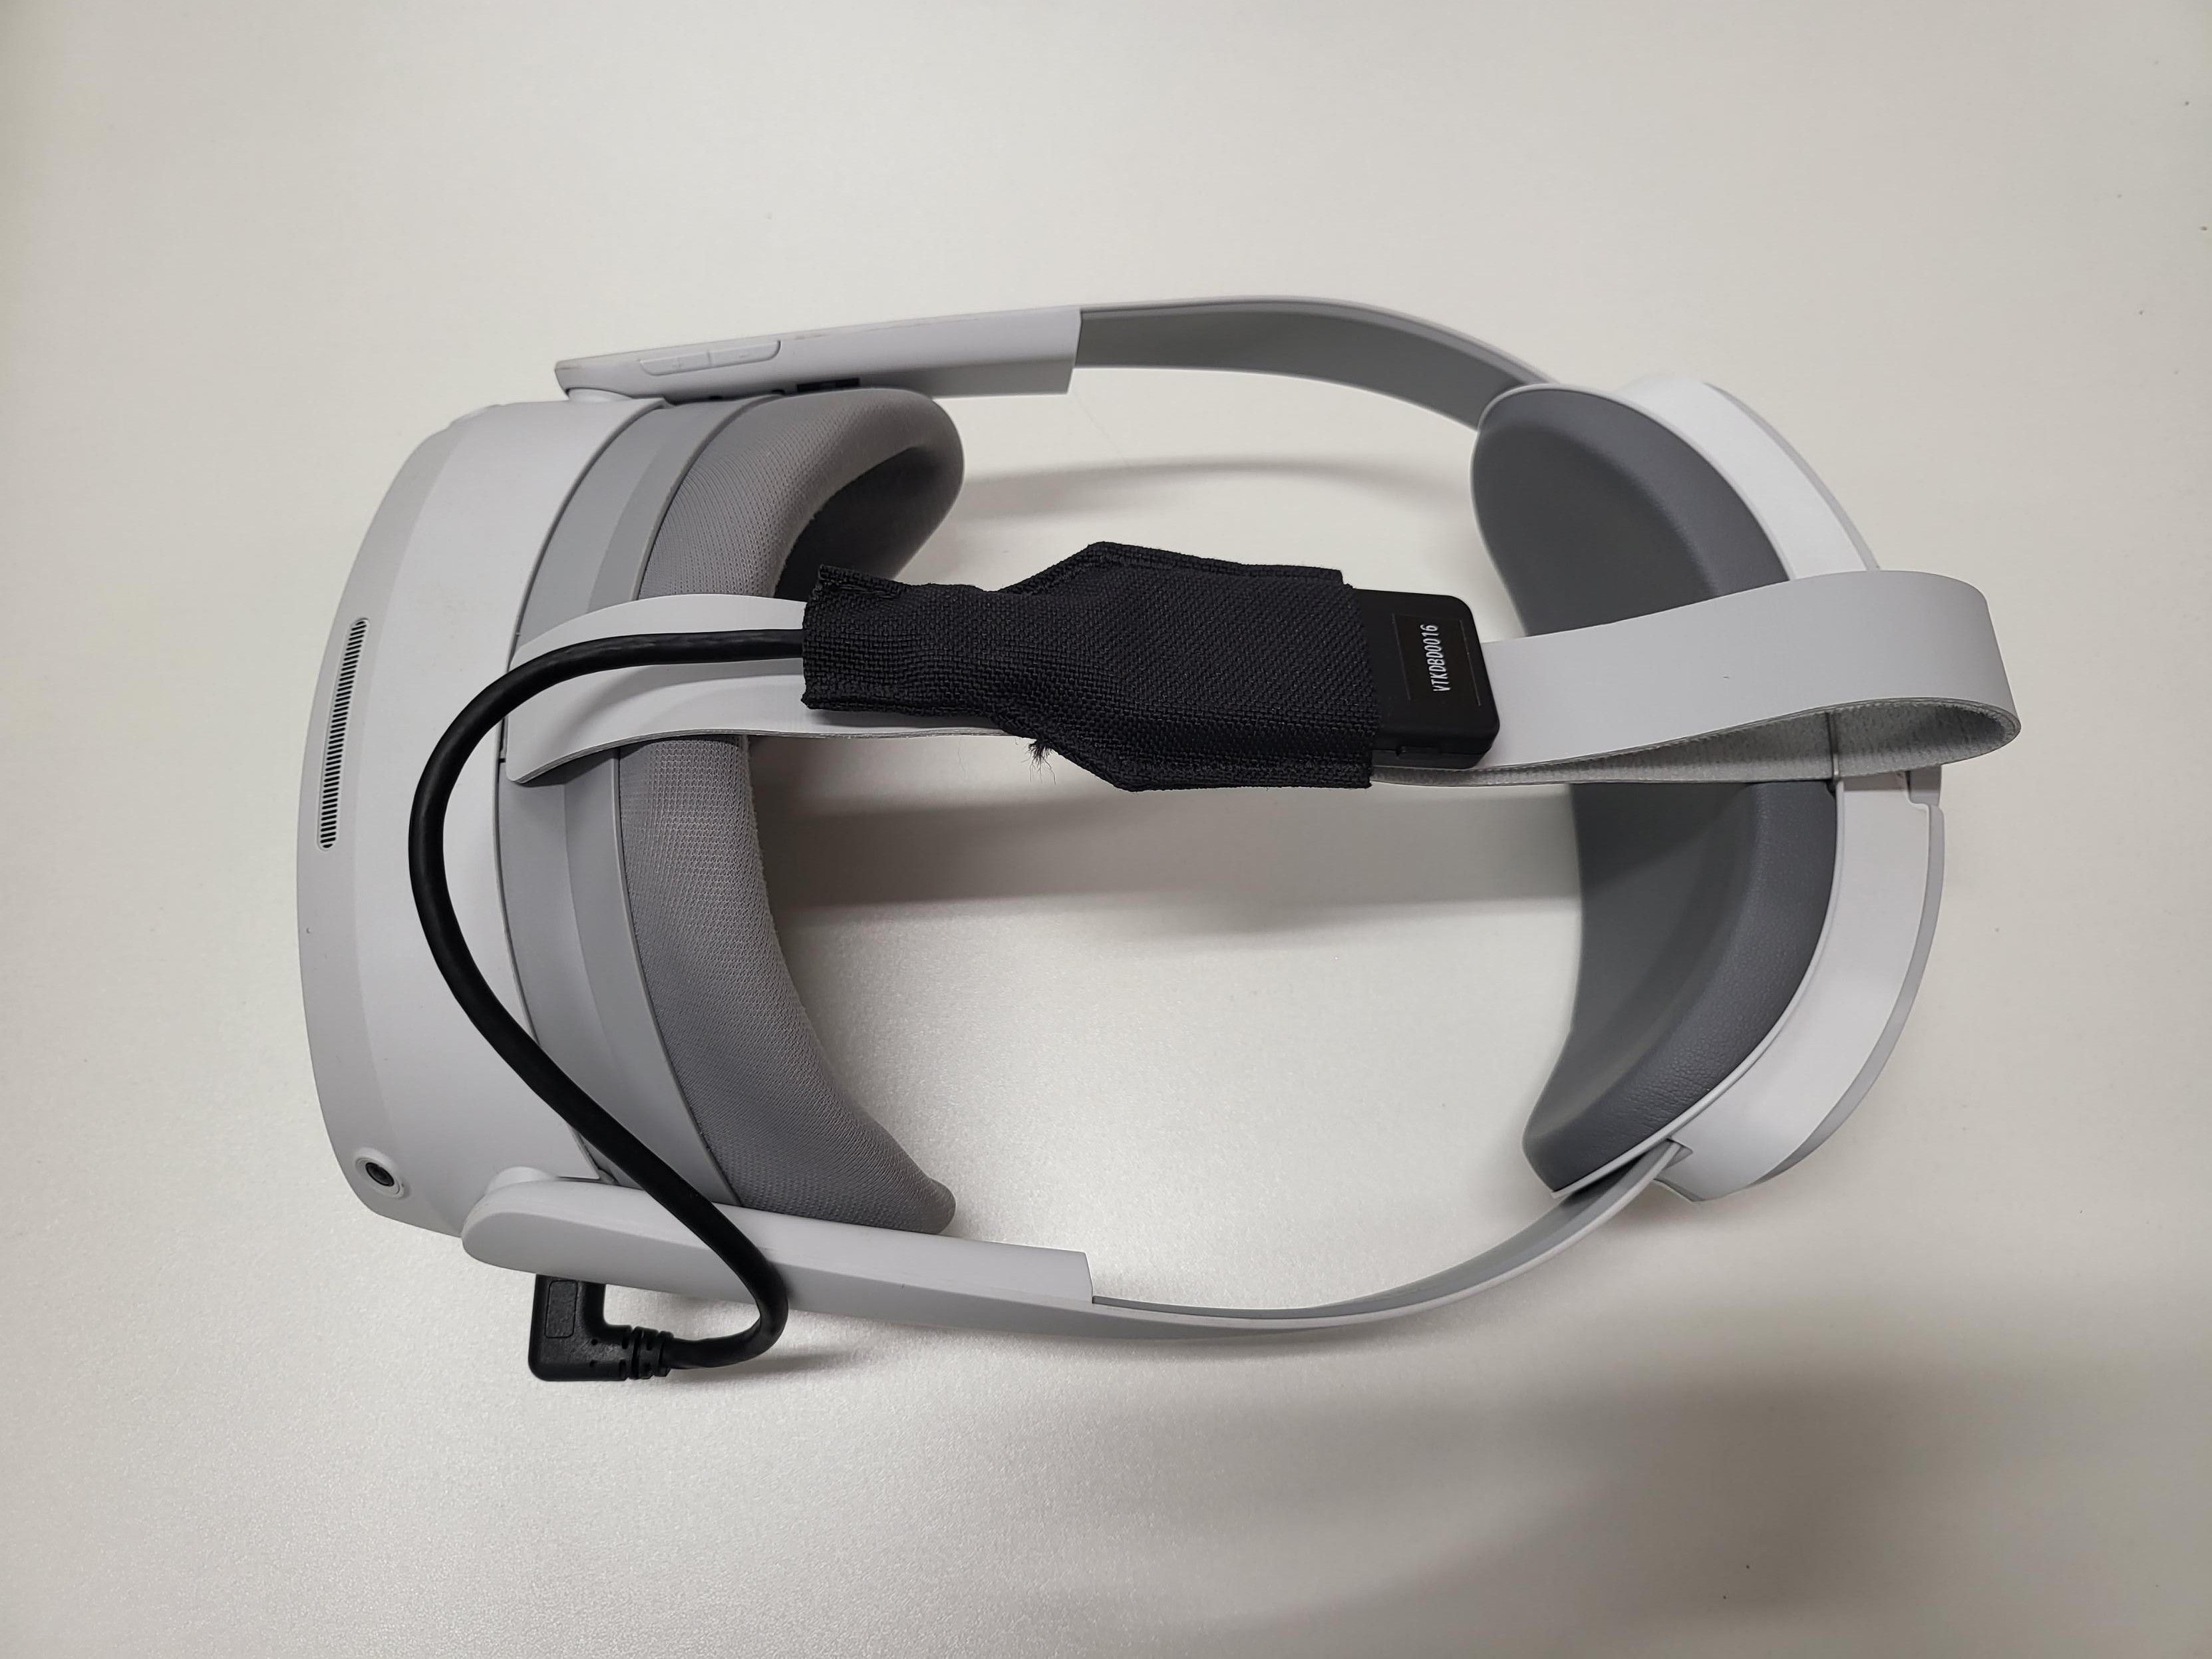
- Version 2 - Side velcro
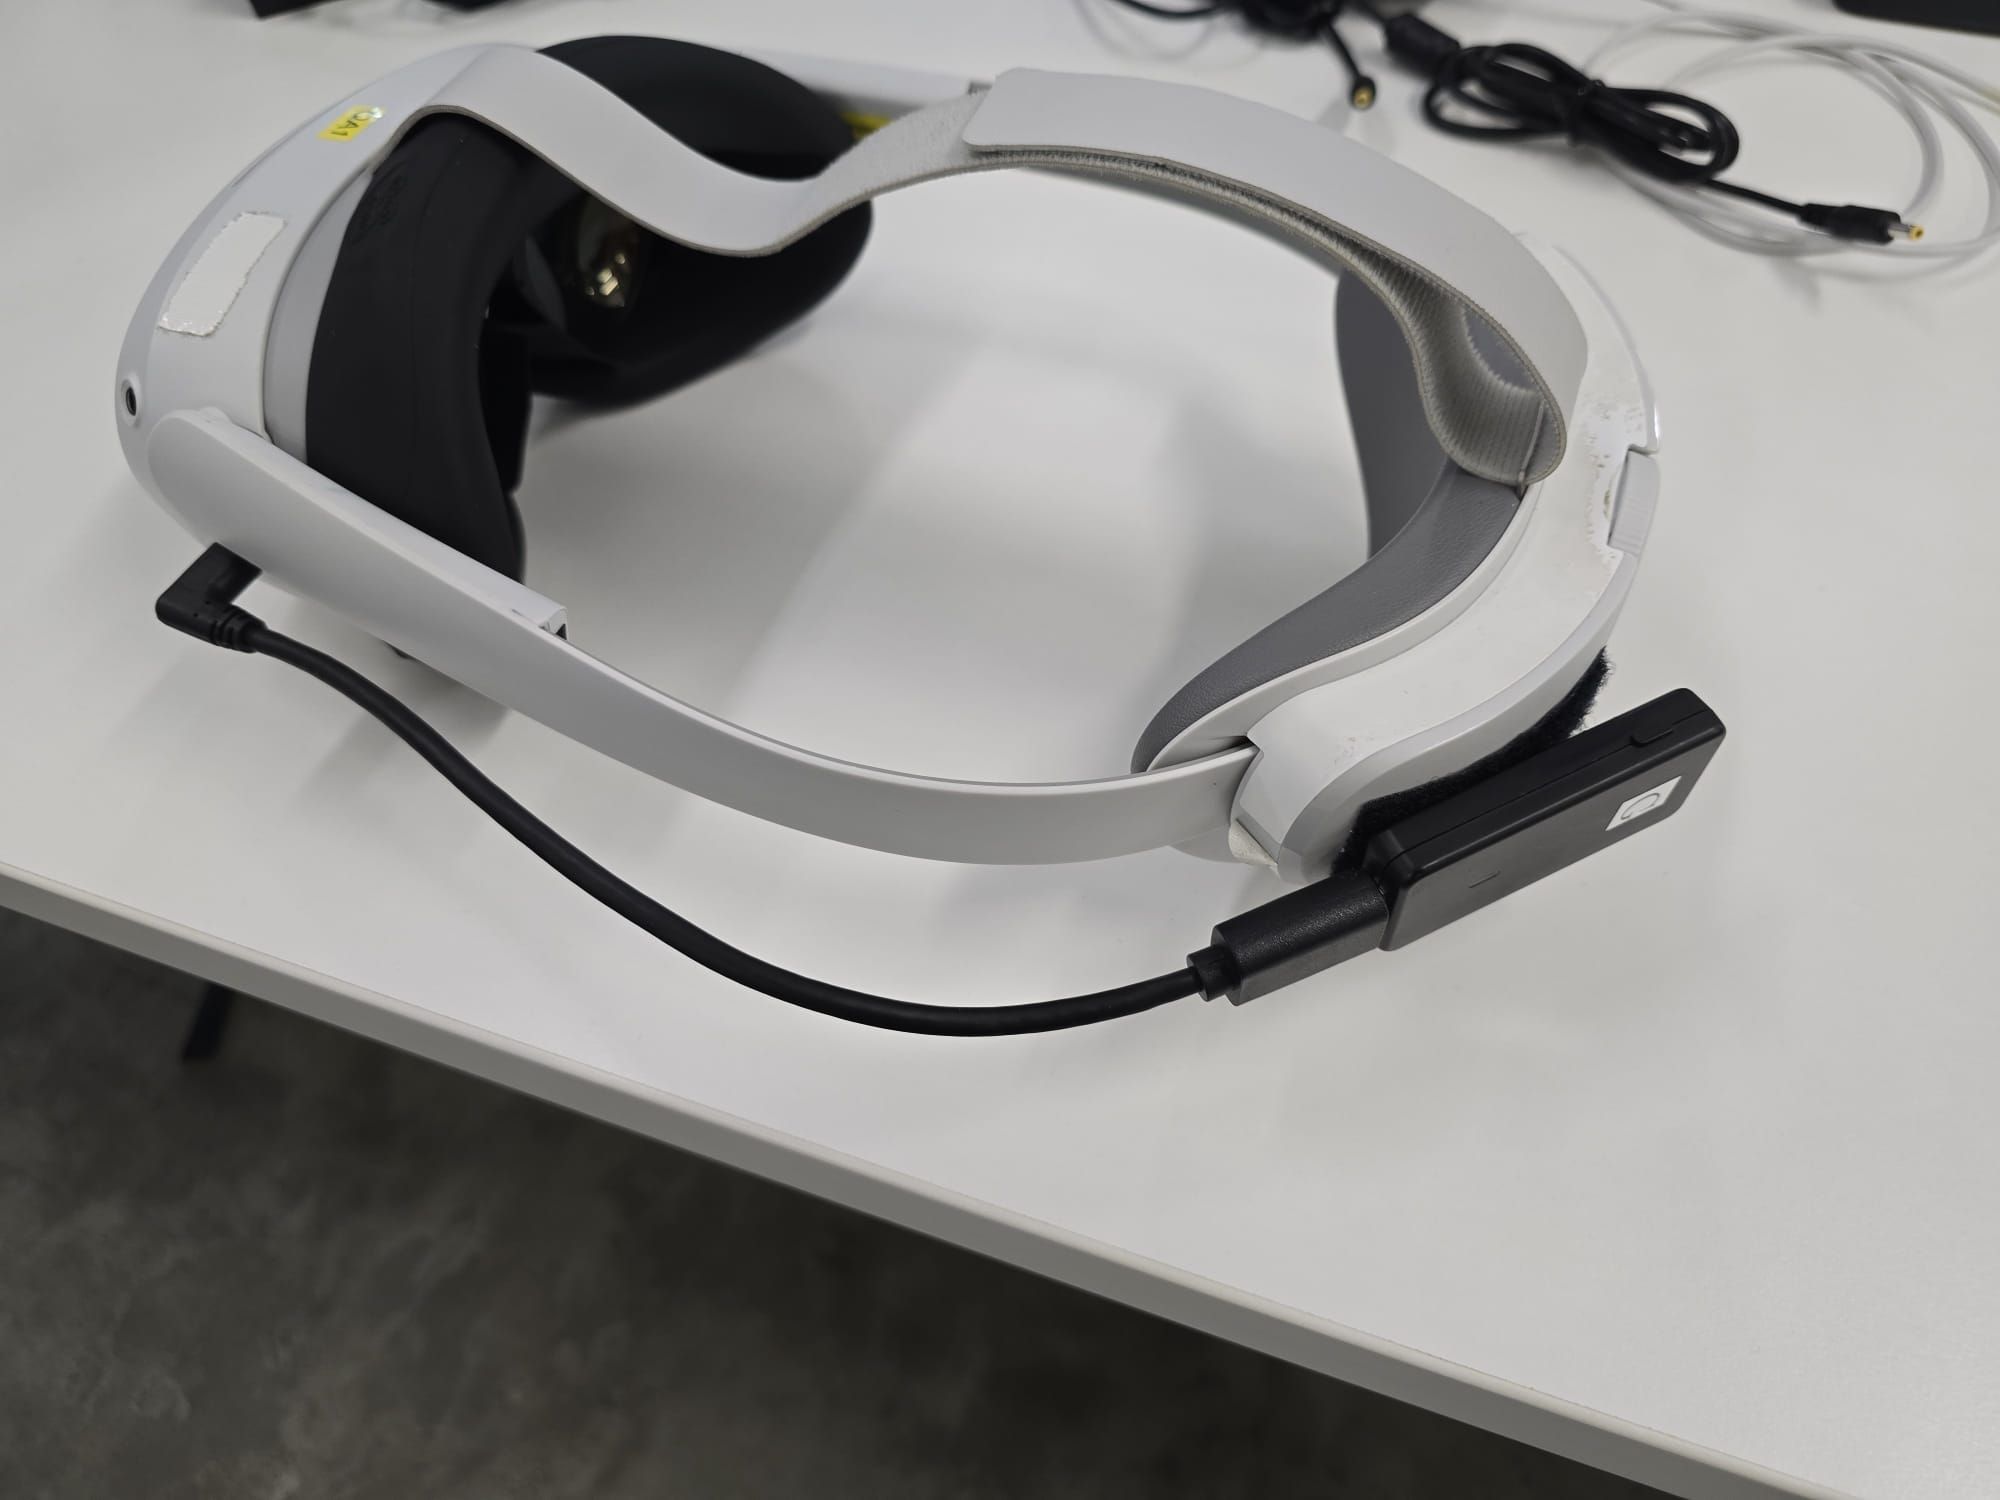
VTKD Box USB-C dongle attachment - Side strap
8. Recommended Settings (for optimal gameplay and prolong battery life):
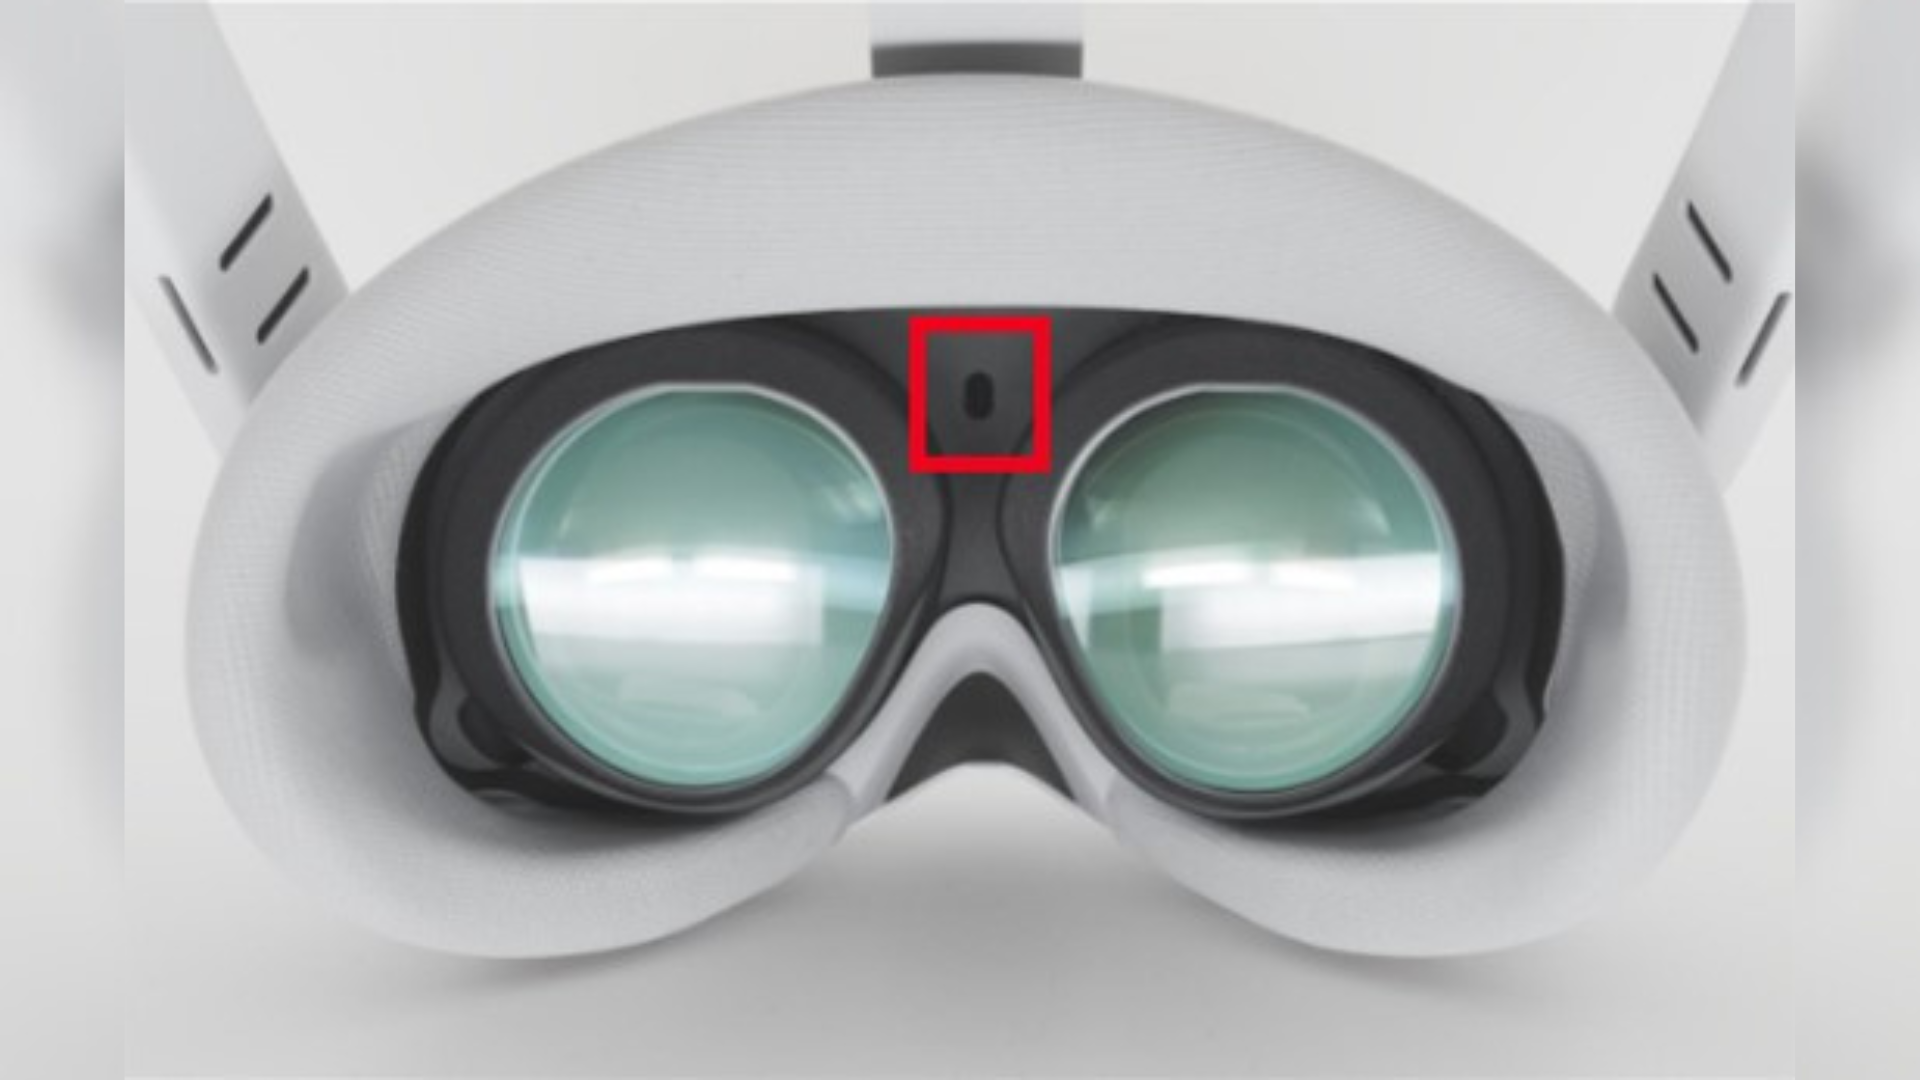
- Cover the infrared sensor with a piece of opaque tape or sticker. This prevents the headset from going to sleep/standby when not worn.
- Set the brightness level to 0.
- Set the volume to a minimum.
- Turn off Bluetooth.
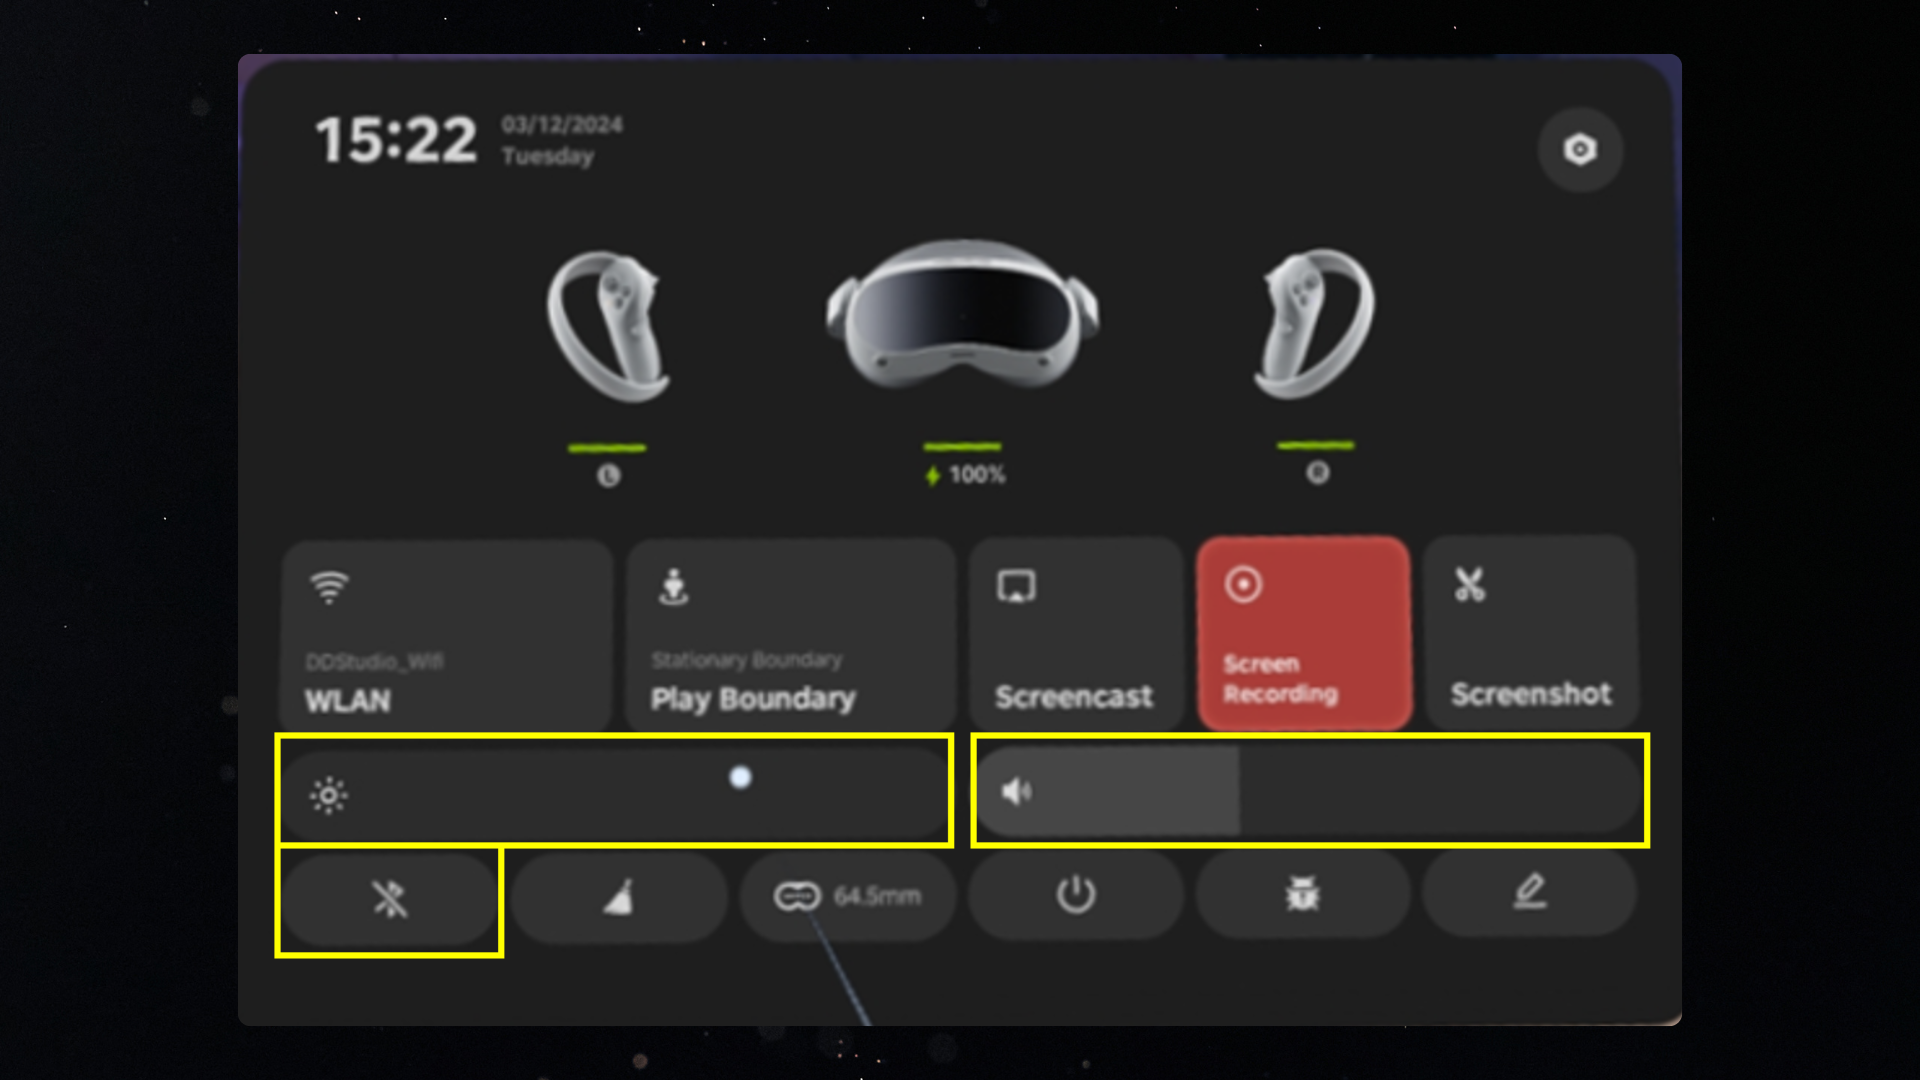
------------------------------------------------------------------------------------------------
c. AXIS Setup
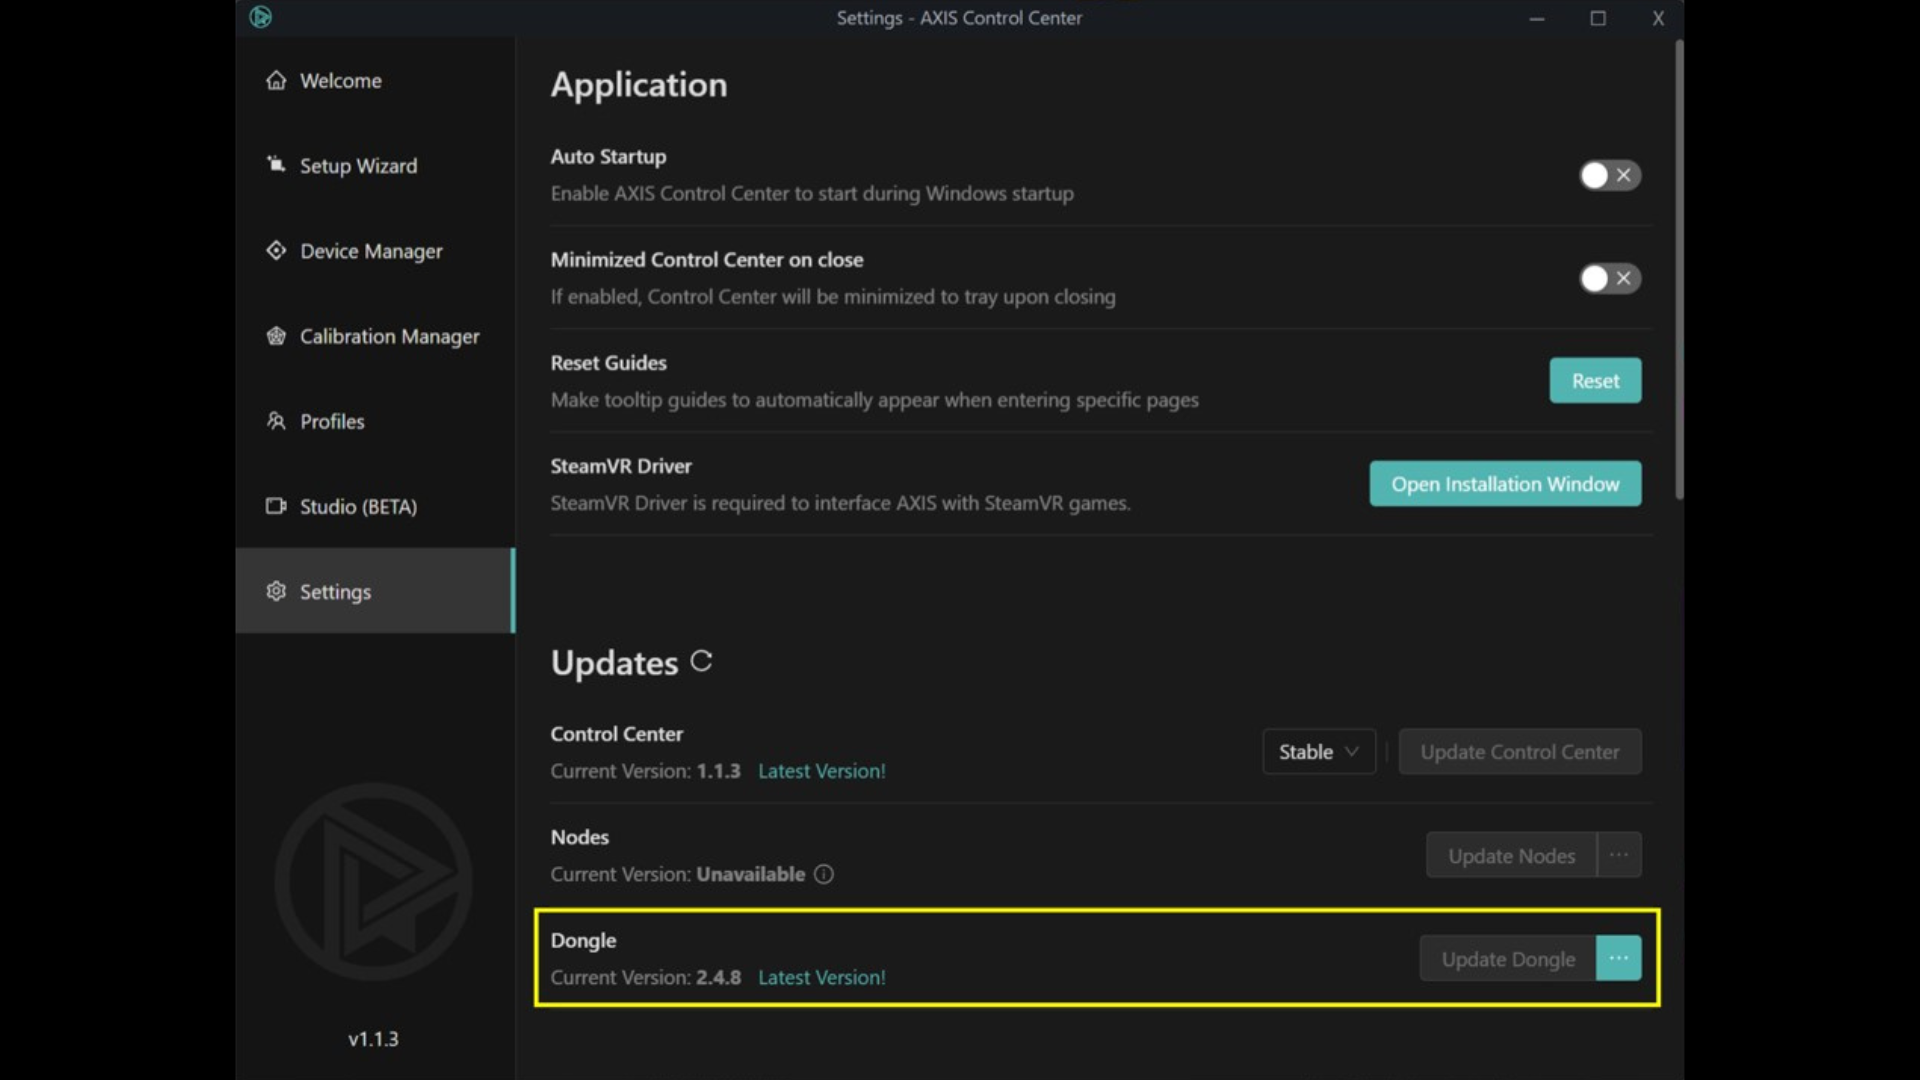
1. Download and Install the AXIS Control Center:
- Follow the prompts to complete the installation.
2. Update AXIS dongle:
- Once installed, launch the AXIS Control Center
- Connect the AXIS dongle to your PC
- Go to ‘Settings’ > ‘Dongle’ > ‘Update Dongle’ (If your device is up to date, there will be an indication ‘Latest Version!’)
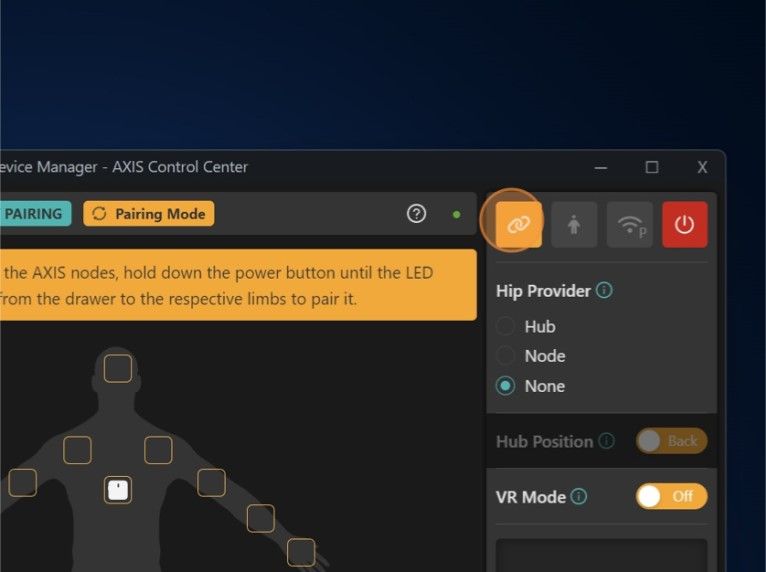
3. Pairing AXIS Motion Trackers/Nodes:
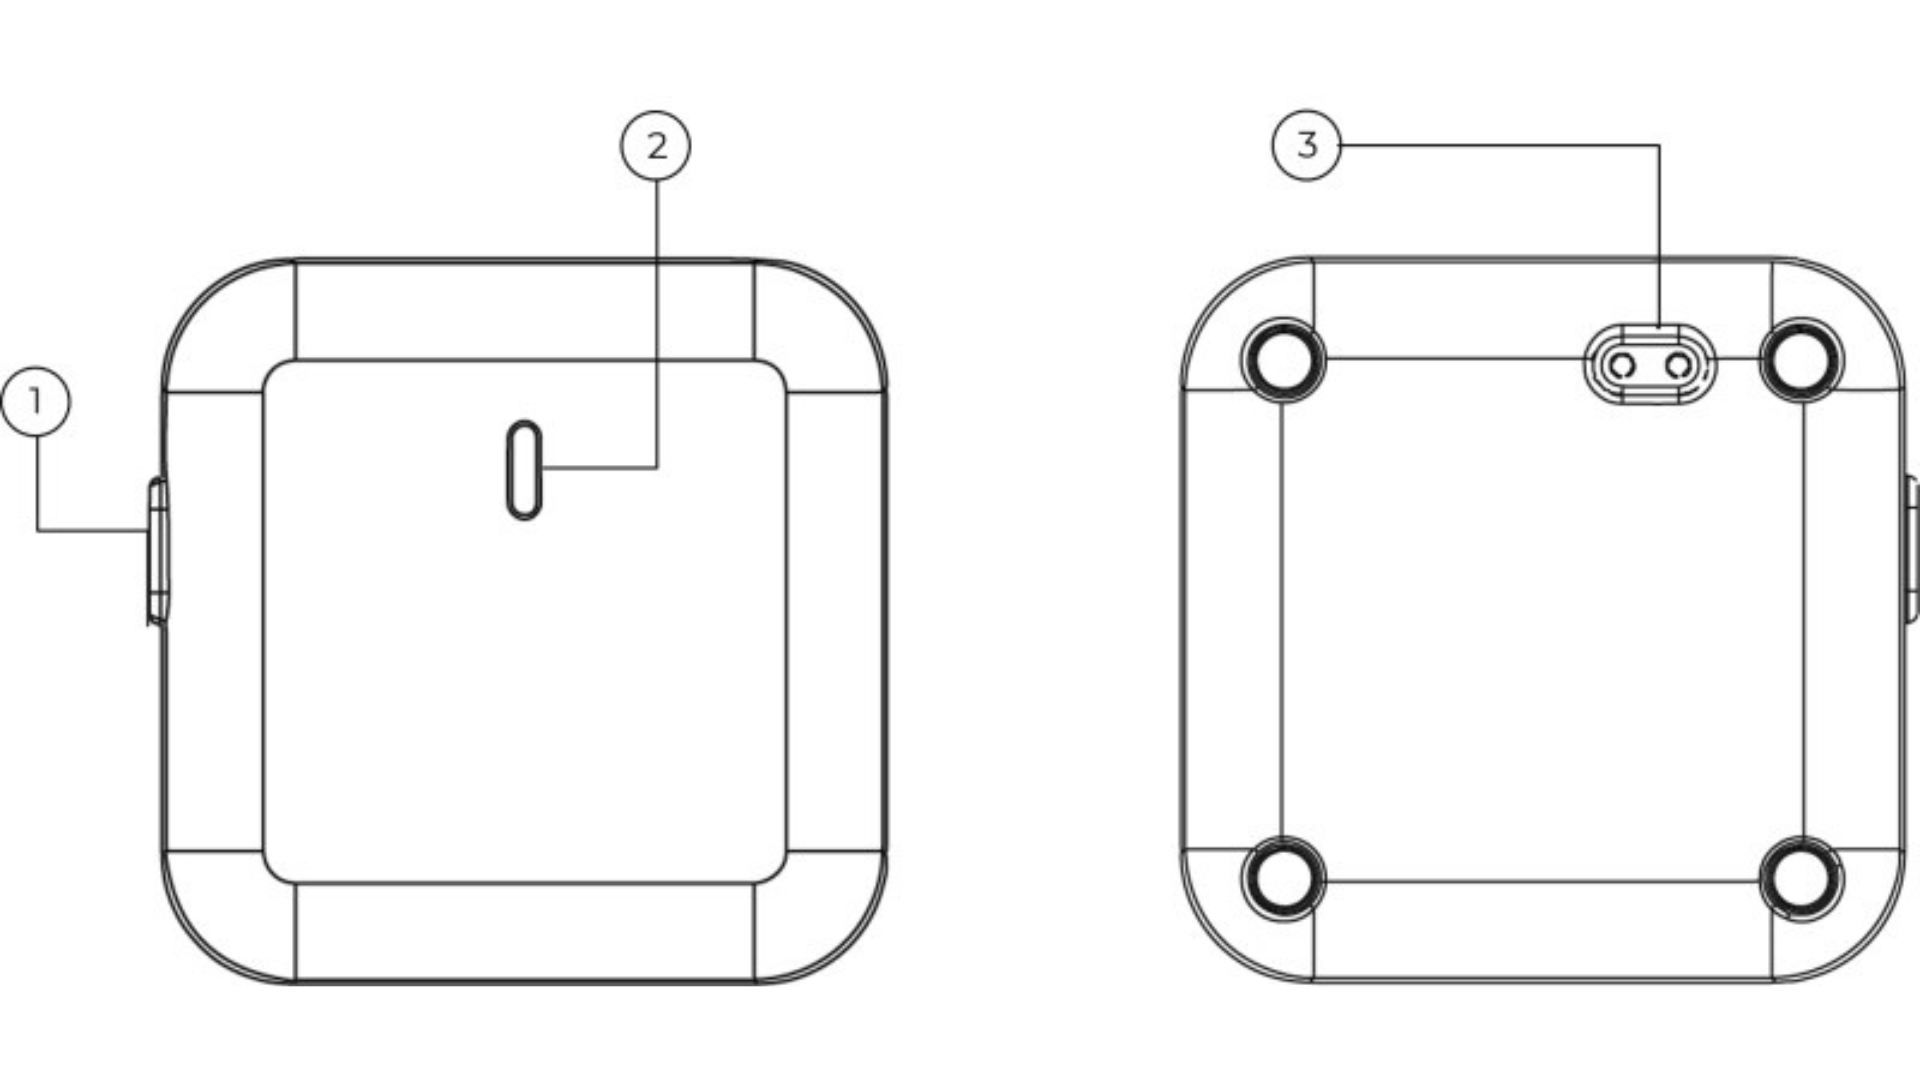
- Set all nodes into pairing mode by pressing and holding the power button (1) until it blinks dark blue (2).
- Click the ‘Set to pairing mode’ button in AXIS Control Center. You will be able to see all the unpaired nodes in the node drawer.
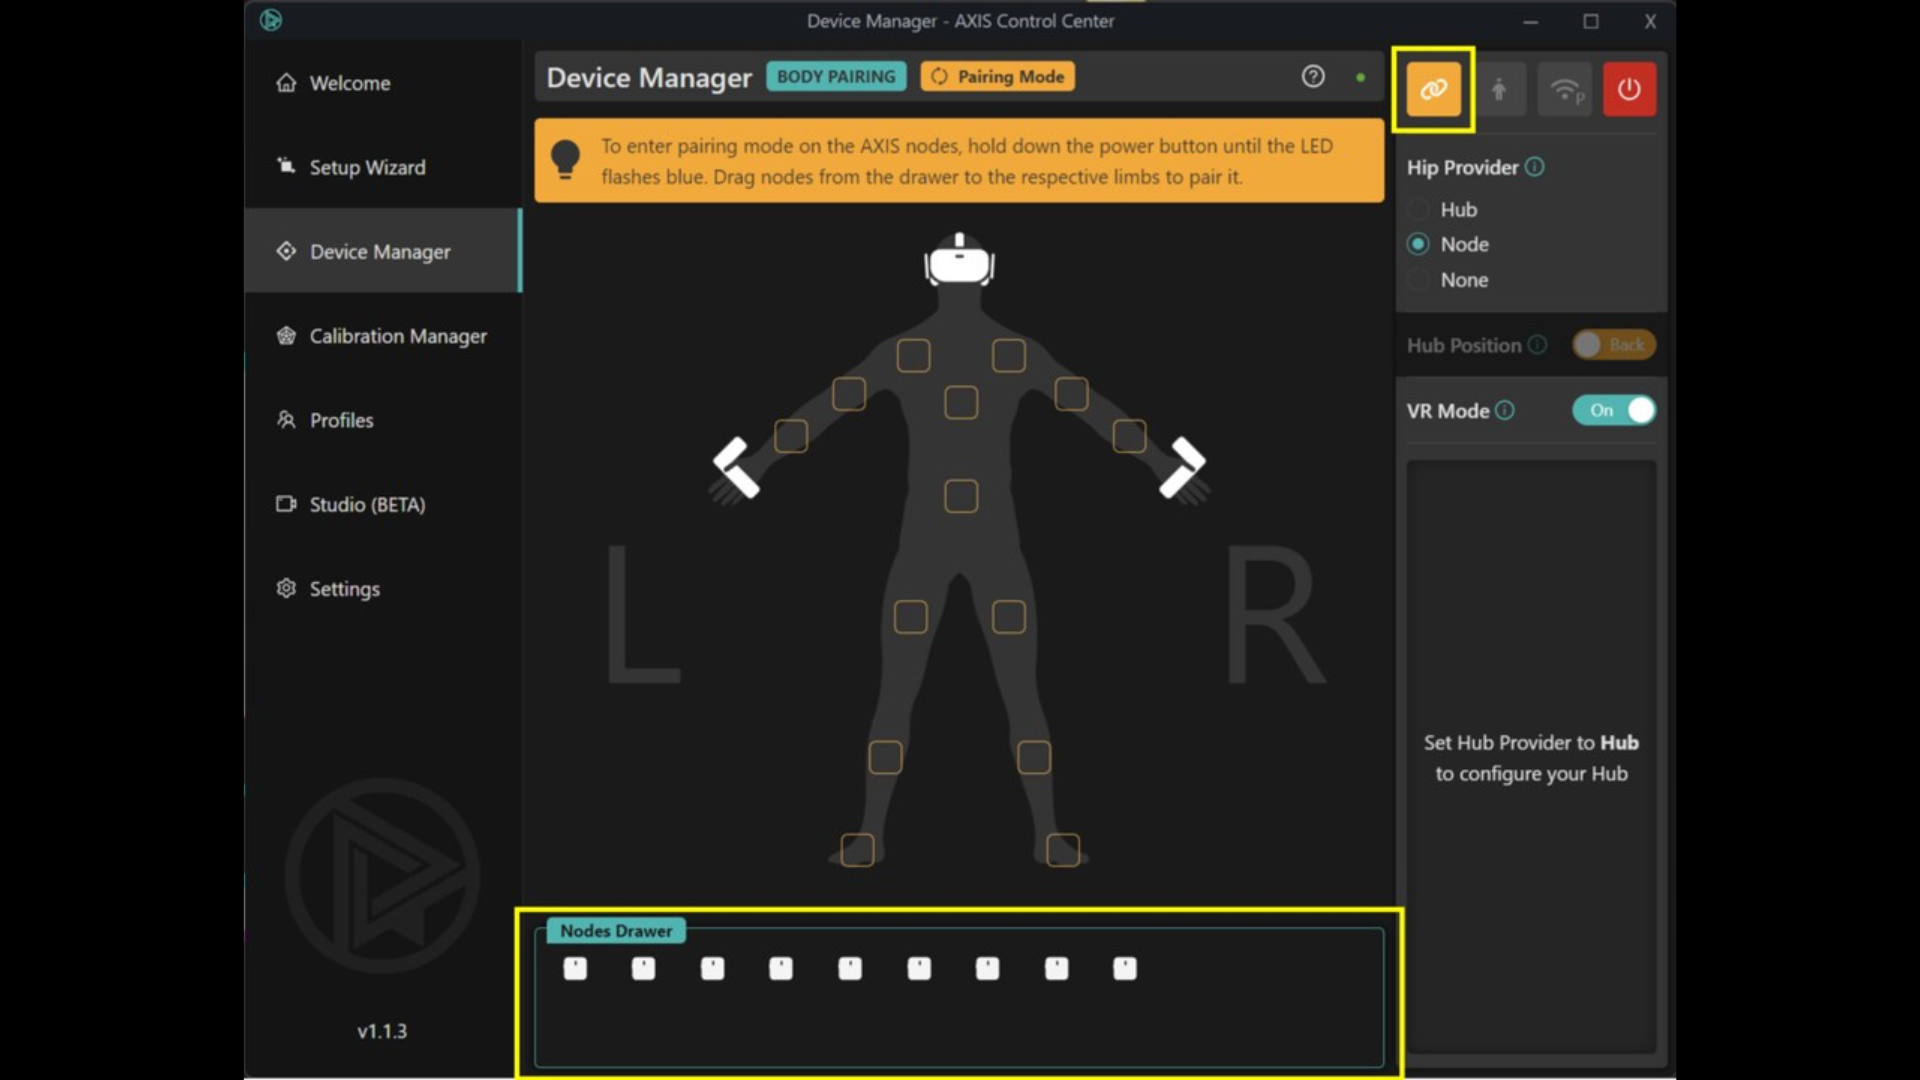
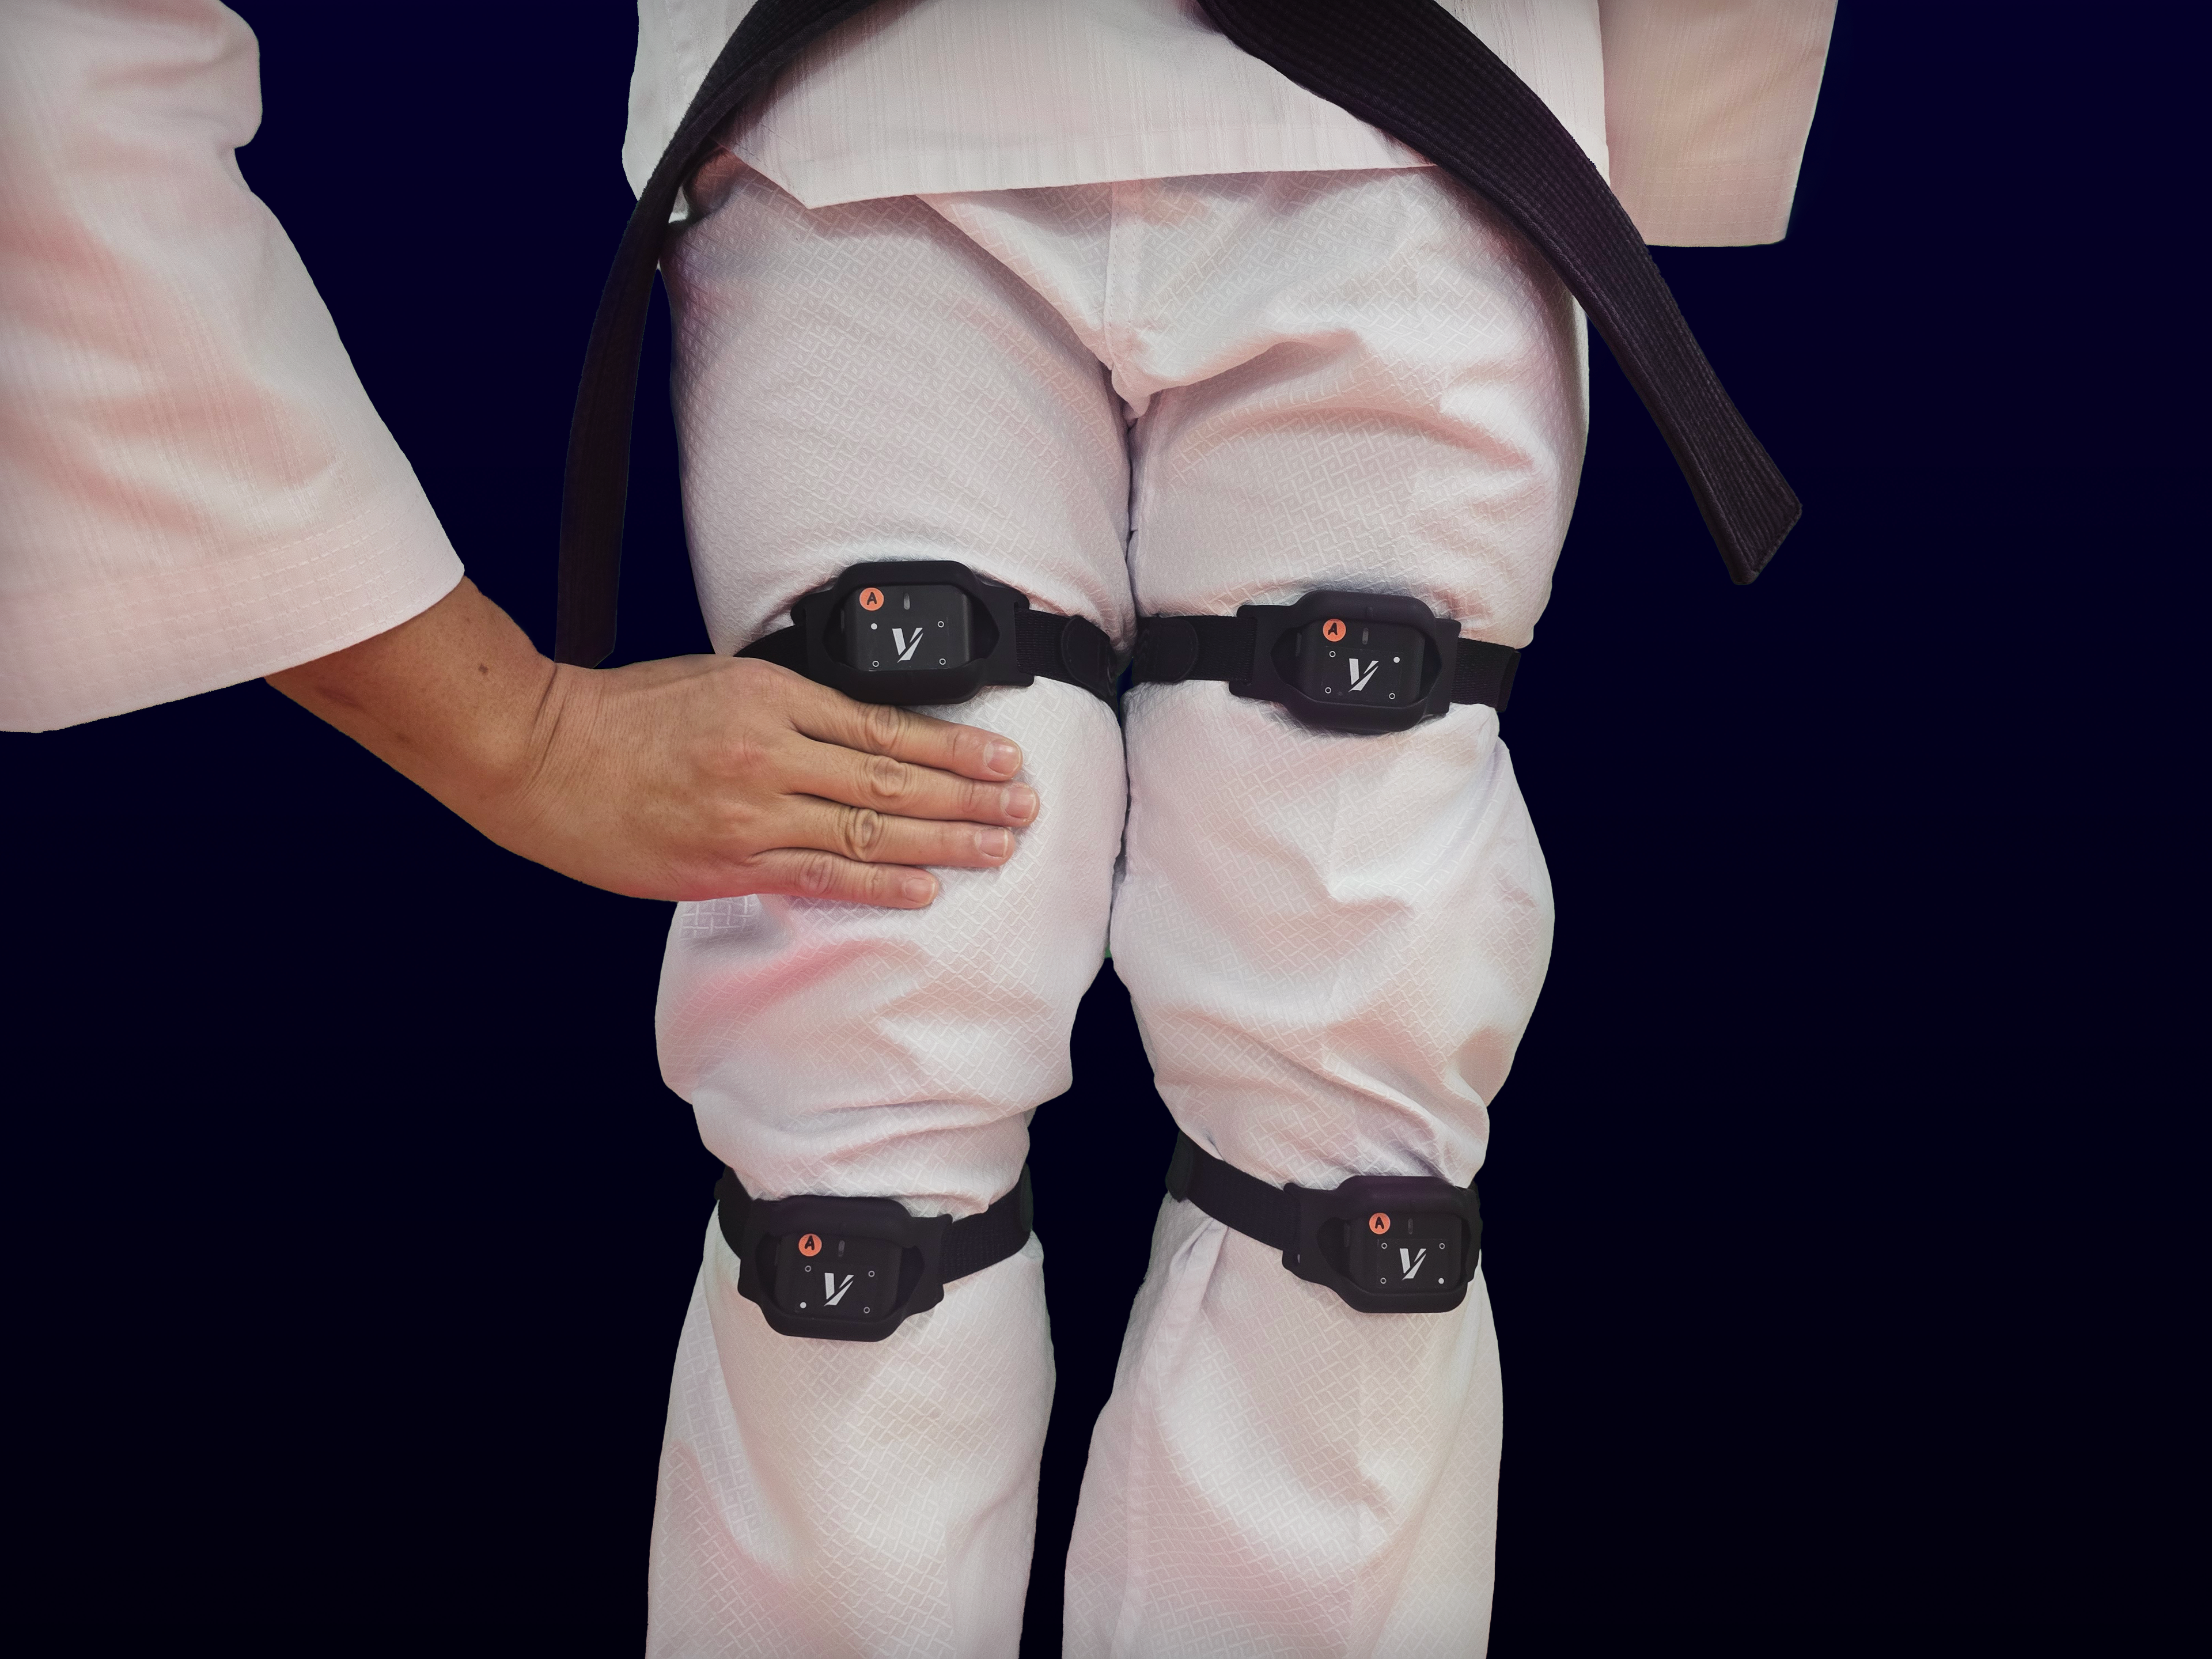
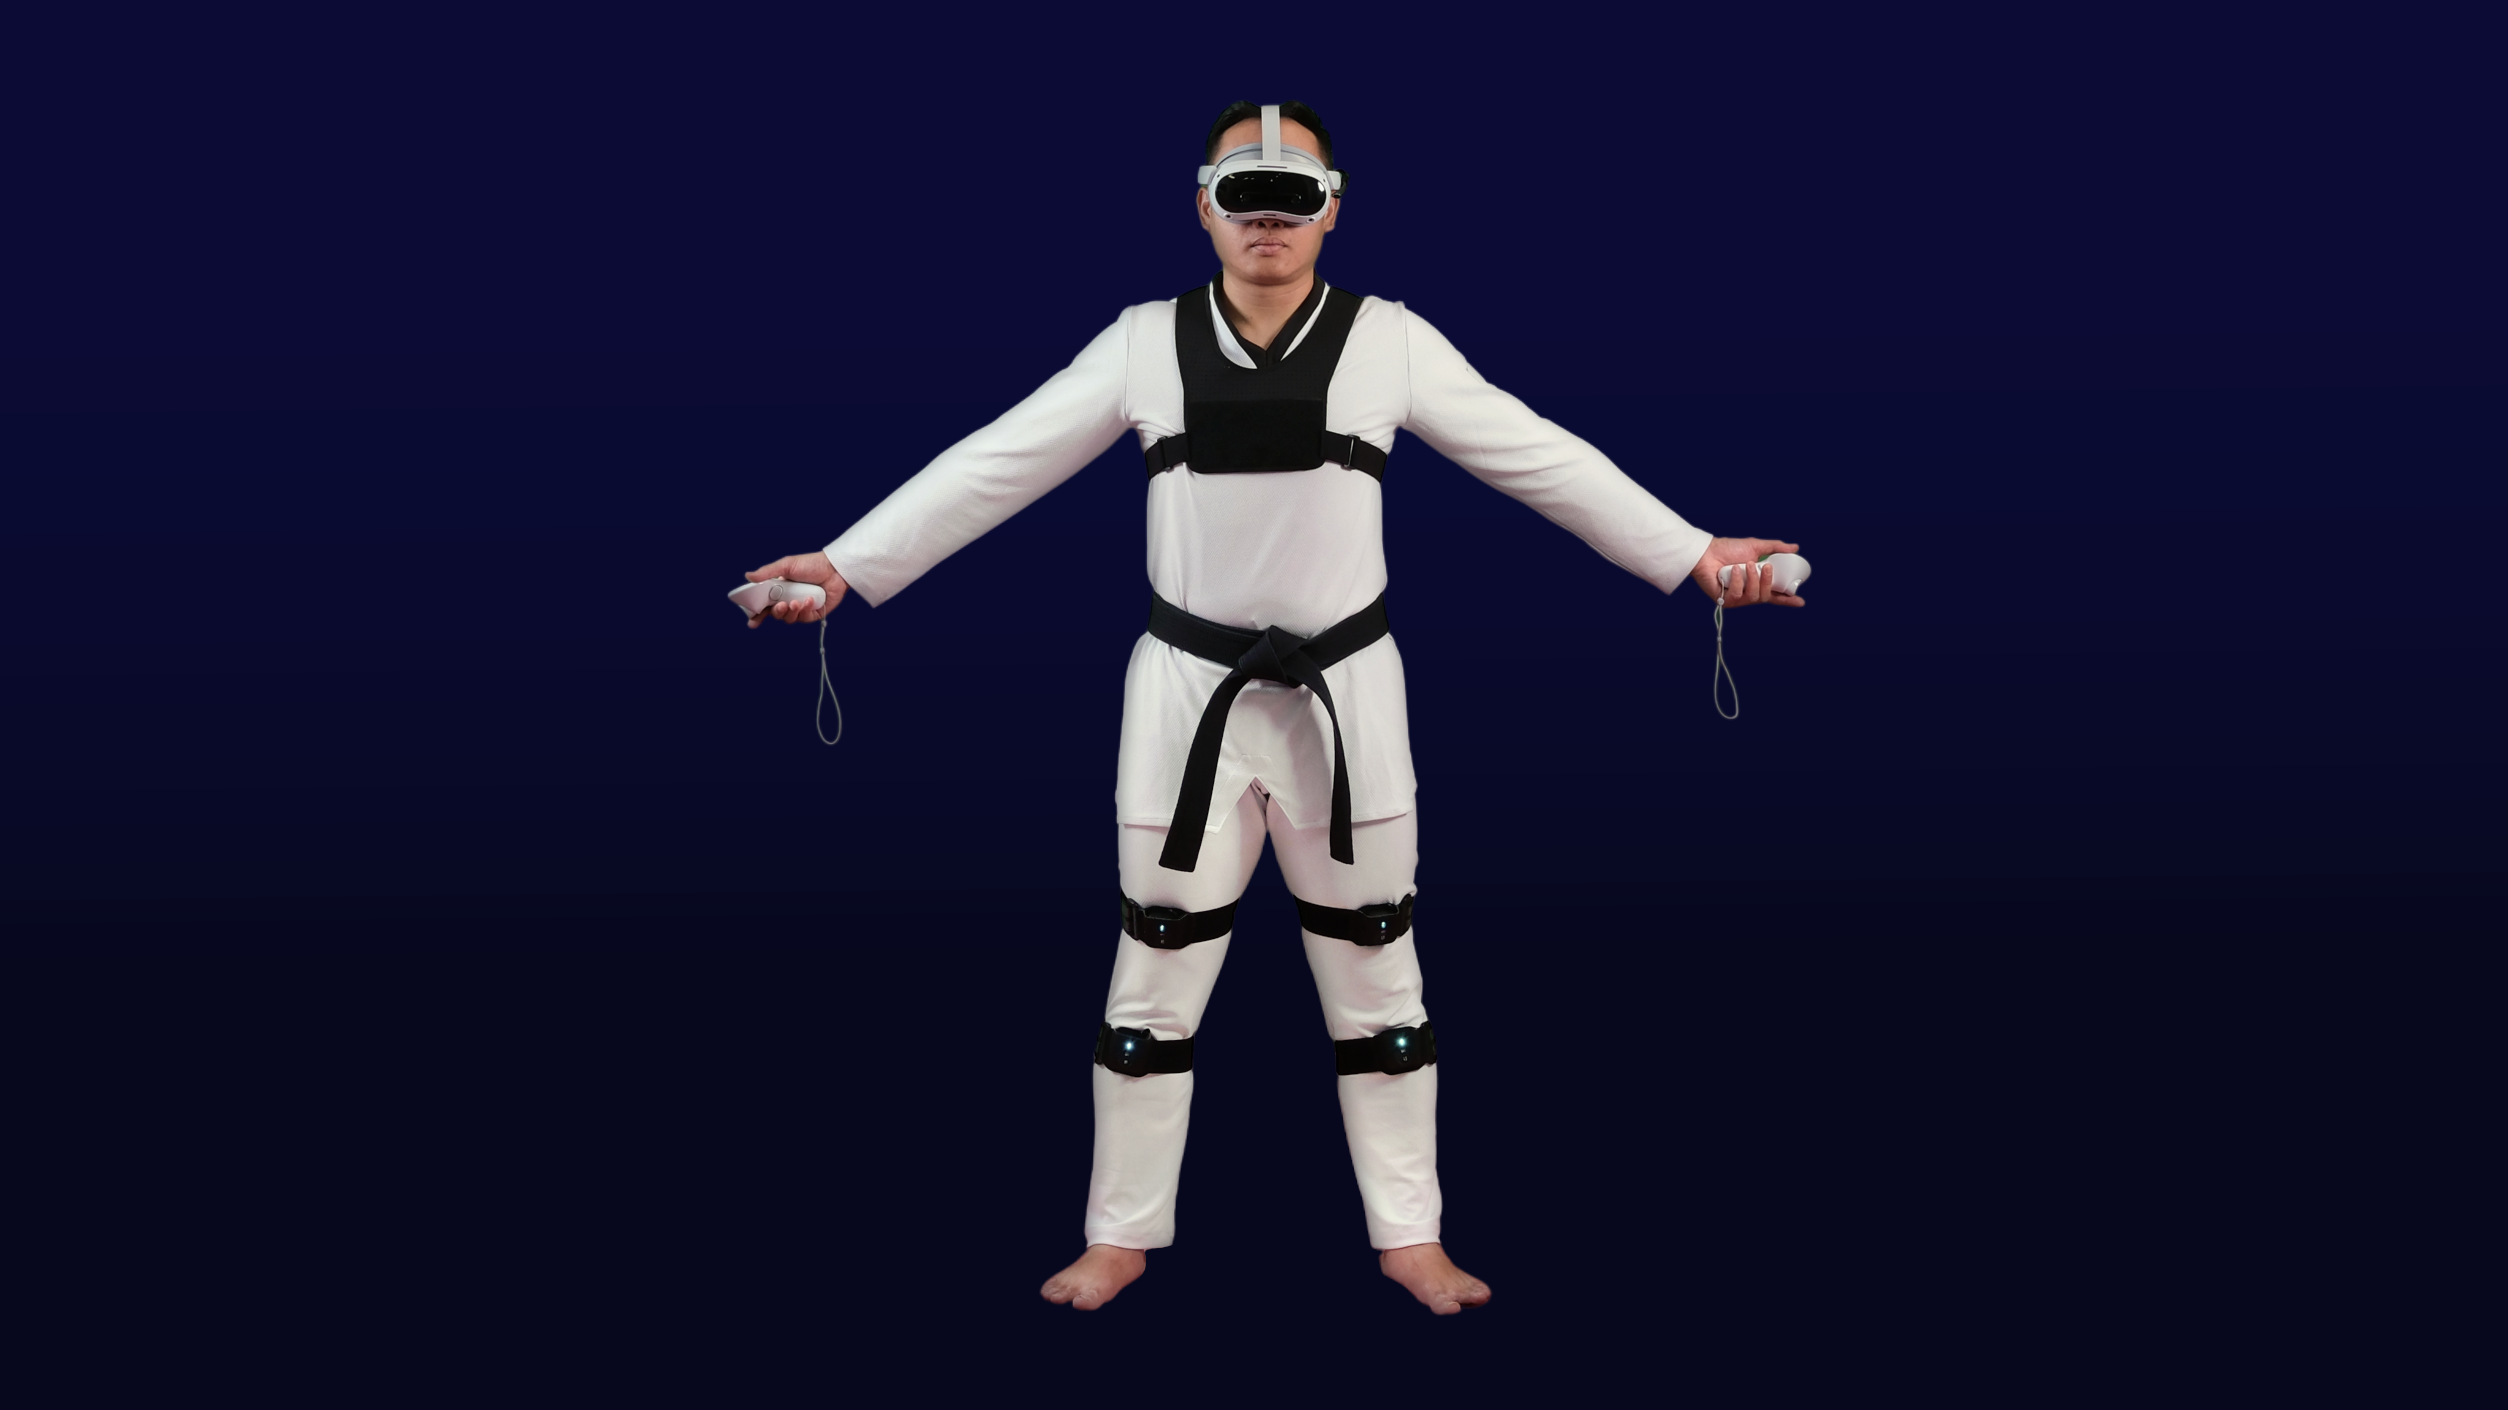
- Drag and drop nodes to the required position for VTKD (Spine, Right Thigh, Right Shin, Left Thigh, and Left Shin)
- You can identify which node corresponds to the one in the node drawer by double clicking or double pressing the button on the physical AXIS node.
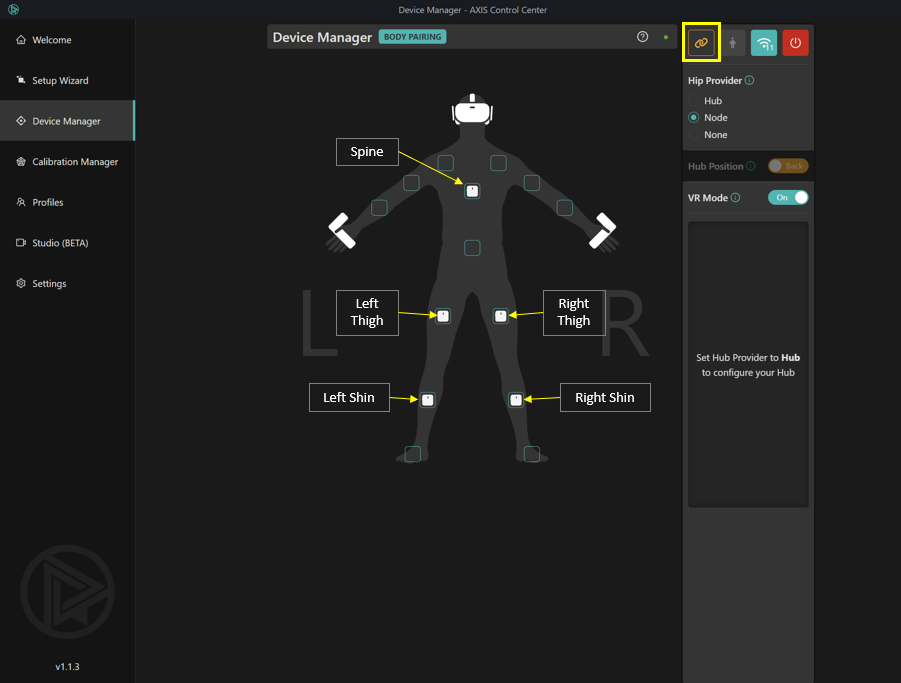
- The placement of the AXIS nodes on the body must match the placement in the AXIS Control Center (i.e. if a node is assigned to the right thigh in the Control Center, the same node must be worn on the right thigh of the player).
- Use a 4 finger space above your knee to place your thigh nodes, and 4 finger space below your knee for your shin nodes.

- For the spine node, it should be placed in the upper part of the back, along the middle of the spine. The orientation of all nodes should be facing upwards.
- Pair additional nodes to other body parts like shoulders or arms (It is recommended to update all nodes together to avoid inconsistency in software version).
- Once nodes are placed in position, click on ‘set to pairing mode’ button again to save.
4. Update AXIS Motion Trackers/Nodes:
- Go to ‘Settings’ > ‘Nodes’ > ‘Update Nodes’(If your device is up to date, there will be an indication ‘Latest Version!’)
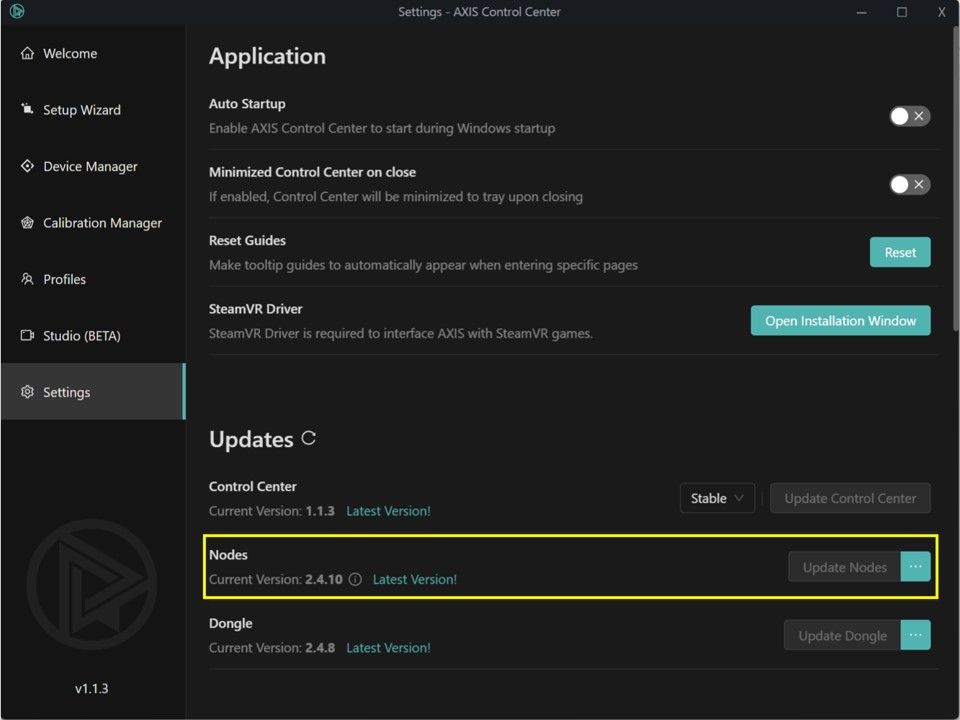
- Once updated, the nodes will turn off automatically.
Video reference:
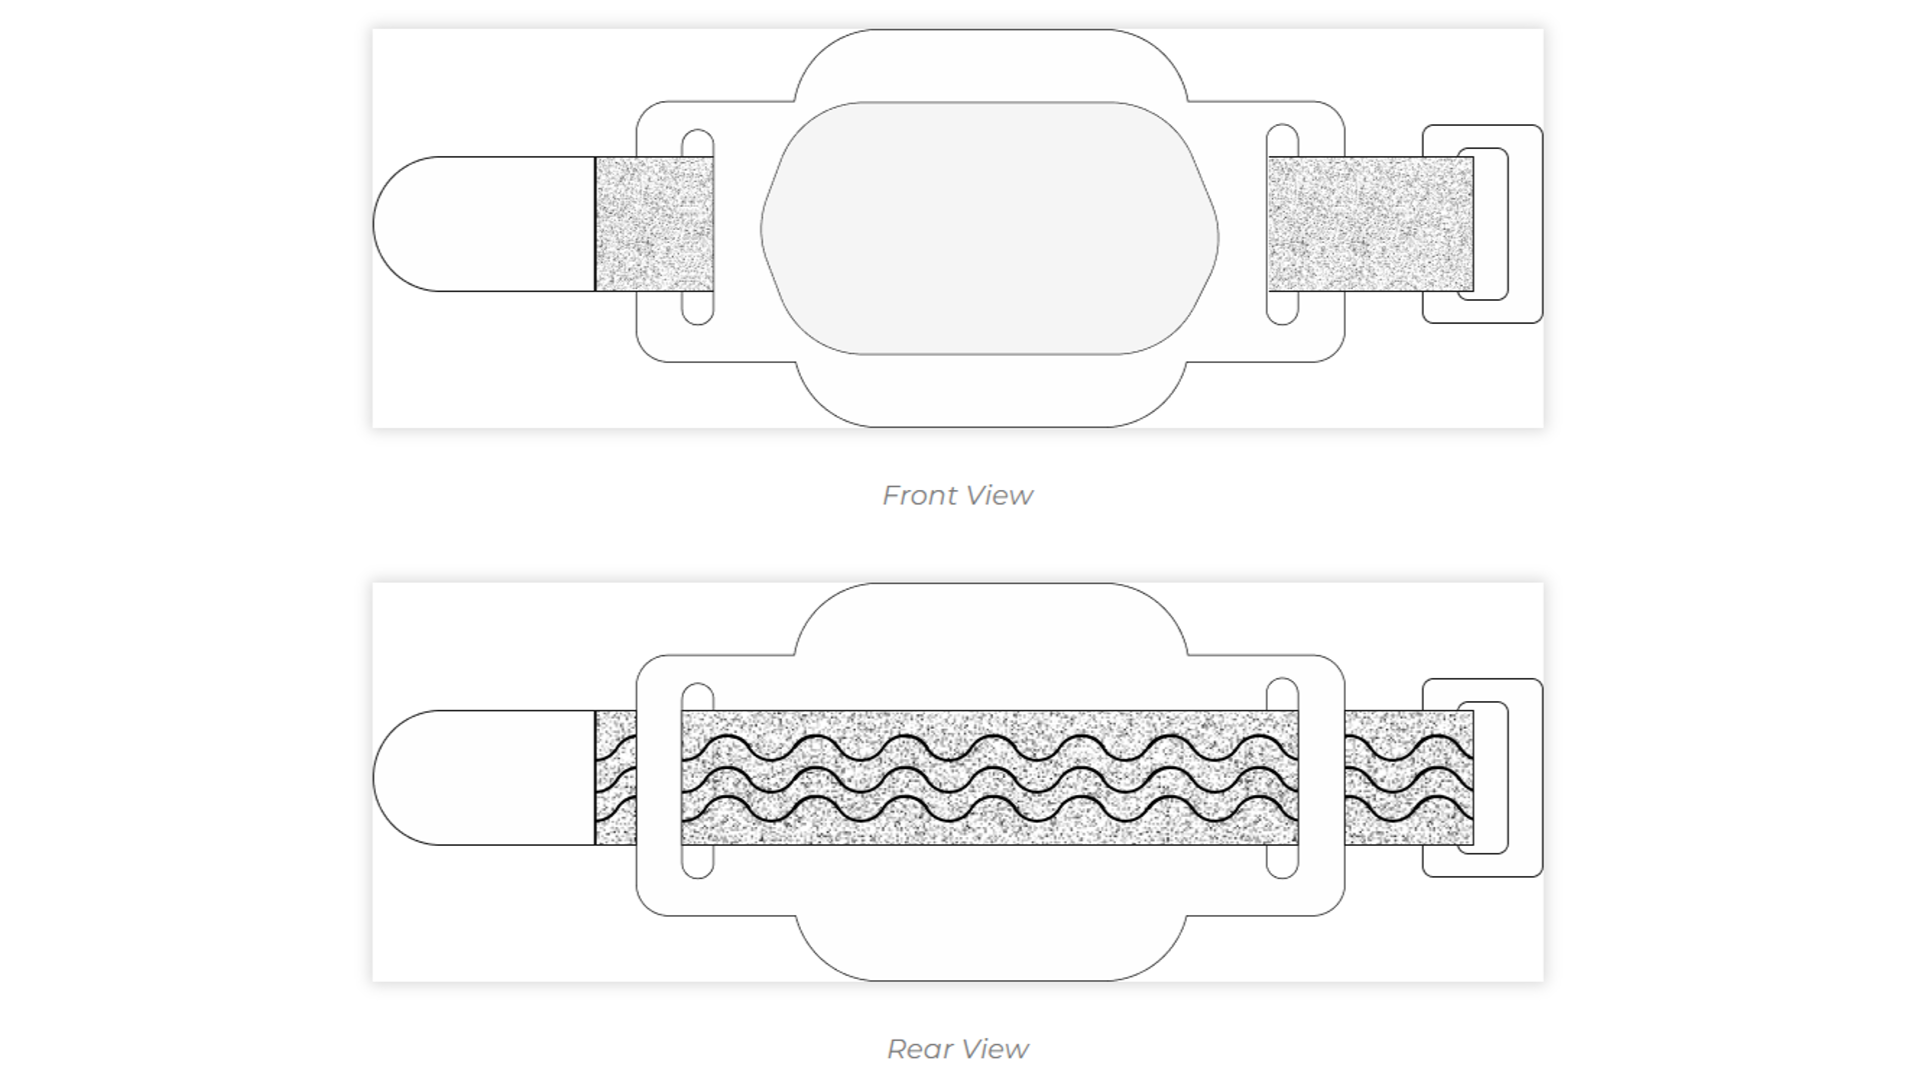
5. AXIS Straps and Node holders:
- Slot in a strap into the node holder with the rubber side facing out
Video reference:
Setting up AXIS WiFi Channels
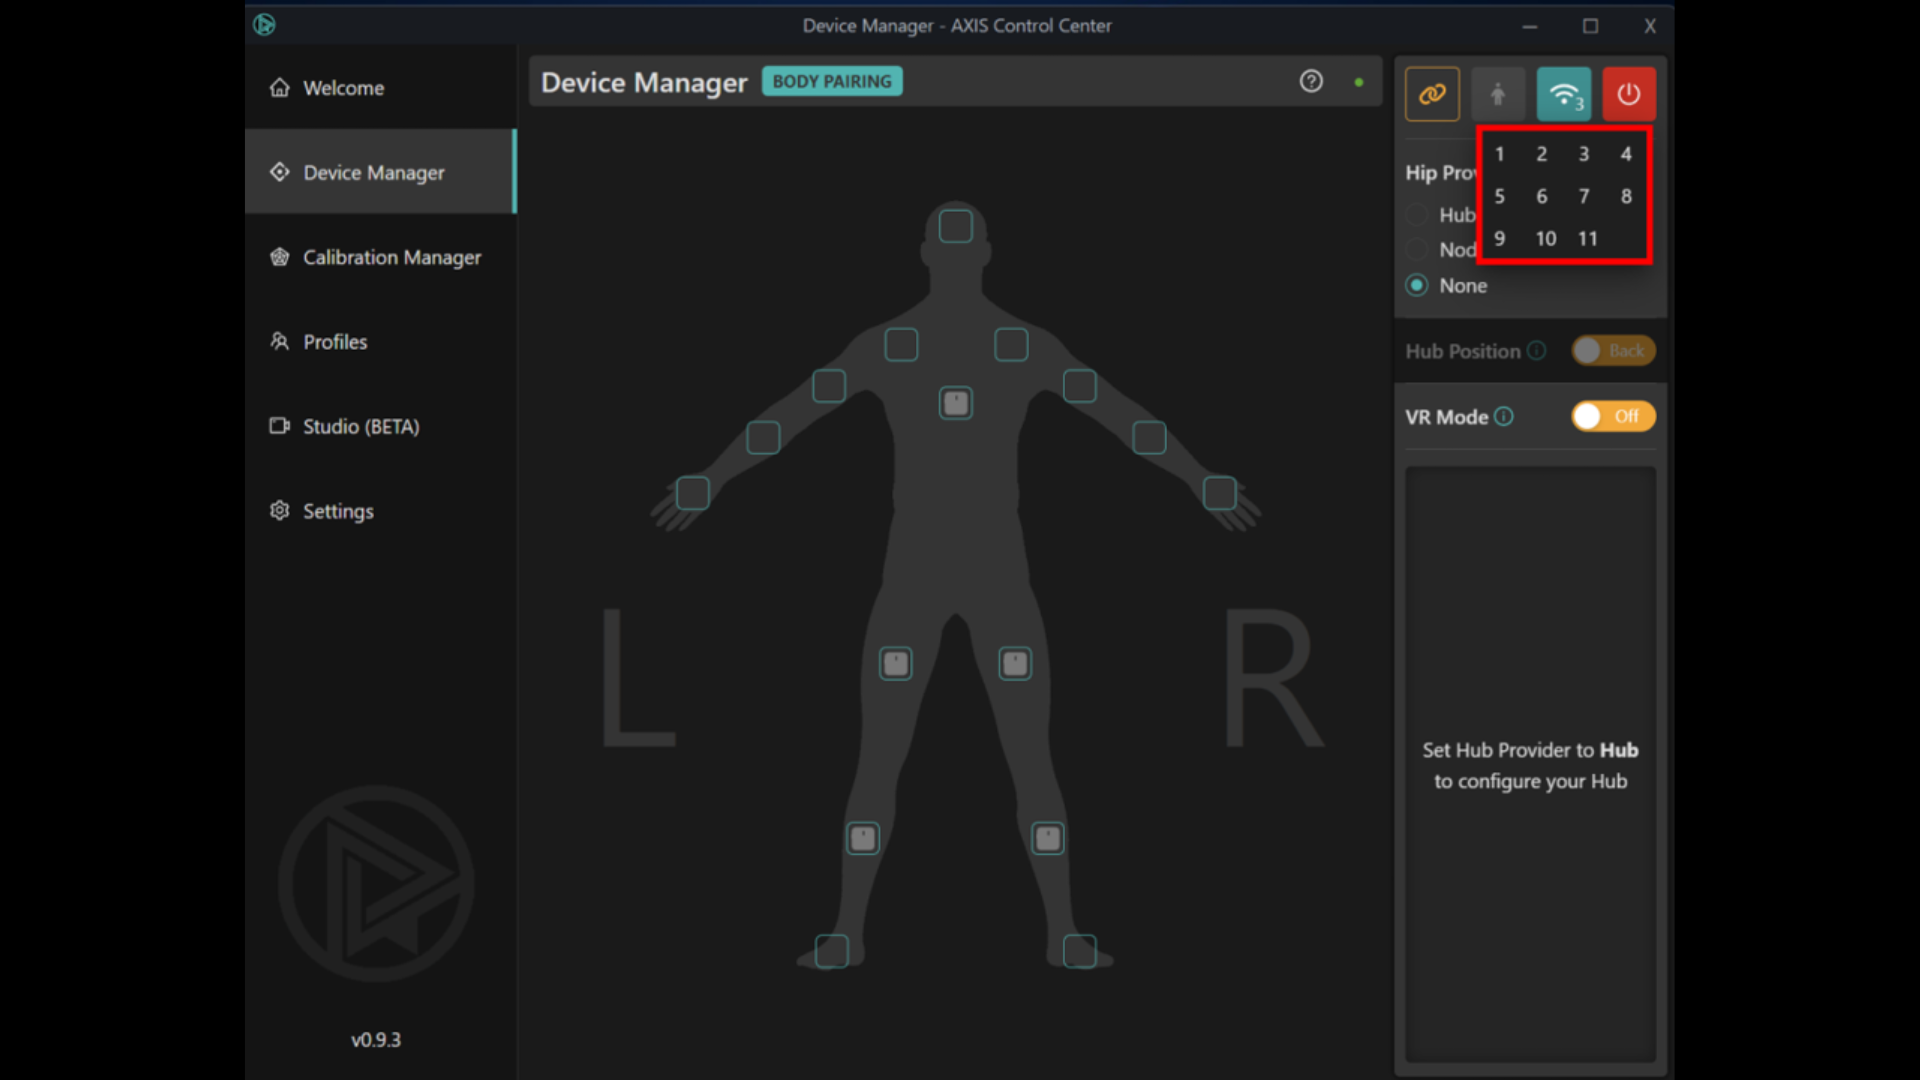
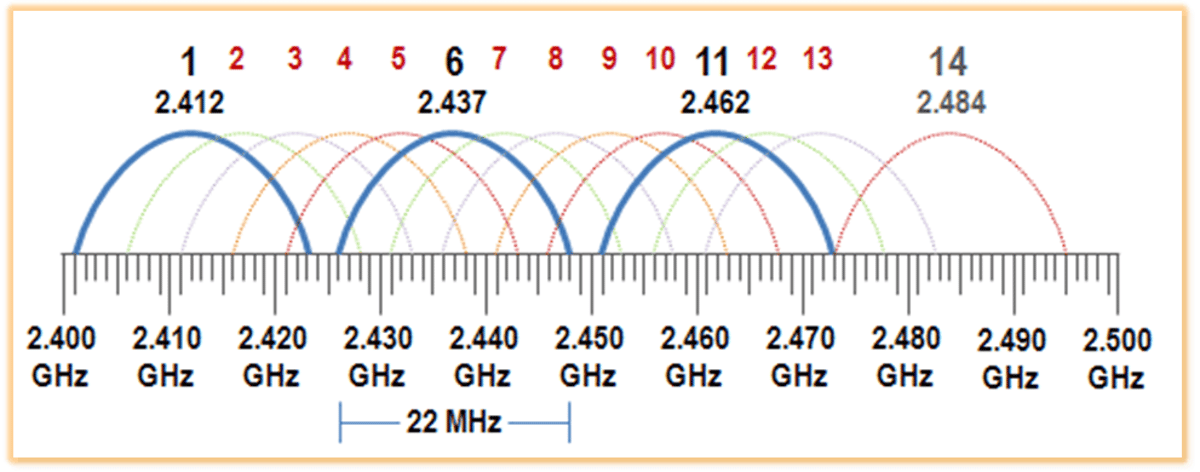
AXIS uses a wireless 2.4Ghz signal to transfer and receive data and has 11 separate channels.
Channel 1, 6, and 11 are the recommended channels to be used as they are not overlapping with each other (Refer to chart below).
When operating with multiple units of AXIS in the same event space, the general principal as follows –
- For each Court or Field of Play (FOP), the two AXIS sets in use (blue player and red player) should be paired on the same Wi-Fi channel e.g., In FOP A, blue player’s AXIS is paired on channel 1, red player’s AXIS should also be paired on channel 1.
- If there are 2 FOPs, both courts should be on different channels E.g., FOP A nodes on Channels 1 and FOP B nodes on Channels 6.
An important note to take is that at any time, it is recommended to only have 10 nodes turned on, on the same channel. E.g., if both FOP A and B nodes are on channel 1 and turned on at the same time (20 nodes), the AXIS might start to drop in performance.
Video reference:
-----------------------------------------------------------------
5. Installing Game Files
a. PC Installation (Game Master & Spectator)
*If you have an older software which requires an update, UNINSTALL the old software from your PC before installing the new version.
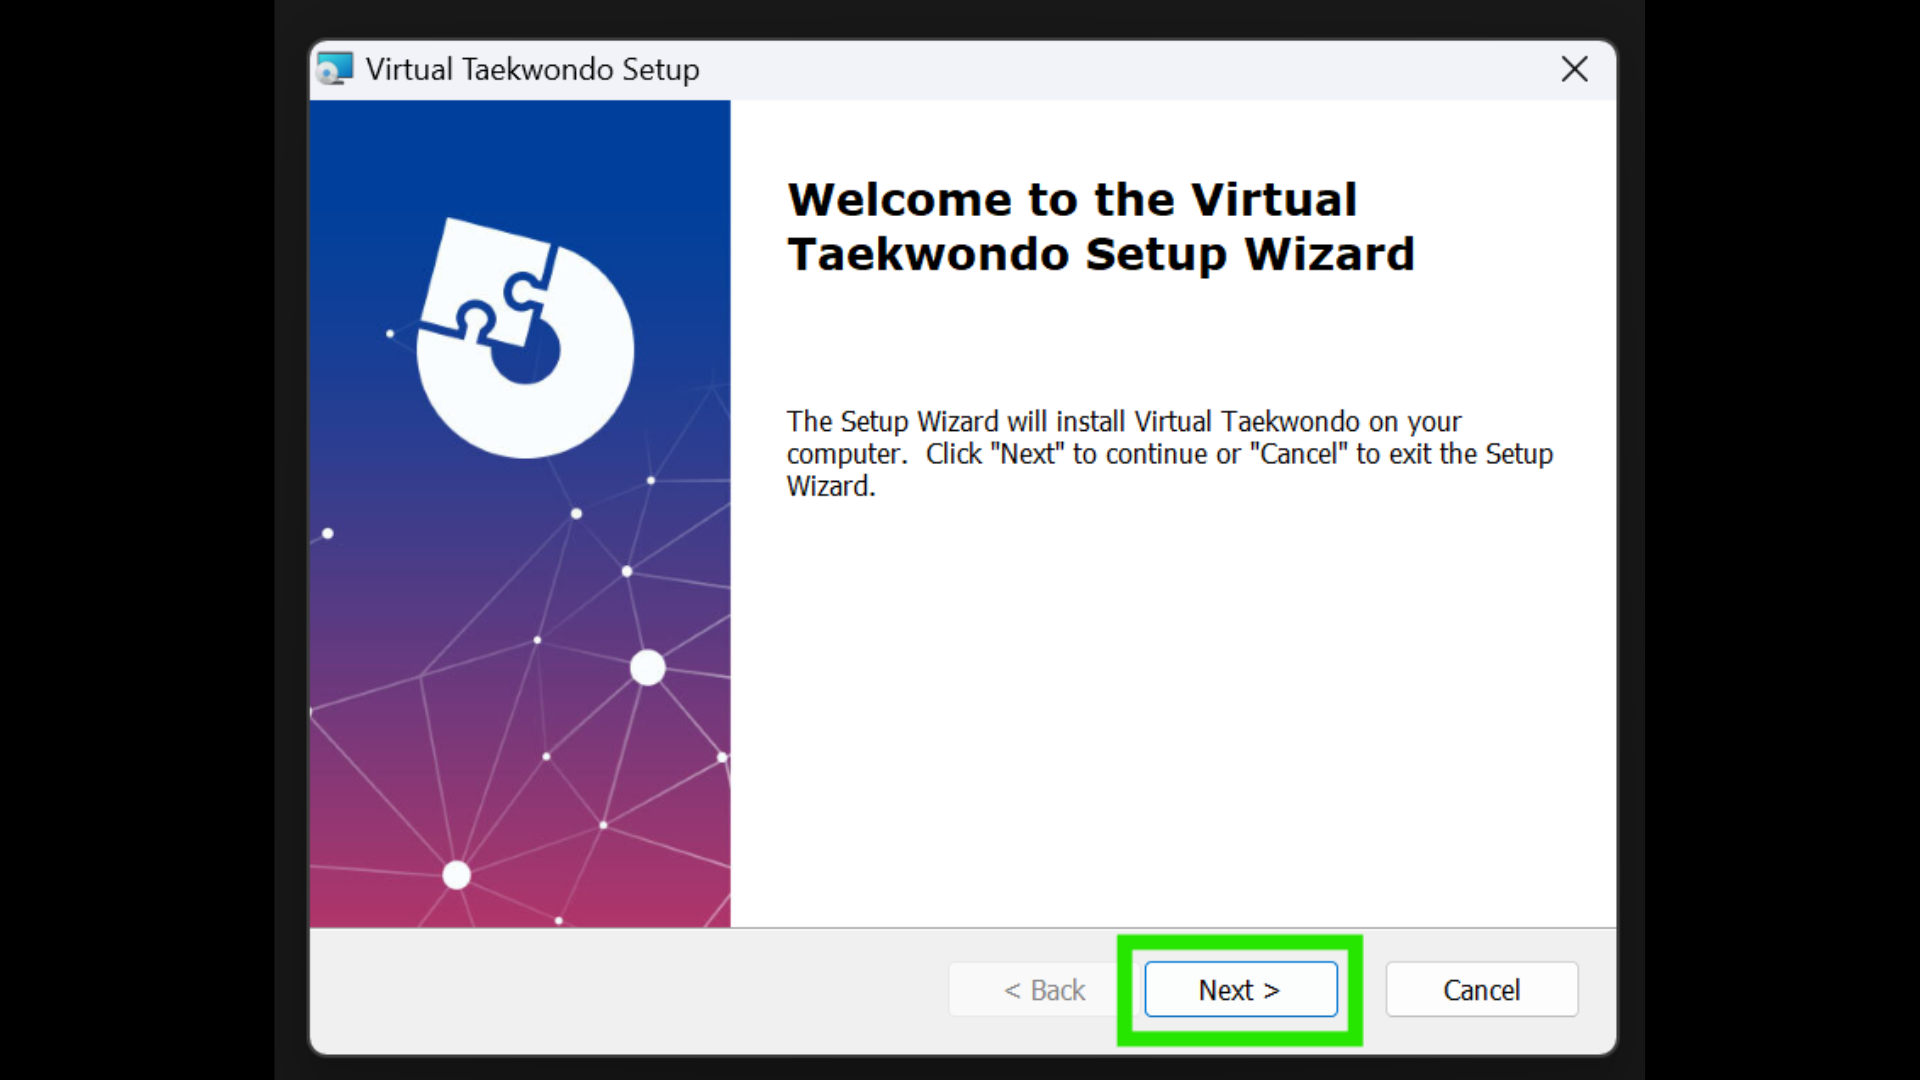
1. Locate the ‘vtkdu-installer…’downloaded game fille as explained under Account Setup & Build Download.

2. Double click on the installer file to launch the Virtual Taekwondo Setup Wizard.
3. Click ‘Next’ on the Setup Wizard.
4. Tick the checkbox about “I agree to the License...”.
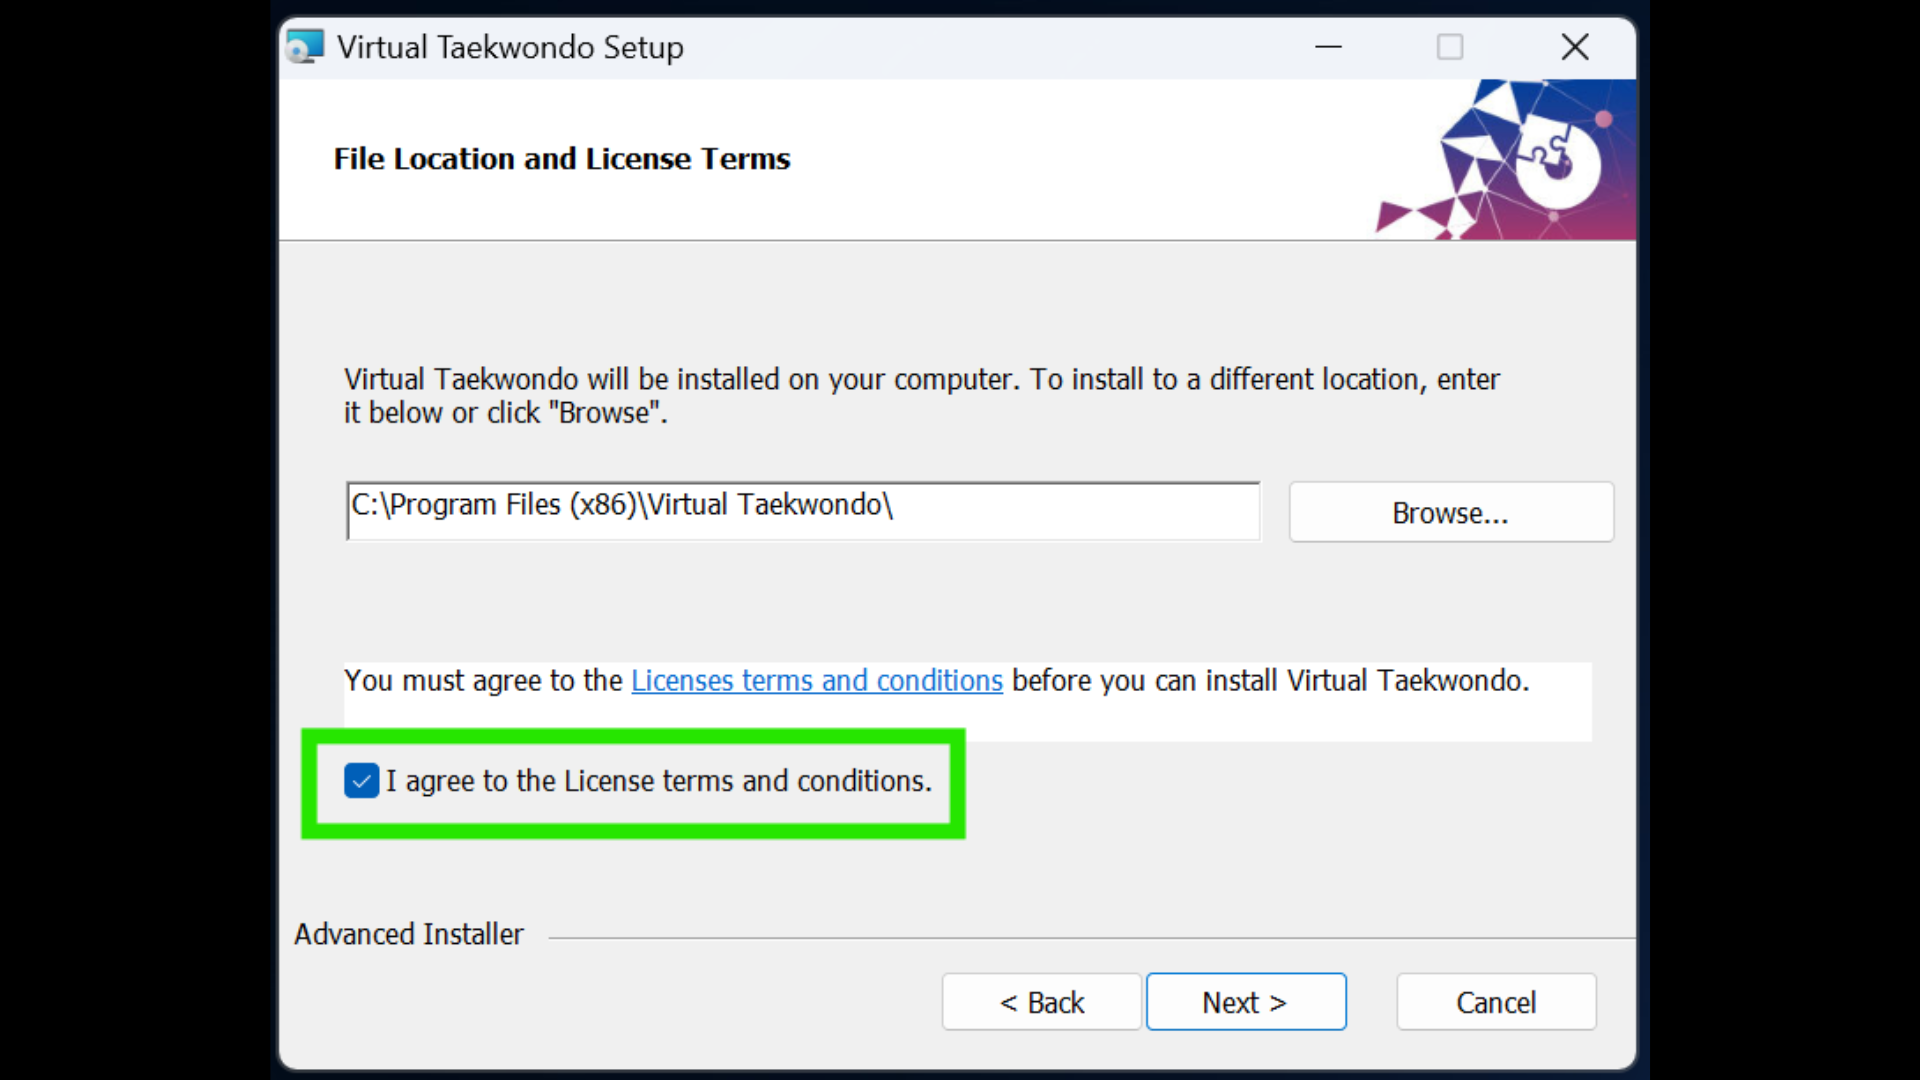
5. Click on 'Install'.
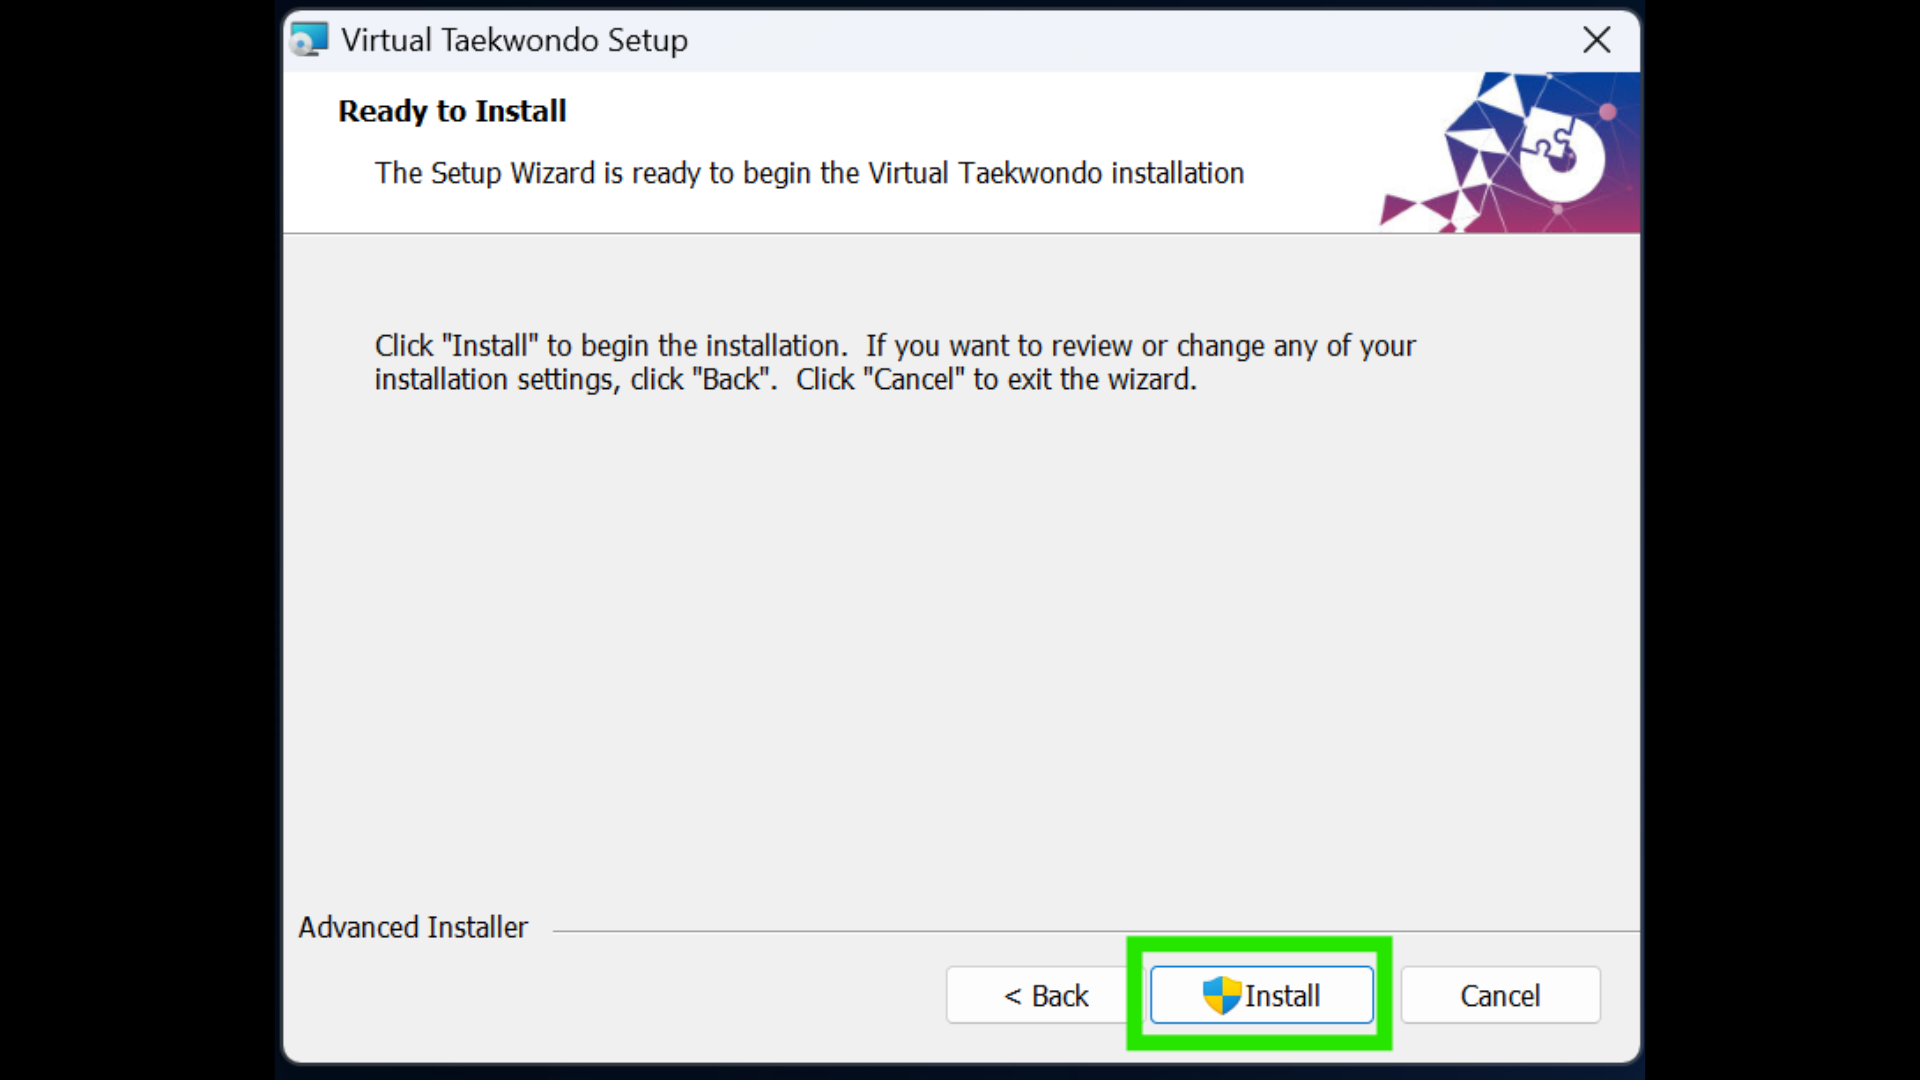
6. If Windows prompts a pop-up asking permission to make changes, click 'Yes'.

7. Once installation is done, click on 'Finish'.
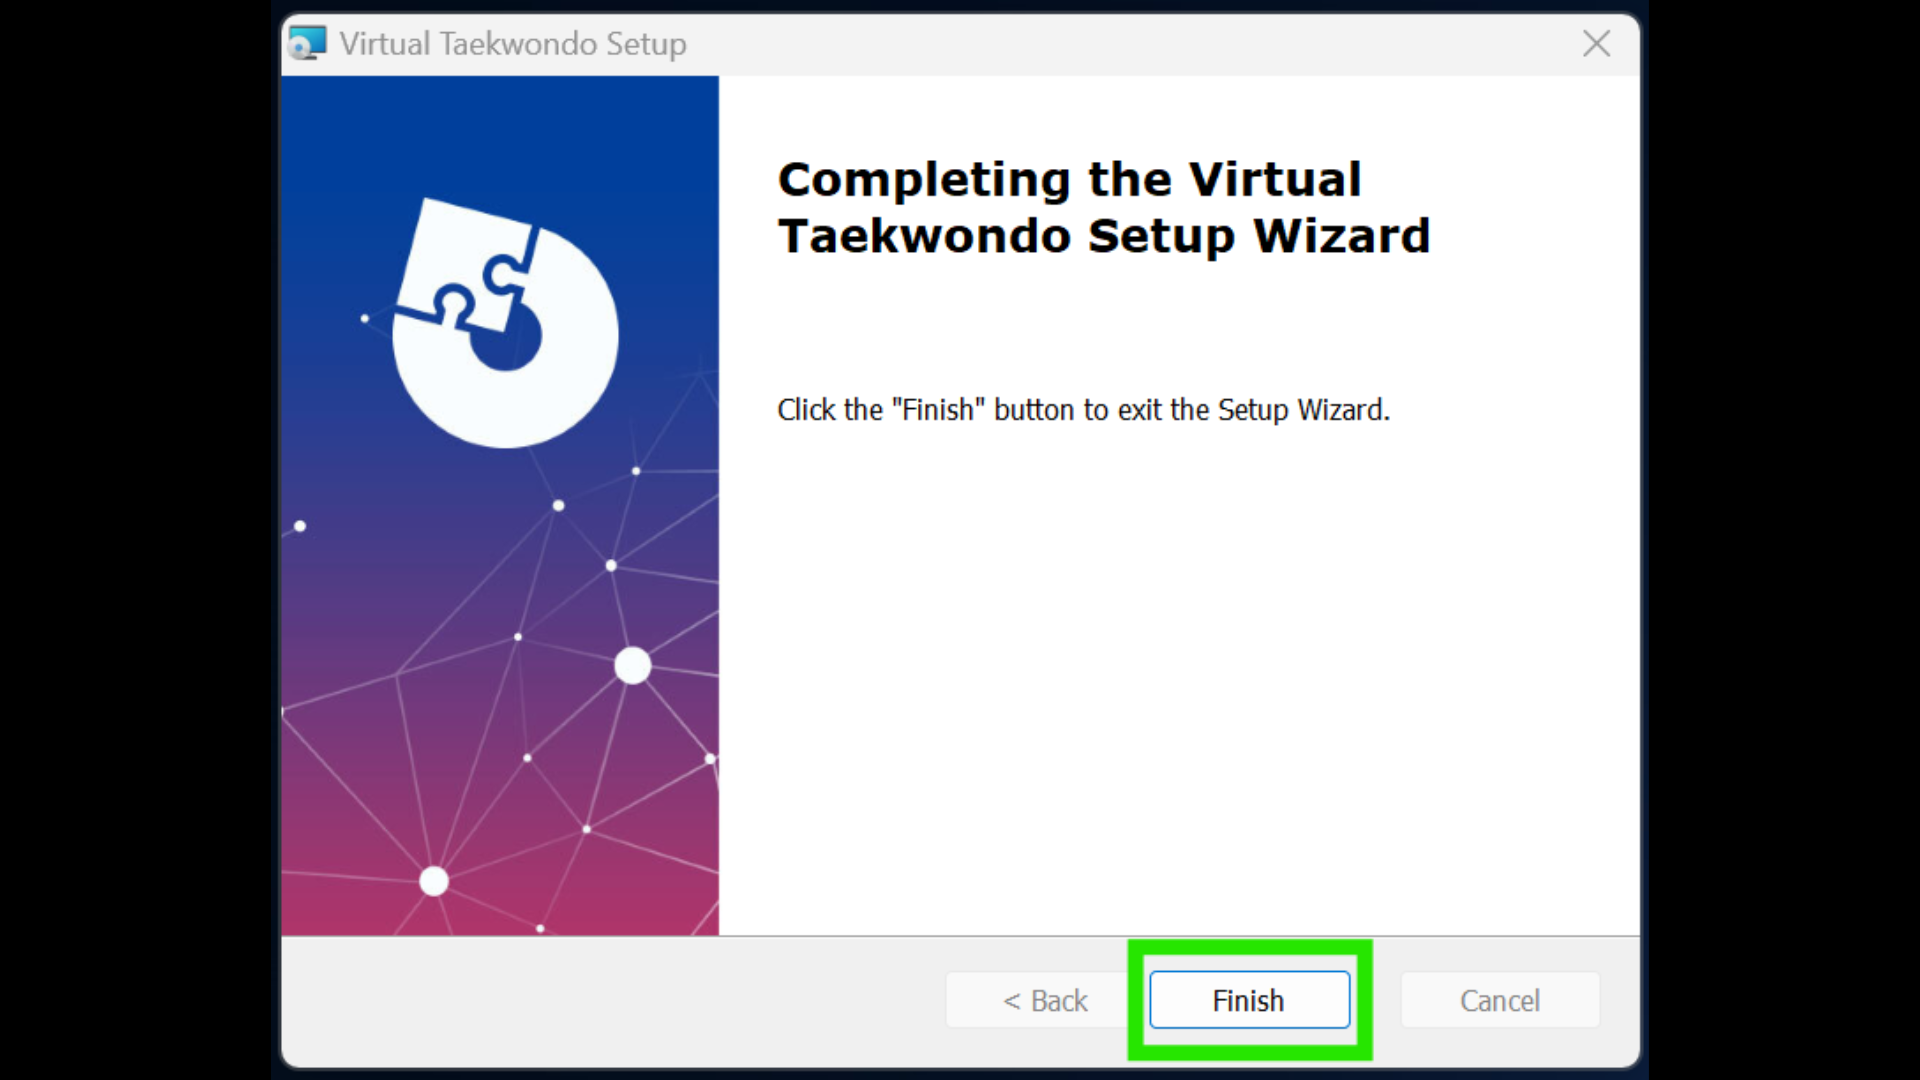
8. A “VTKDUPlayer” application shortcut will appear on your desktop.
b. PICO4 VR Headset Installation (Players)
*Before proceeding with the Headset installation, be sure to have completed the necessary setup for your PICO4 device and updated it to the latest version. You may refer to the PICO Setup.
1. Turn on the headset.
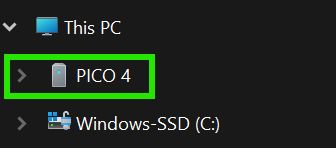
2. Connect the headset to PC via USB-C. PICO4 should appear as a drive on your PC.
3. Locate the “Android-PICO…”downloaded game file on your PC, as explained in VKTD Account Setup & Build Download.
4. Right-click on 'Android-PICO…', then select and click 'Extract All...'.
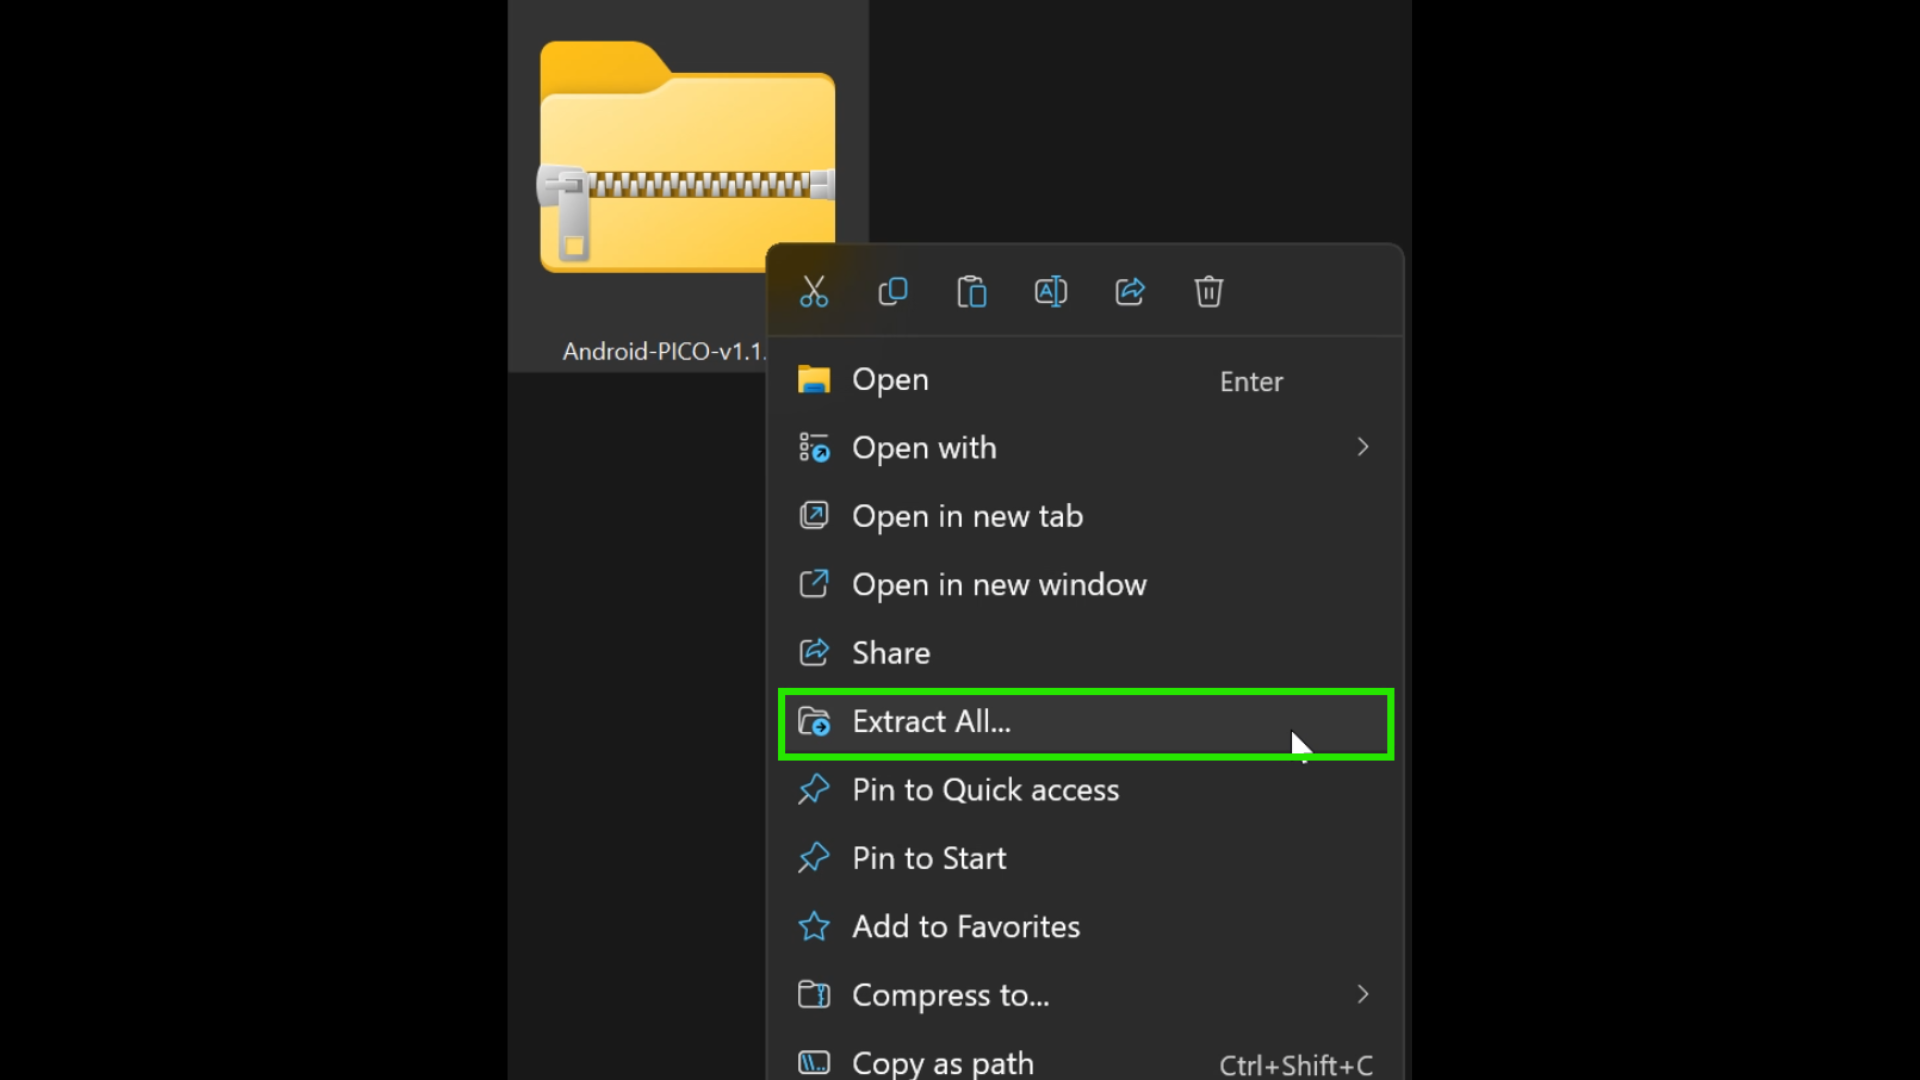
5. Specify the path of the extracted file or just use default and click 'Extract'.
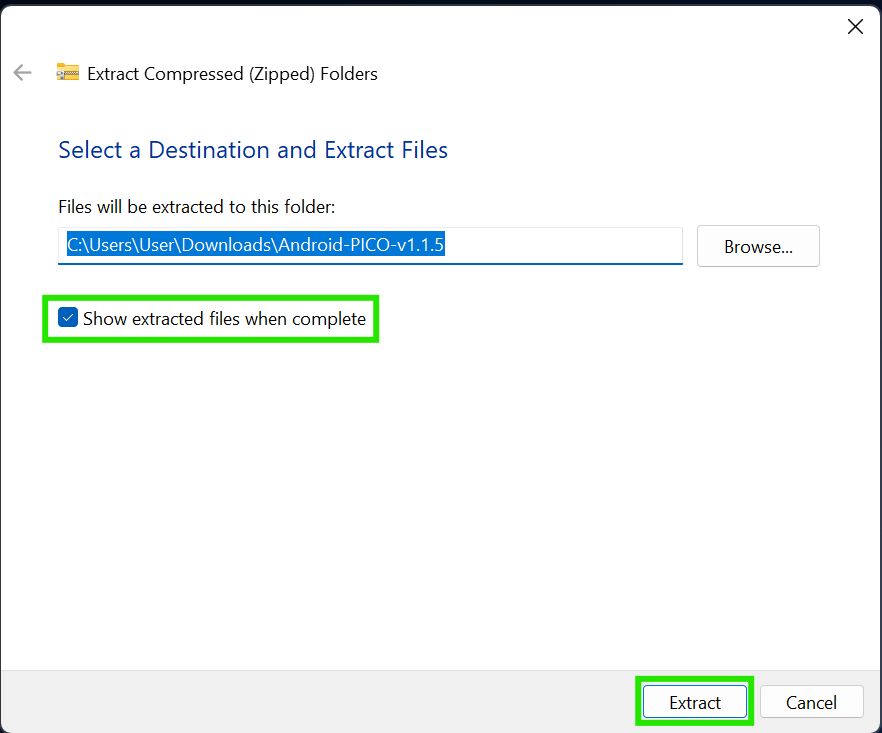
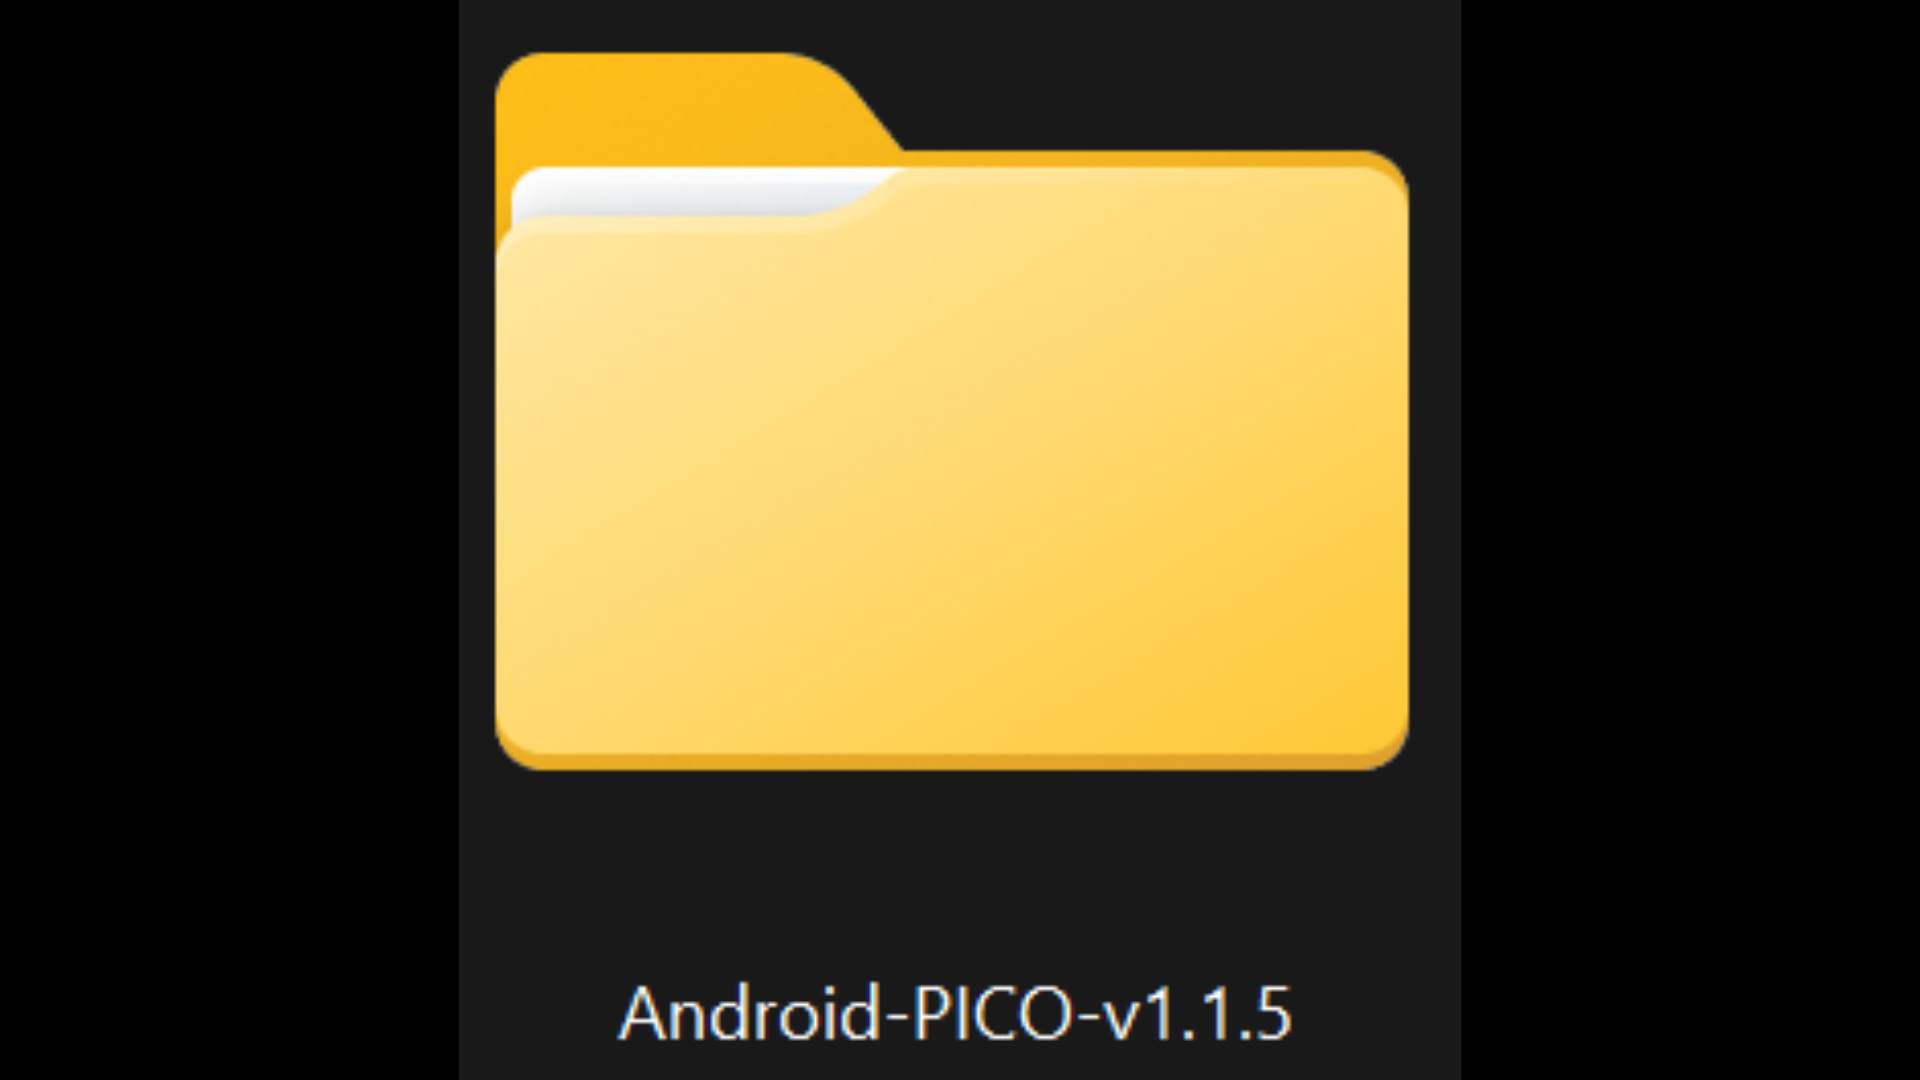
6. Once files are extracted, locate the “Android-PICO...” folder.
Note: If you have difficulty extracting the folder, try using the WinRAR application.
7. Within the “Android-PICO...” folder, locate the “Android_Install.bat” file.
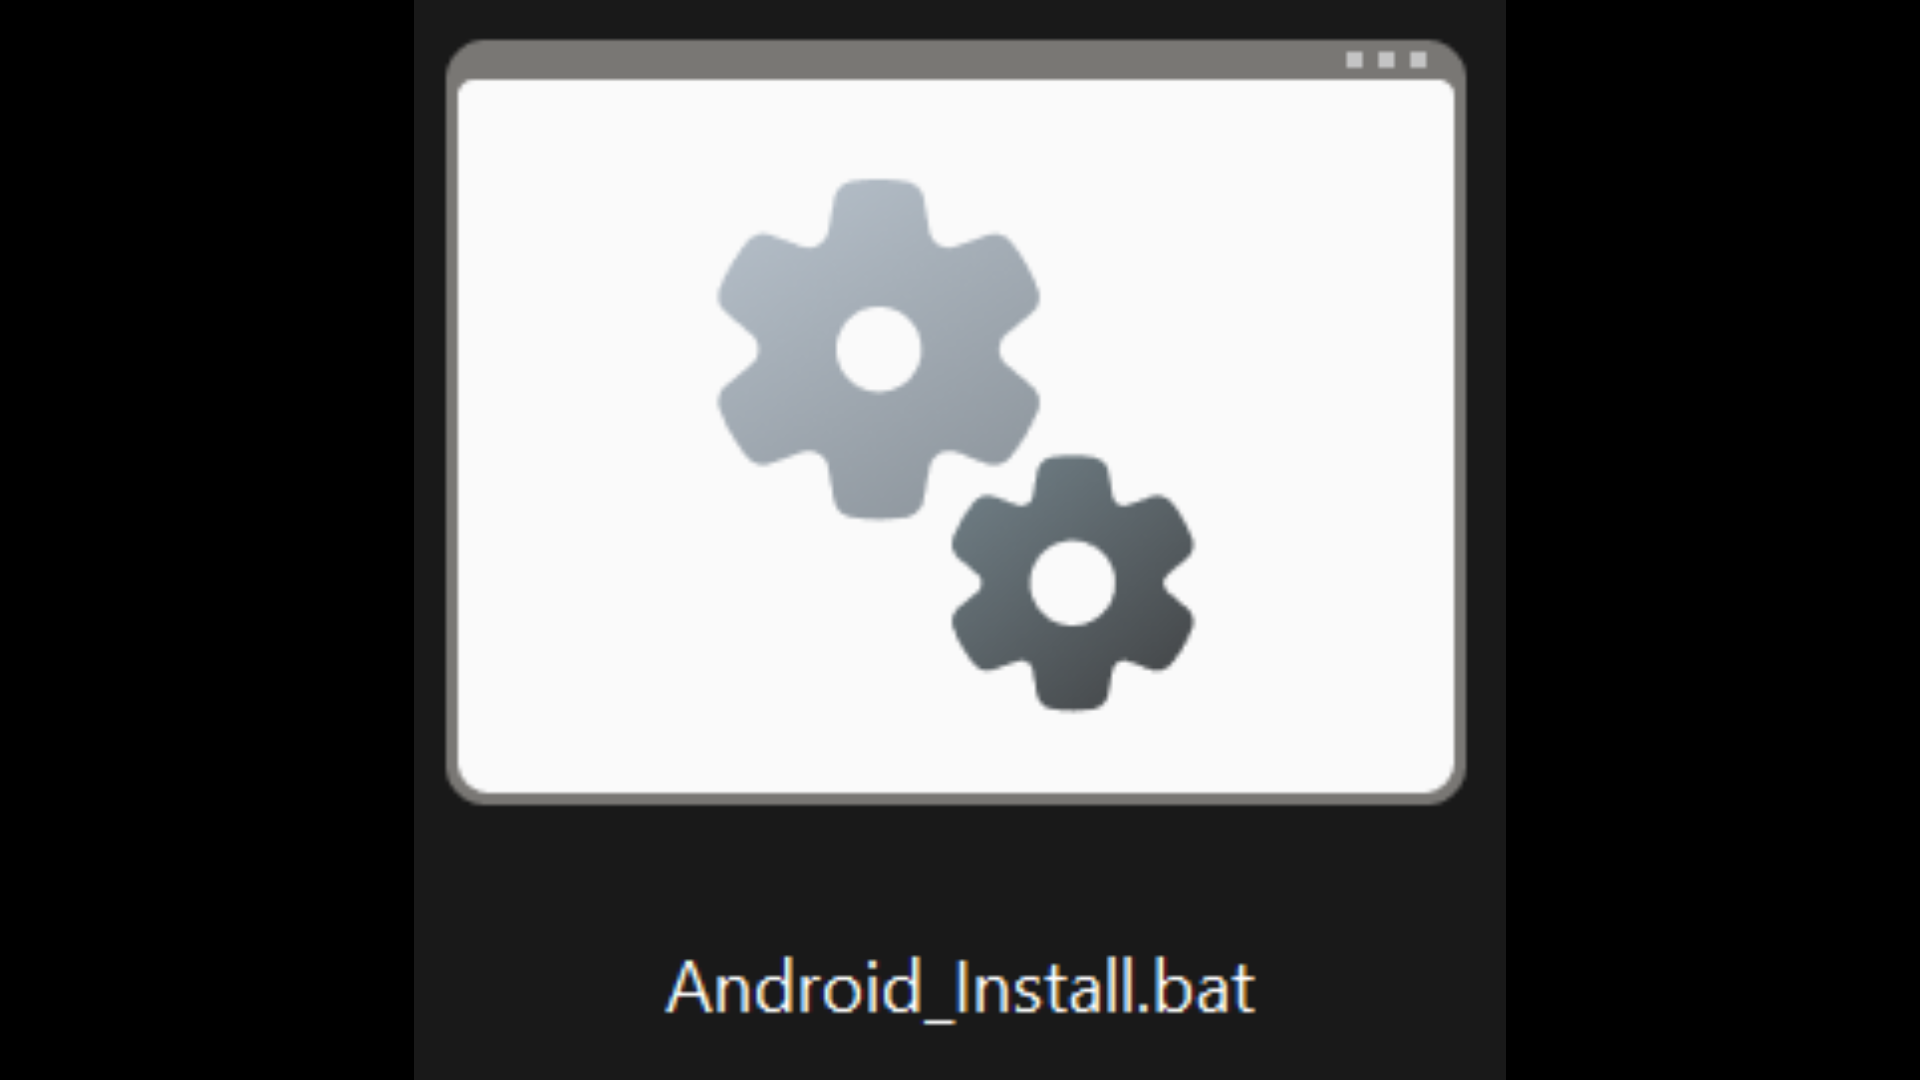
8. Double click on the “Android_Install.bat” file and the installation will start.
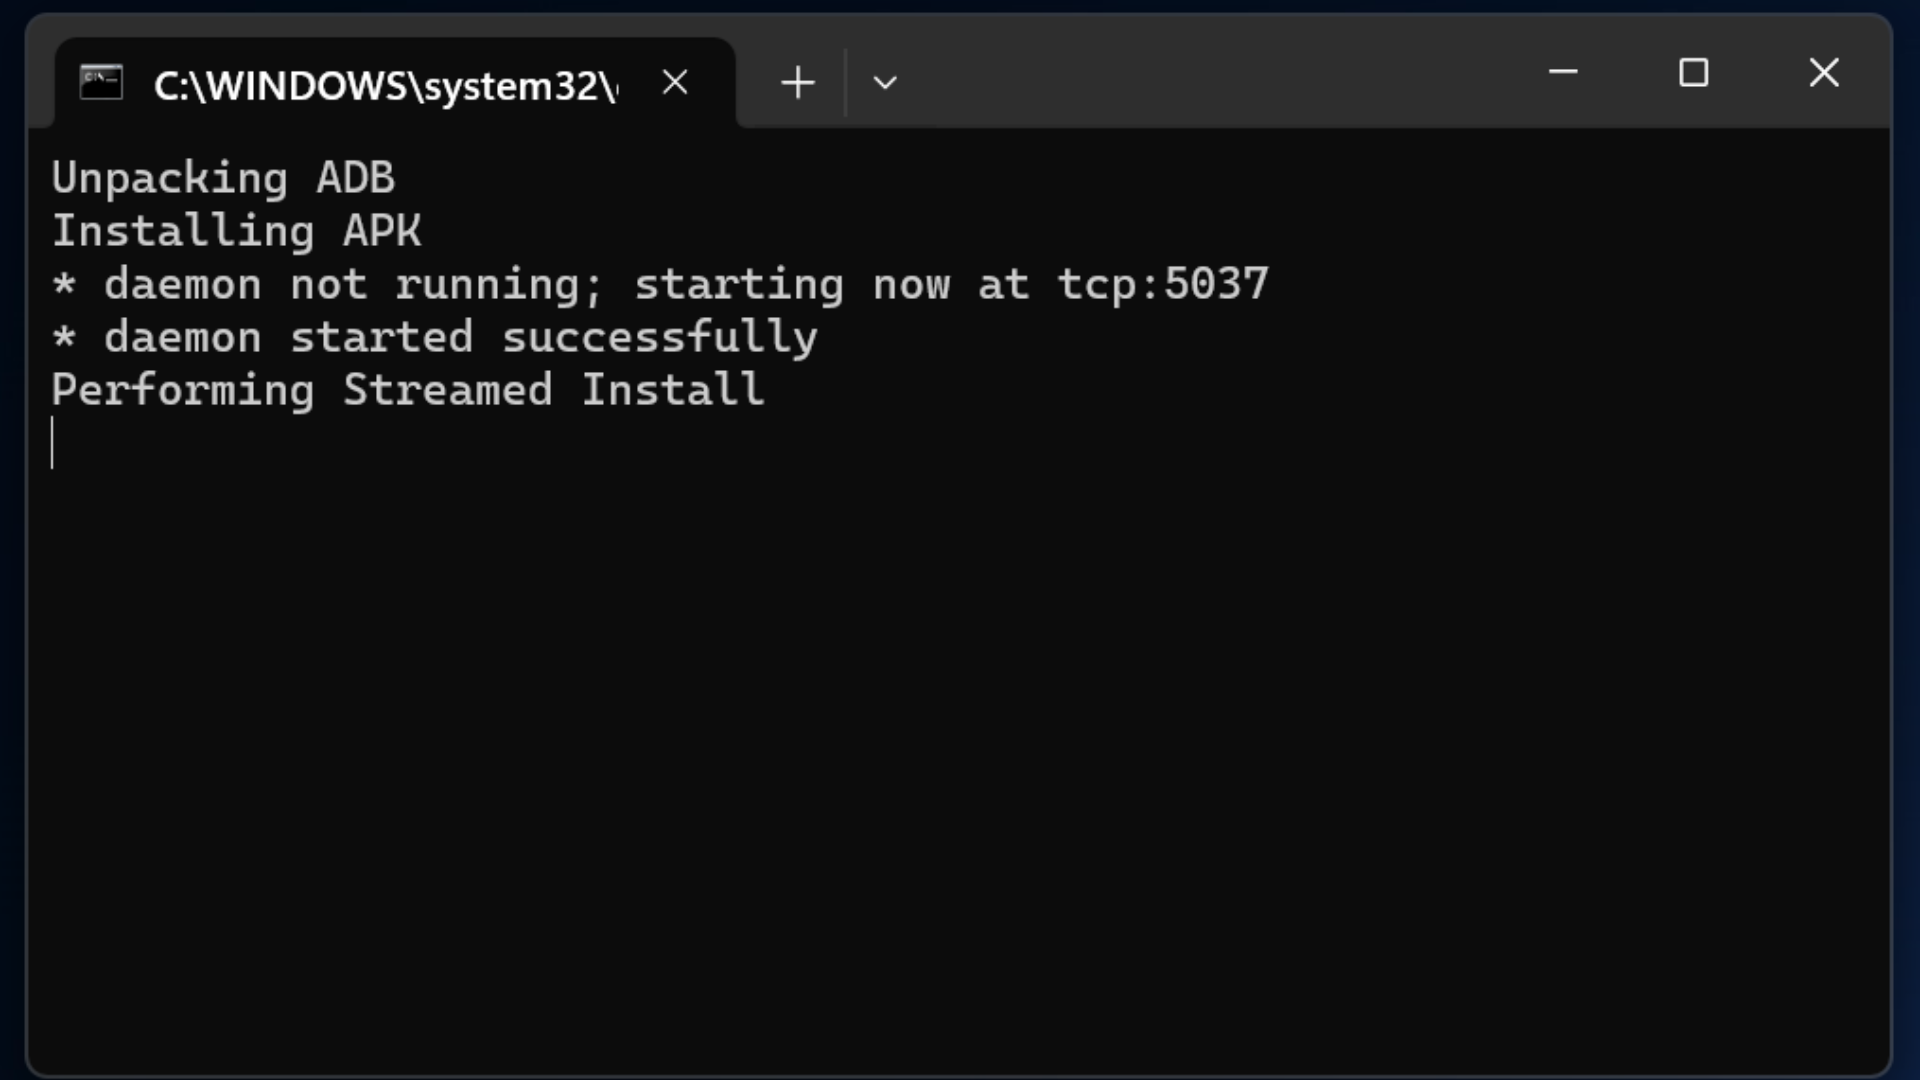
If Windows prompts “Windows protected...”, click 'More Info' and 'Run anyway'.
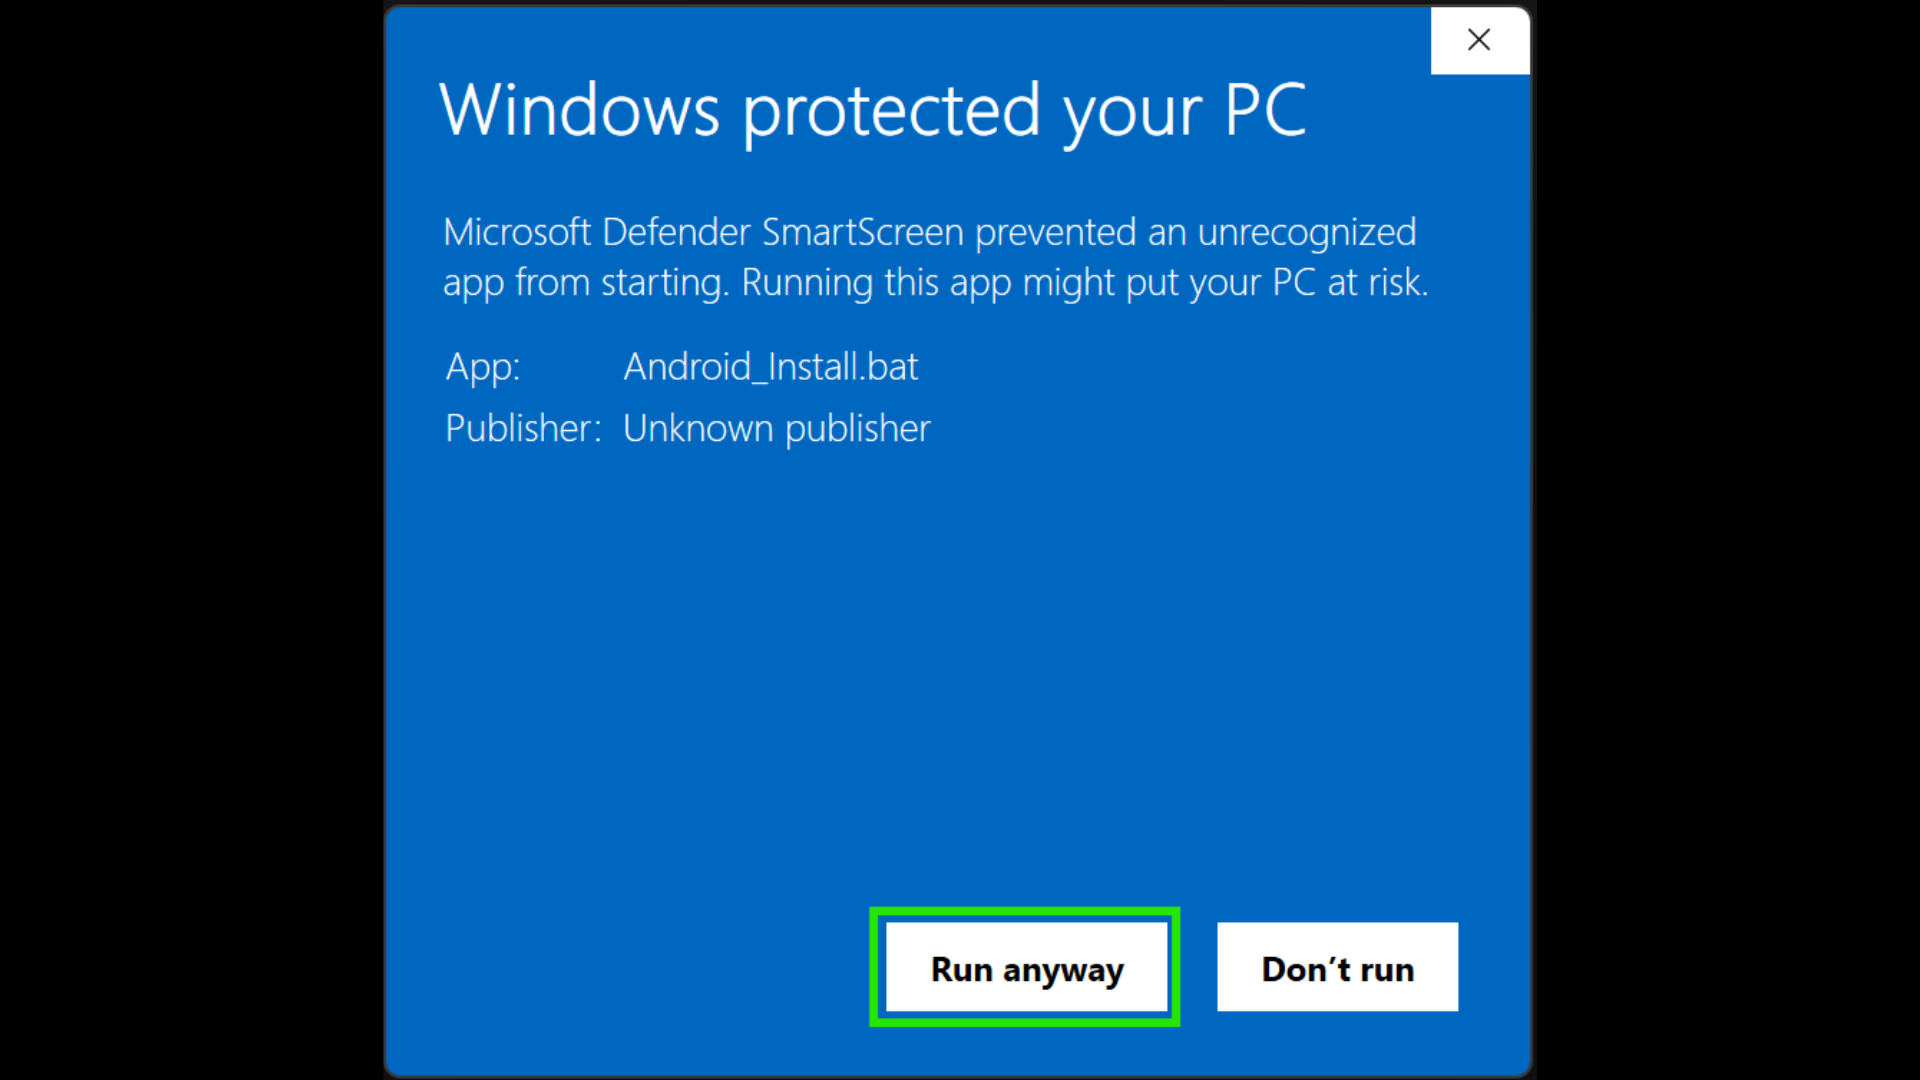
9. Once the installation is completed, there will be a “...Success...” indication;
you can now disconnect the PICO4 from the PC.
Video reference:
-----------------------------------------------------------------
6. Types of Calibration
There are 3 different types of calibration. 2 that needs to be done before an event/competition, and 1 during:
Before
1. Magnetometer Calibration (PC and AXIS)
2. Surface Calibration (PC and AXIS) [Recommended to be done once, for every 4 hours of use]
During
3. In-Game Calibration (VR Headset and AXIS)
Magnetometer Calibration (PC and AXIS)
The Magnetometer Calibration is required to calibrate the magnetometer of the AXIS motion trackers to ensure they correctly identify the direction of the earth's magnetic field, and not to other magnetic interferences. This only needs to be done ONCE before the event.
Here are the steps to doing a Magnetometer Calibration:
- Detach the charger from the charging dock
- Put the nodes in the charging dock
- Ensure that the nodes are turned on
- Close the lid of the charging dock
- Start Magnetometer Calibration
- X-axis: Flip the charging dock along the X-axis
- Z-axis: Flip the charging dock along the Z-axis
- Y-axis: Rotate the charging dock along the Y-axis
Video reference:
Surface Calibration (PC and AXIS)
The Surface Calibration is required to calibrate the magnetometer of the AXIS motion trackers to the specific direction that the Players will be facing, to ensure it correctly identify the player's forward position. This calibration is to be done at the player's starting point on the Field of Play.
It is recommended to be done once, for every 4 hour session. This reduces the frequency of In-Game Calibration (will be introduced below in the 'In-Game Calibration' section).
Here are the steps to doing a Surface Calibration:
1. Plug in your dongle to your PC
2. Open the AXIS Control Center application on your PC
3. Ensure your 5 motion trackers for VTKD are paired in the right position in the 'Device Manager' tab.
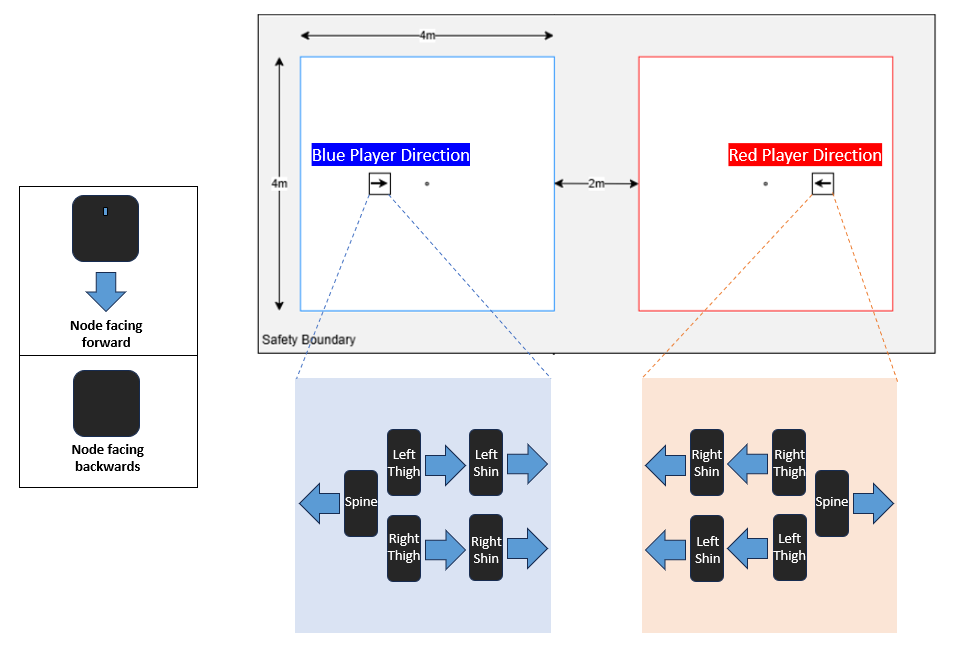
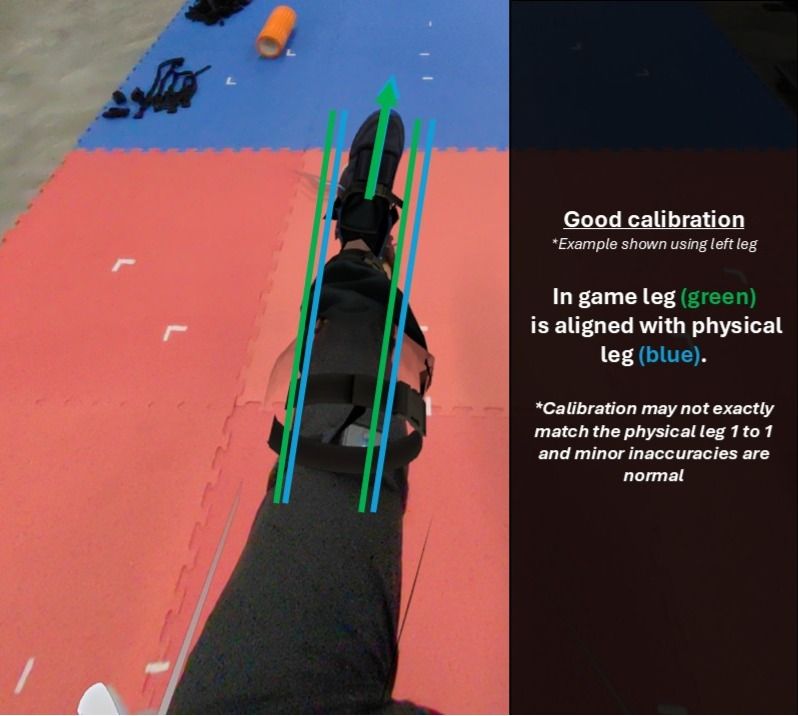
4. Place your motion trackers on the Player's start point in the Field of Play, simulating the direction that the player will be facing (Refer to image for Players direction example).
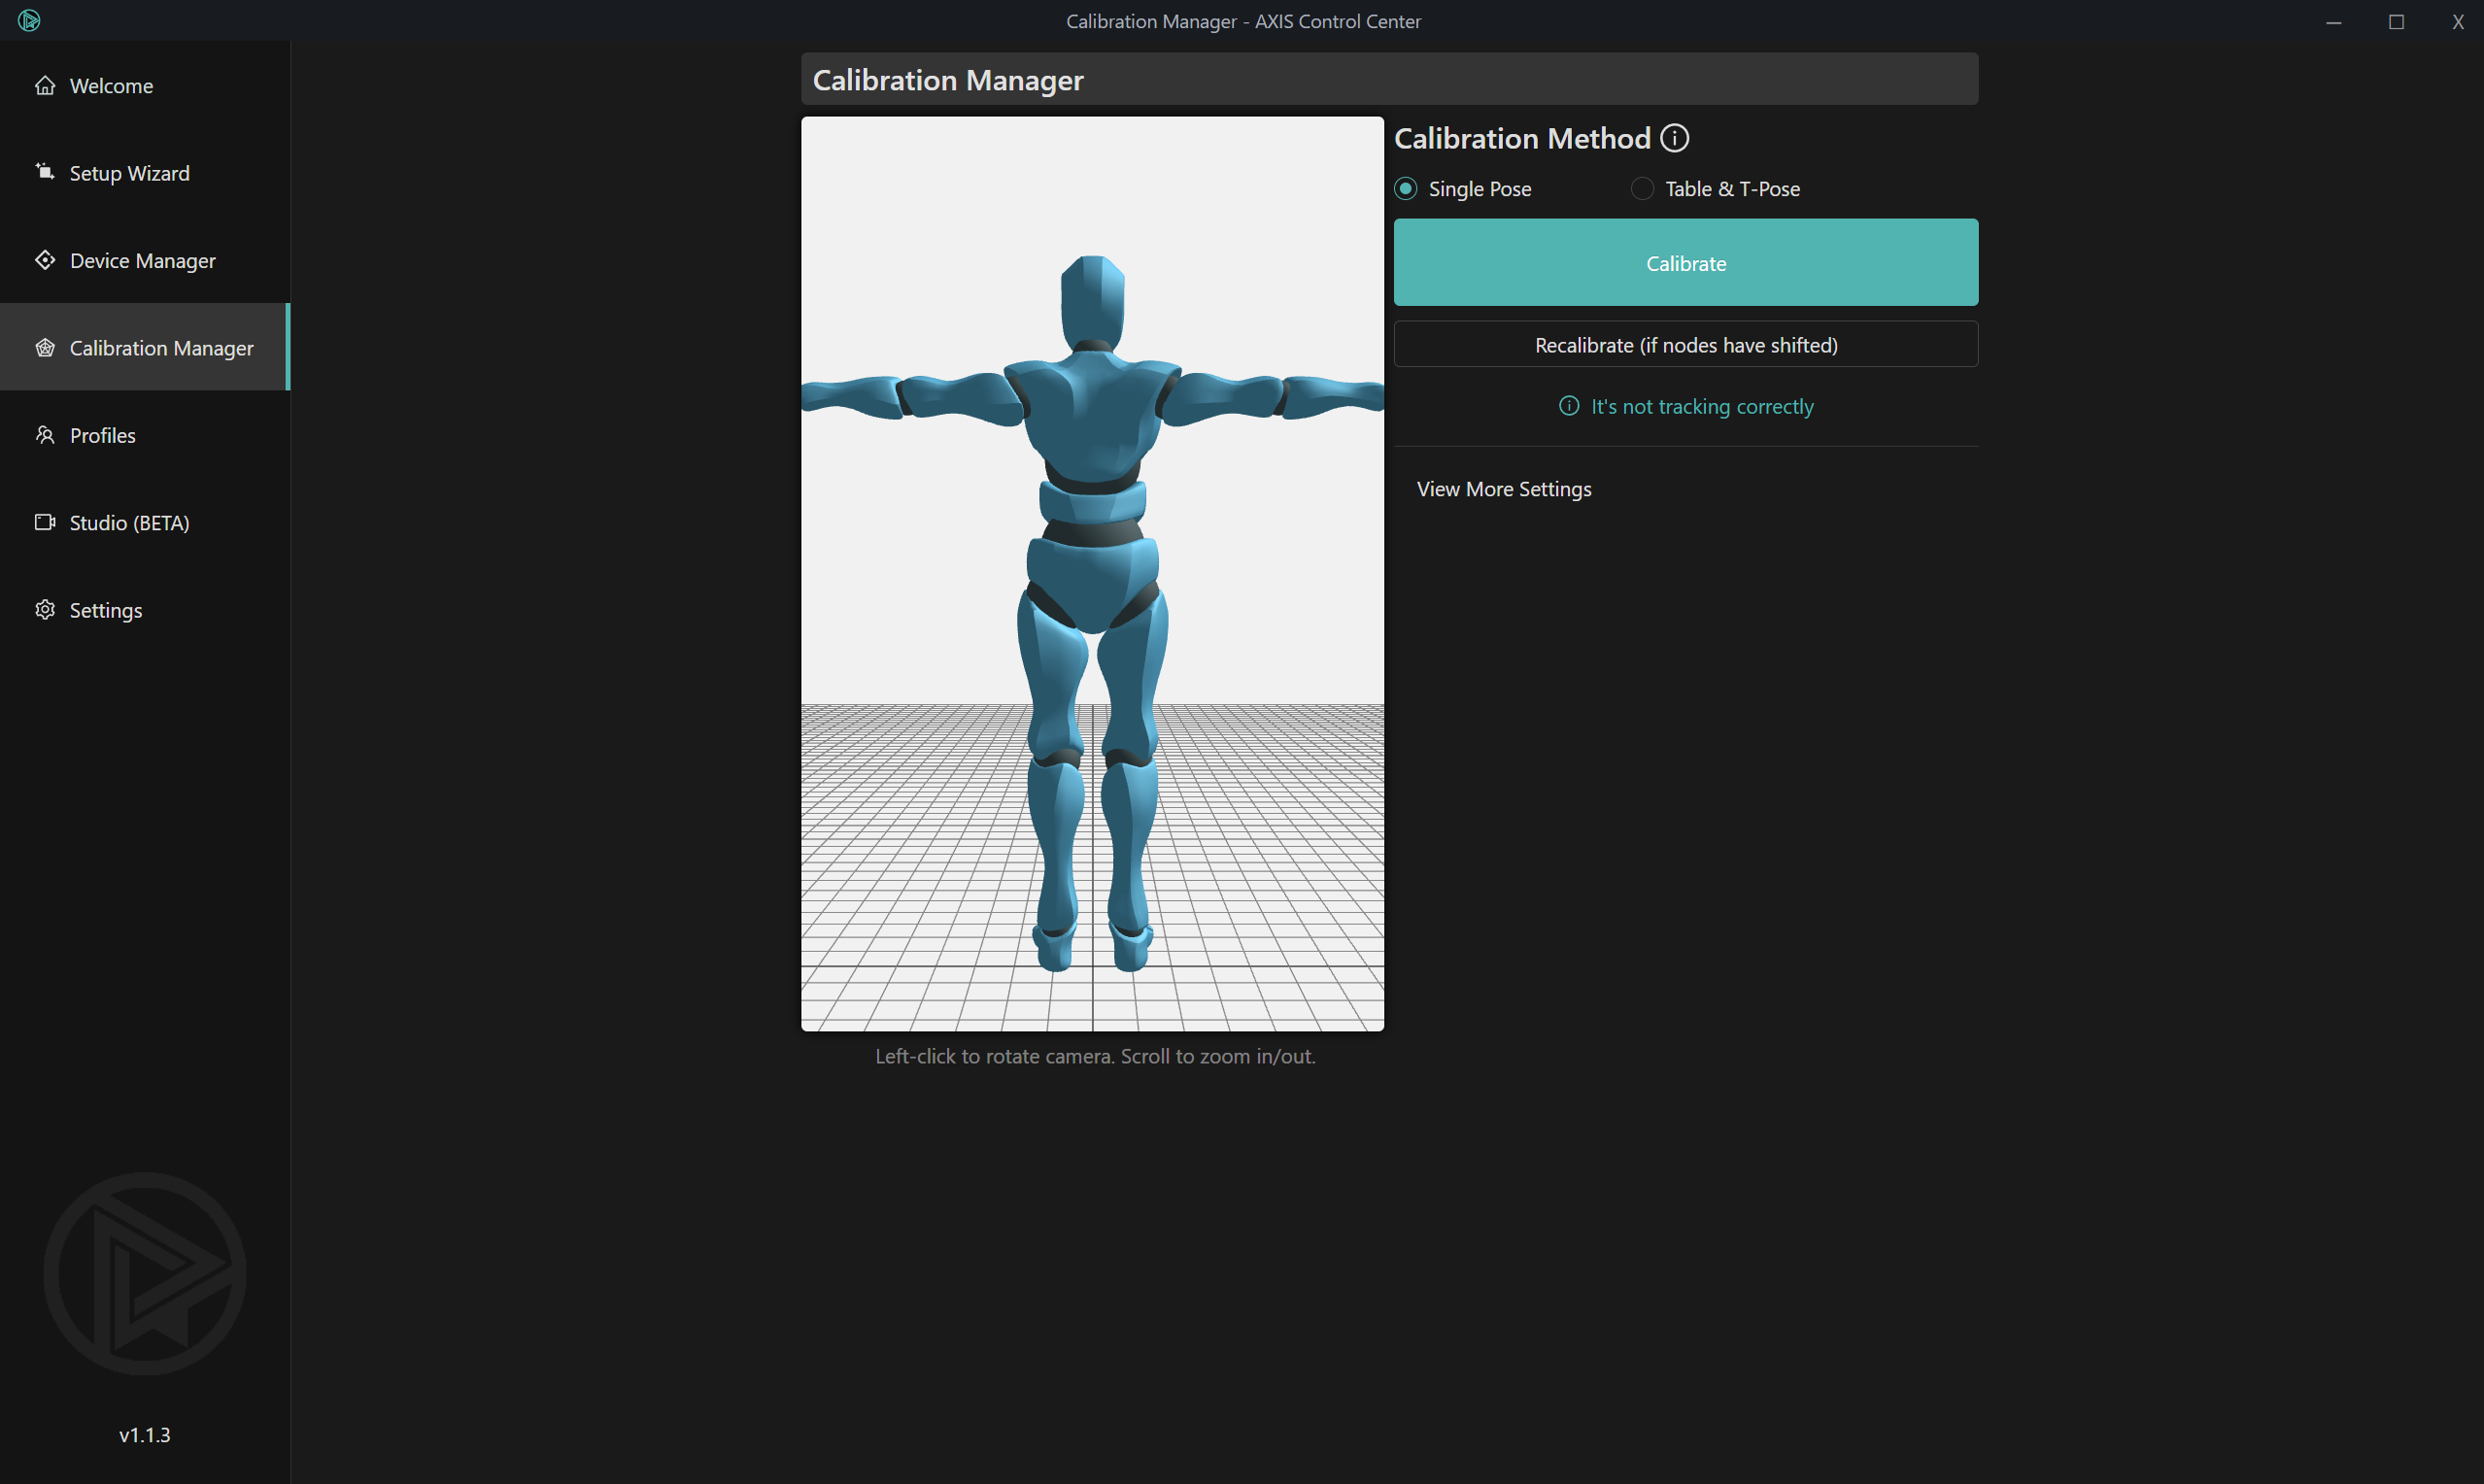
5. Go to the 'Calibration Manager' tab, on select the 'Single Pose' Calibration Method. Click on 'Calibrate'.
6. Click on 'Calibrate' in the 'T-Pose Calibration' pop-up.
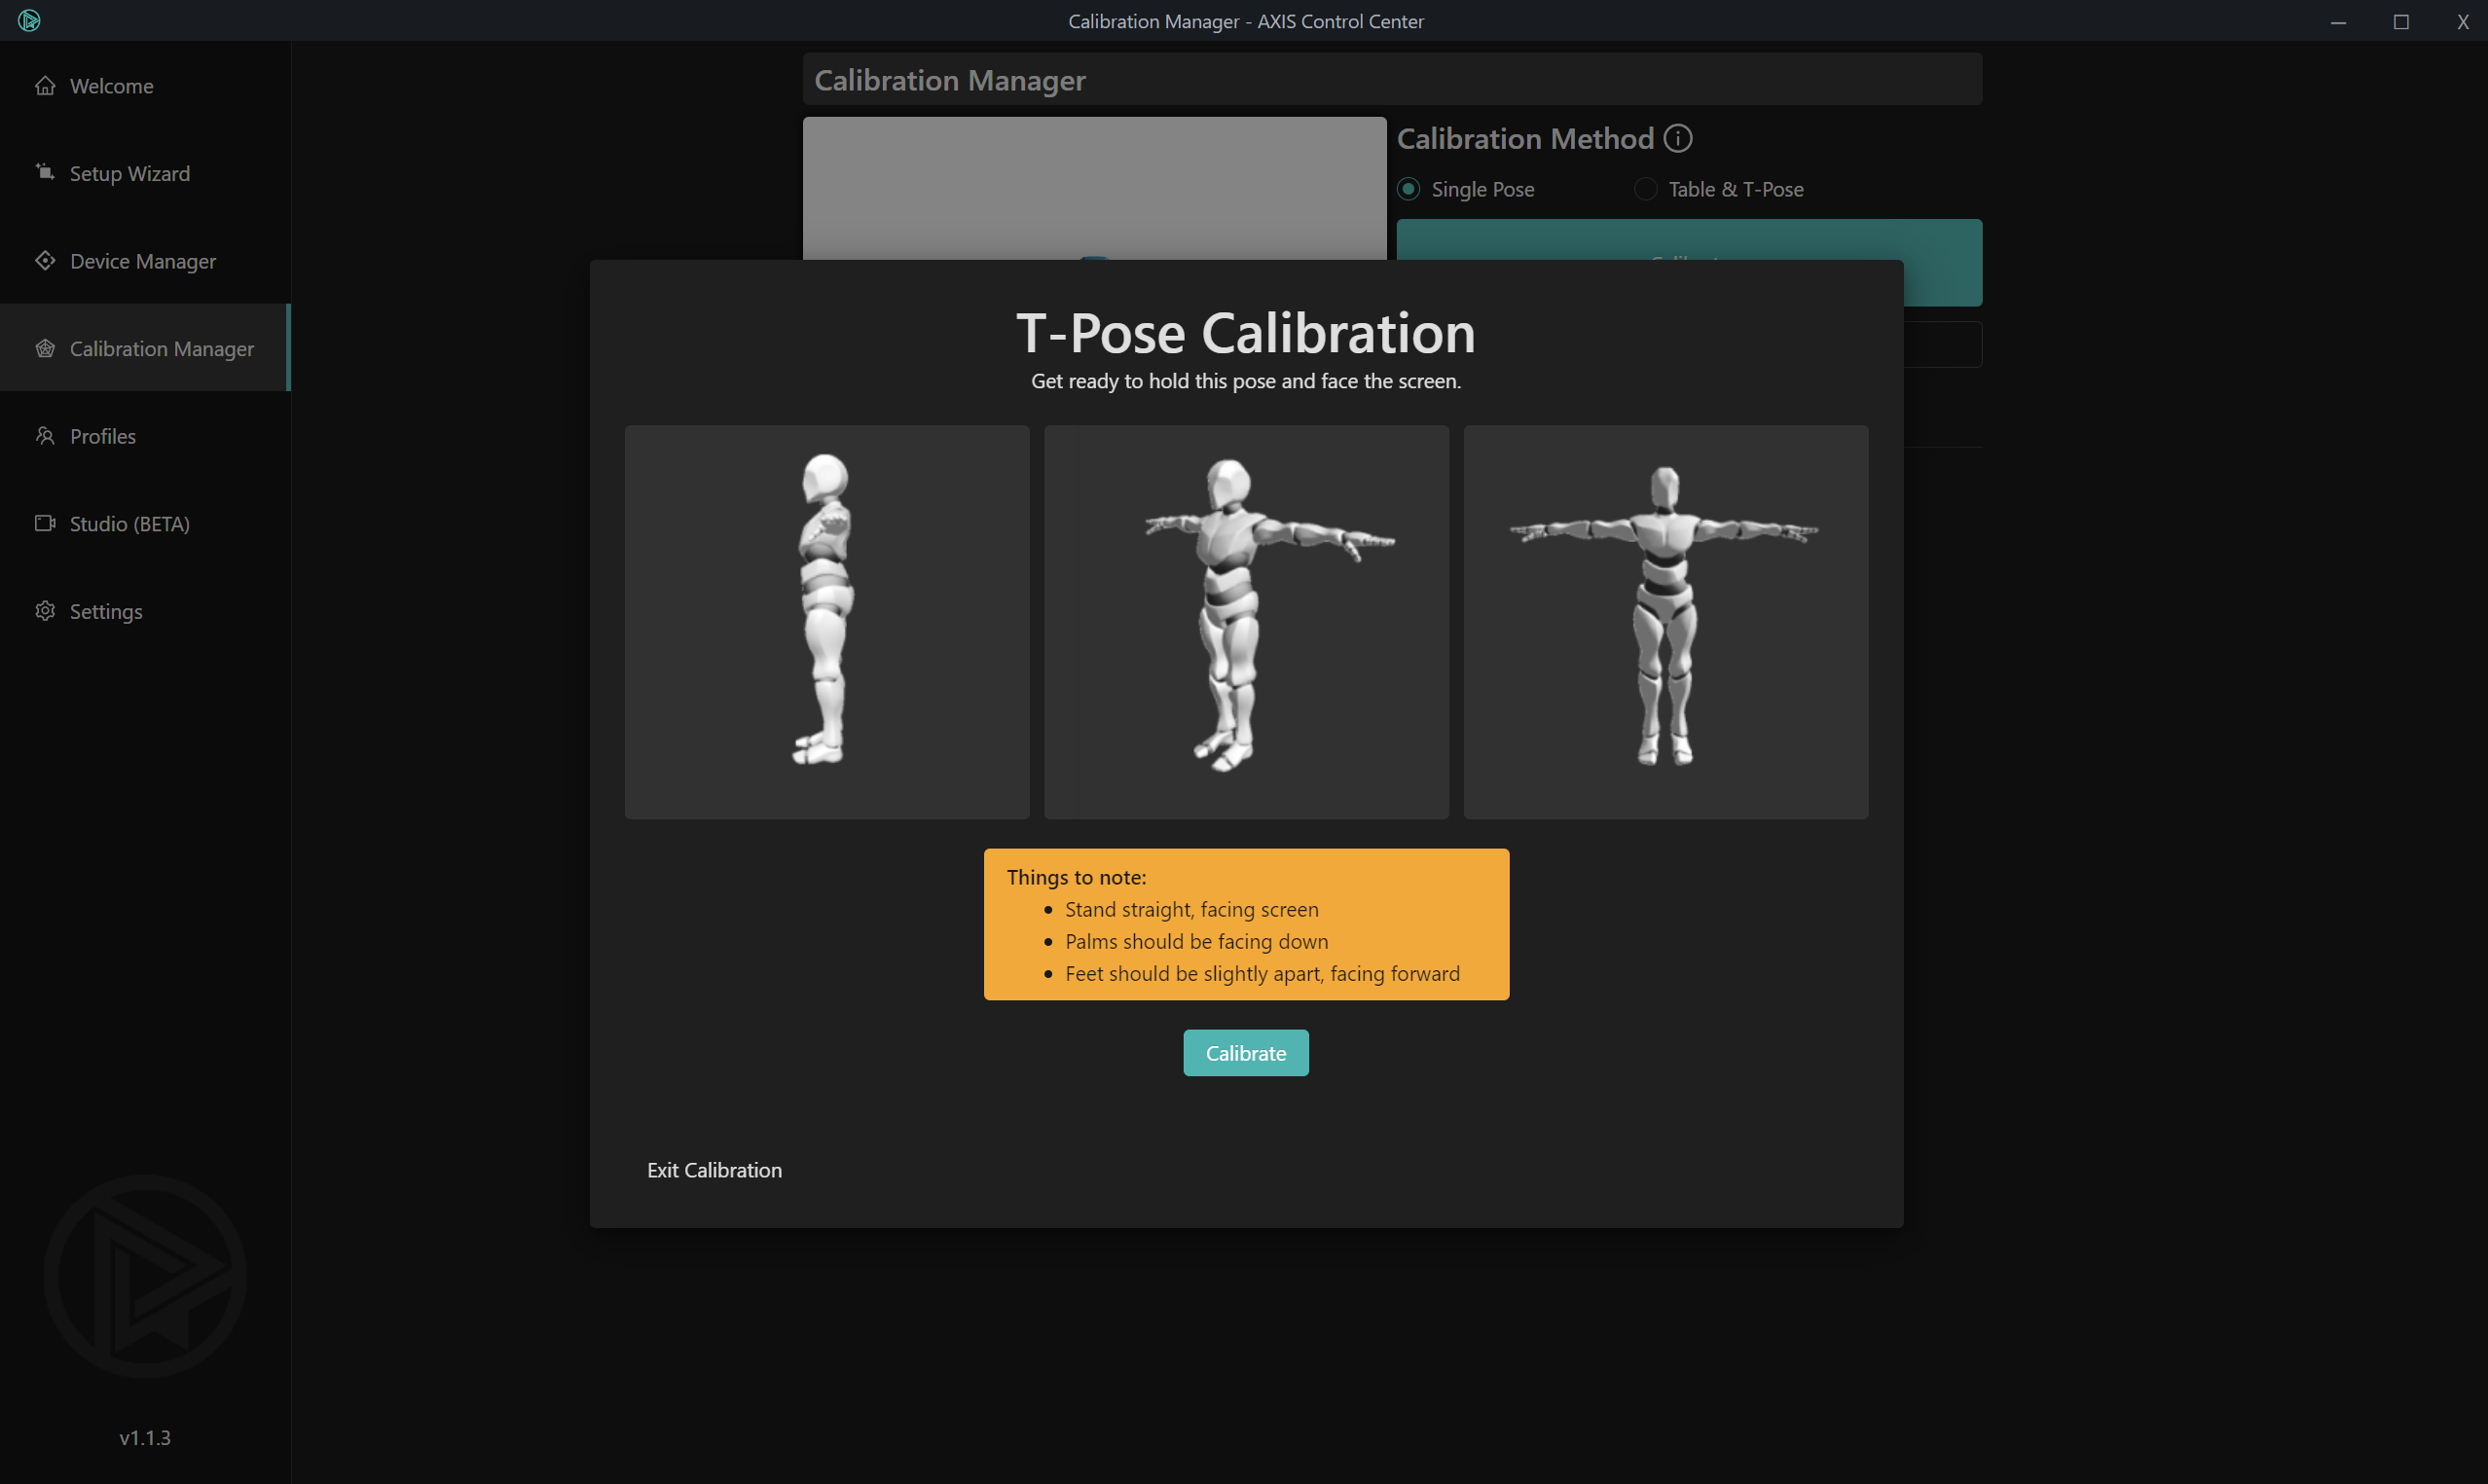
7. A 3 second countdown timer will begin, and disappear once the calibration is done.
Surface Calibration Workaround
Why Surface Calibration may not work in some FOPs
Surface Calibration relies on stable sensor conditions across the play area. In some venues, the magnetic field can fluctuate significantly across the floor, especially when the FOP has:
- Different mats/tiles with varying magnetic properties
- Gaps or uneven transitions between mats
- Nearby metal structures/equipment (or other environmental interference)
Note: When the magnetic field varies significantly from one spot to another, Surface Calibration can become unstable and the avatar legs may not align correctly.
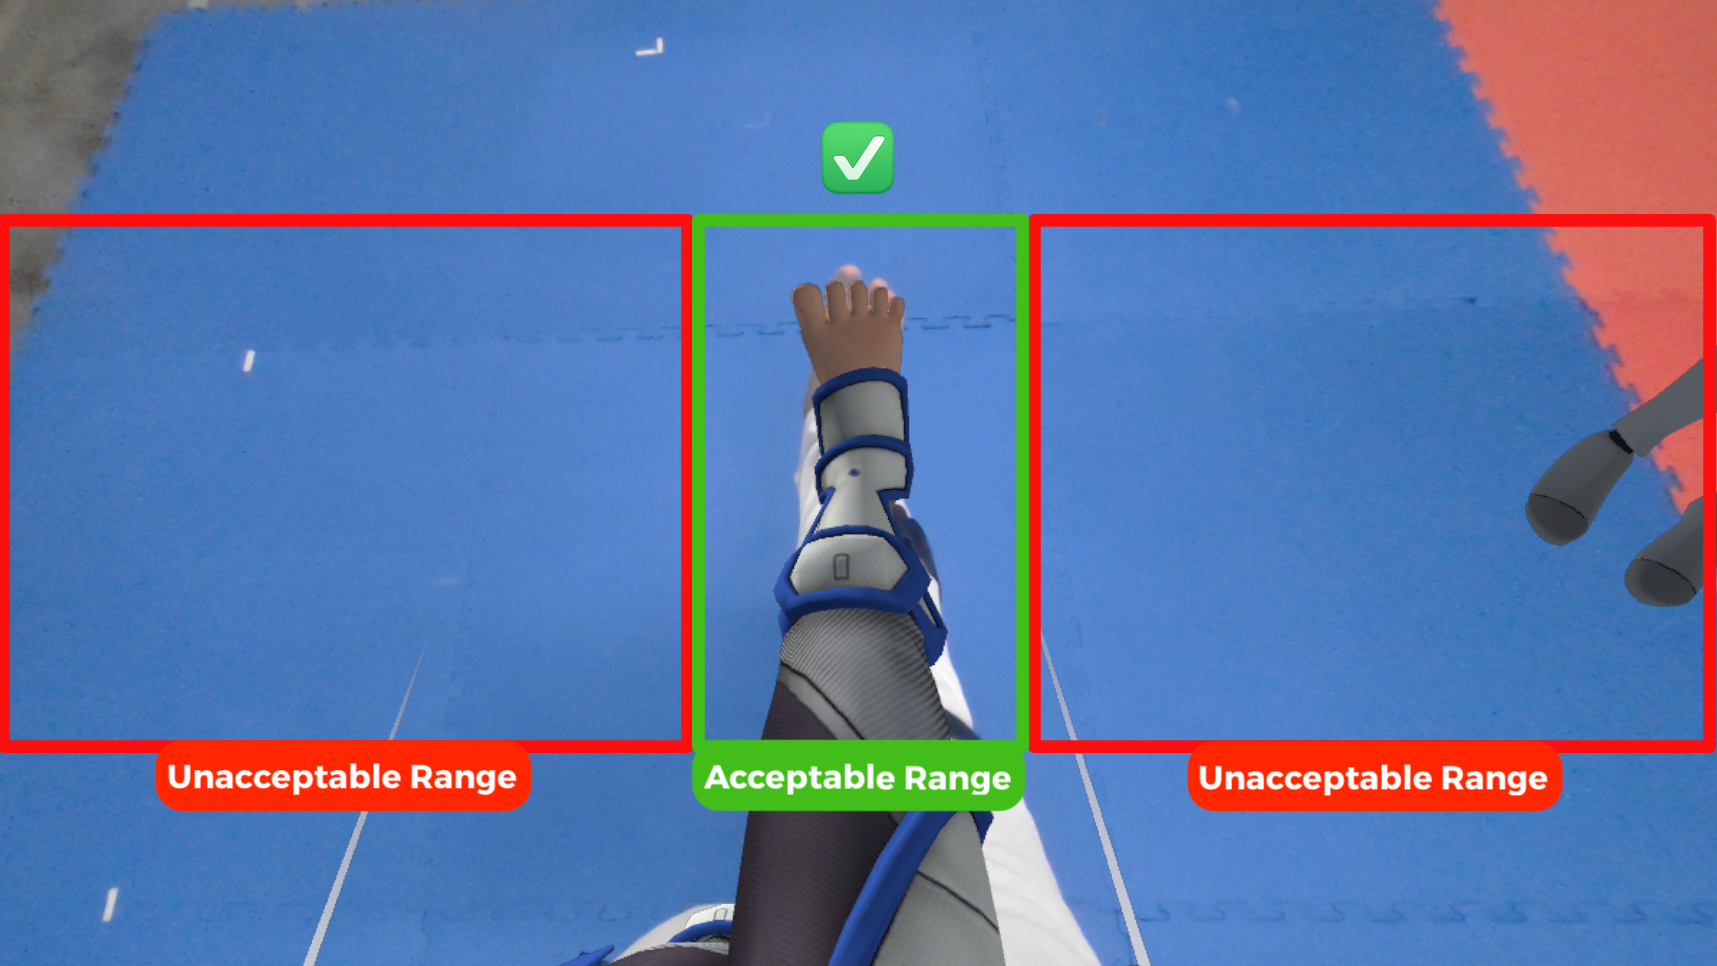
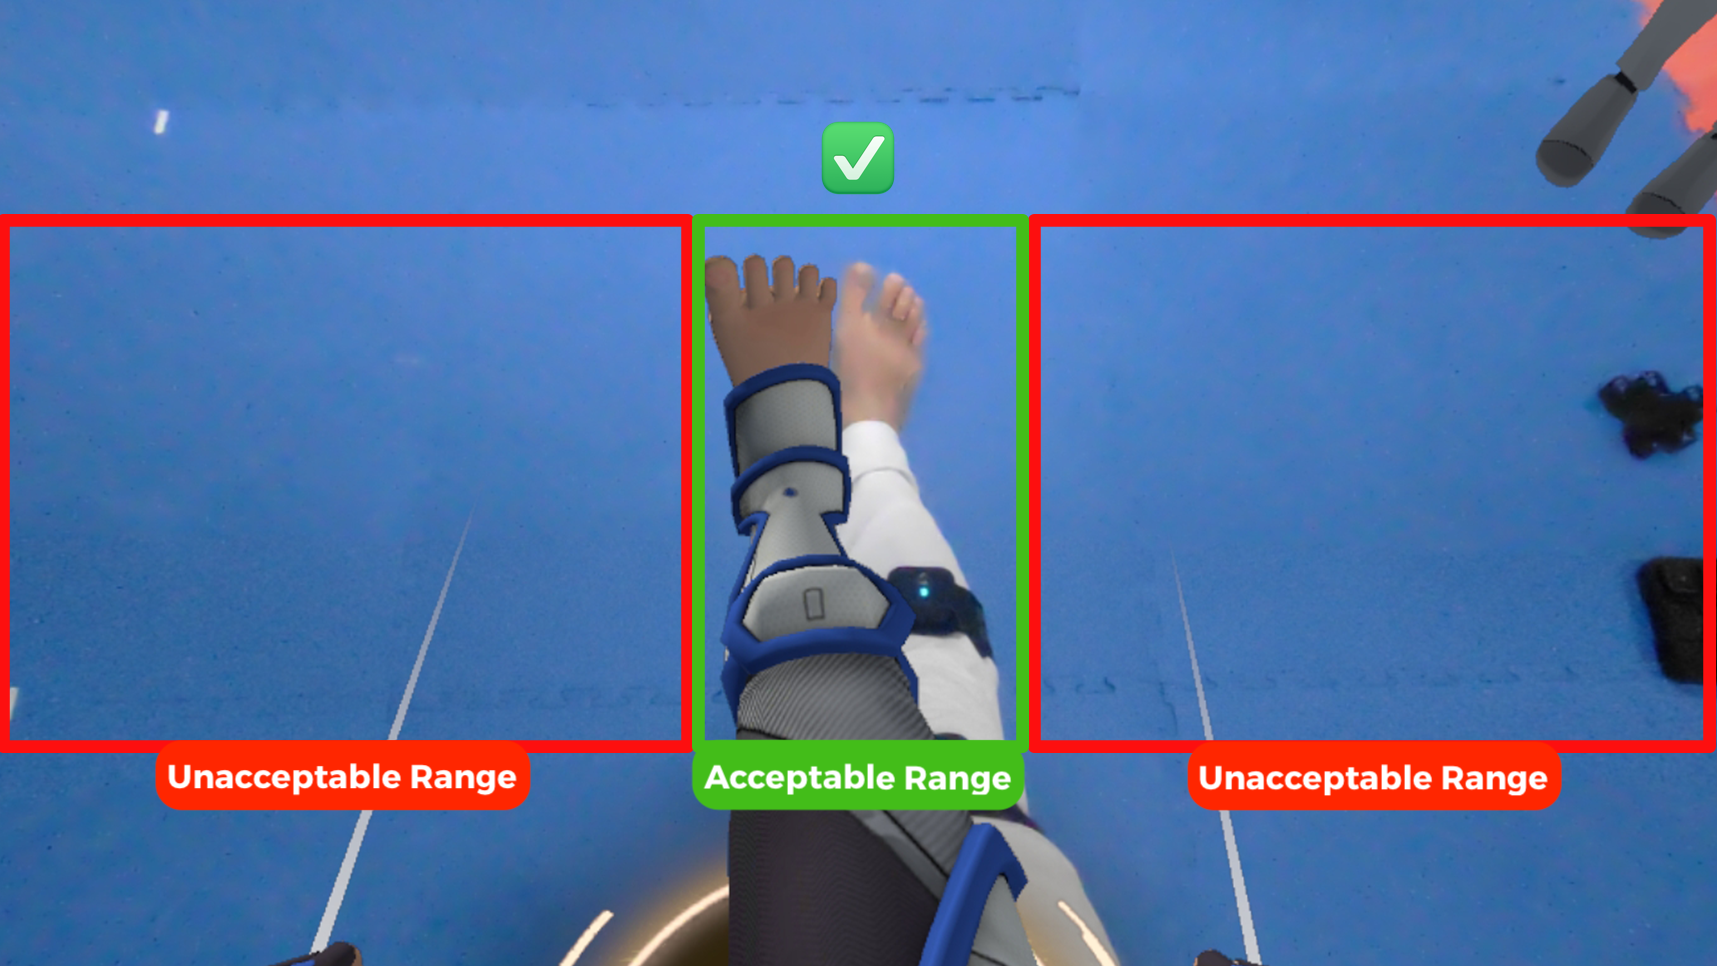
How to tell whether Surface Calibration is working
Surface Calibration is likely working and acceptable when:
- After calibration, the avatar legs match your real legs in stance and facing direction.
- Small movements (steps, knee lifts) track smoothly without sudden twisting.
- During normal practice, legs stay aligned and do not drift heavily.
- Slight inward/outward offsets are acceptable as long as tracking remains stable during movement.
Note: The offset between the avatar legs (in VR) and their physical legs should be no more than 1 foot inward or outward. Any alignment with an offset greater than 1 foot should be treated as unacceptable.
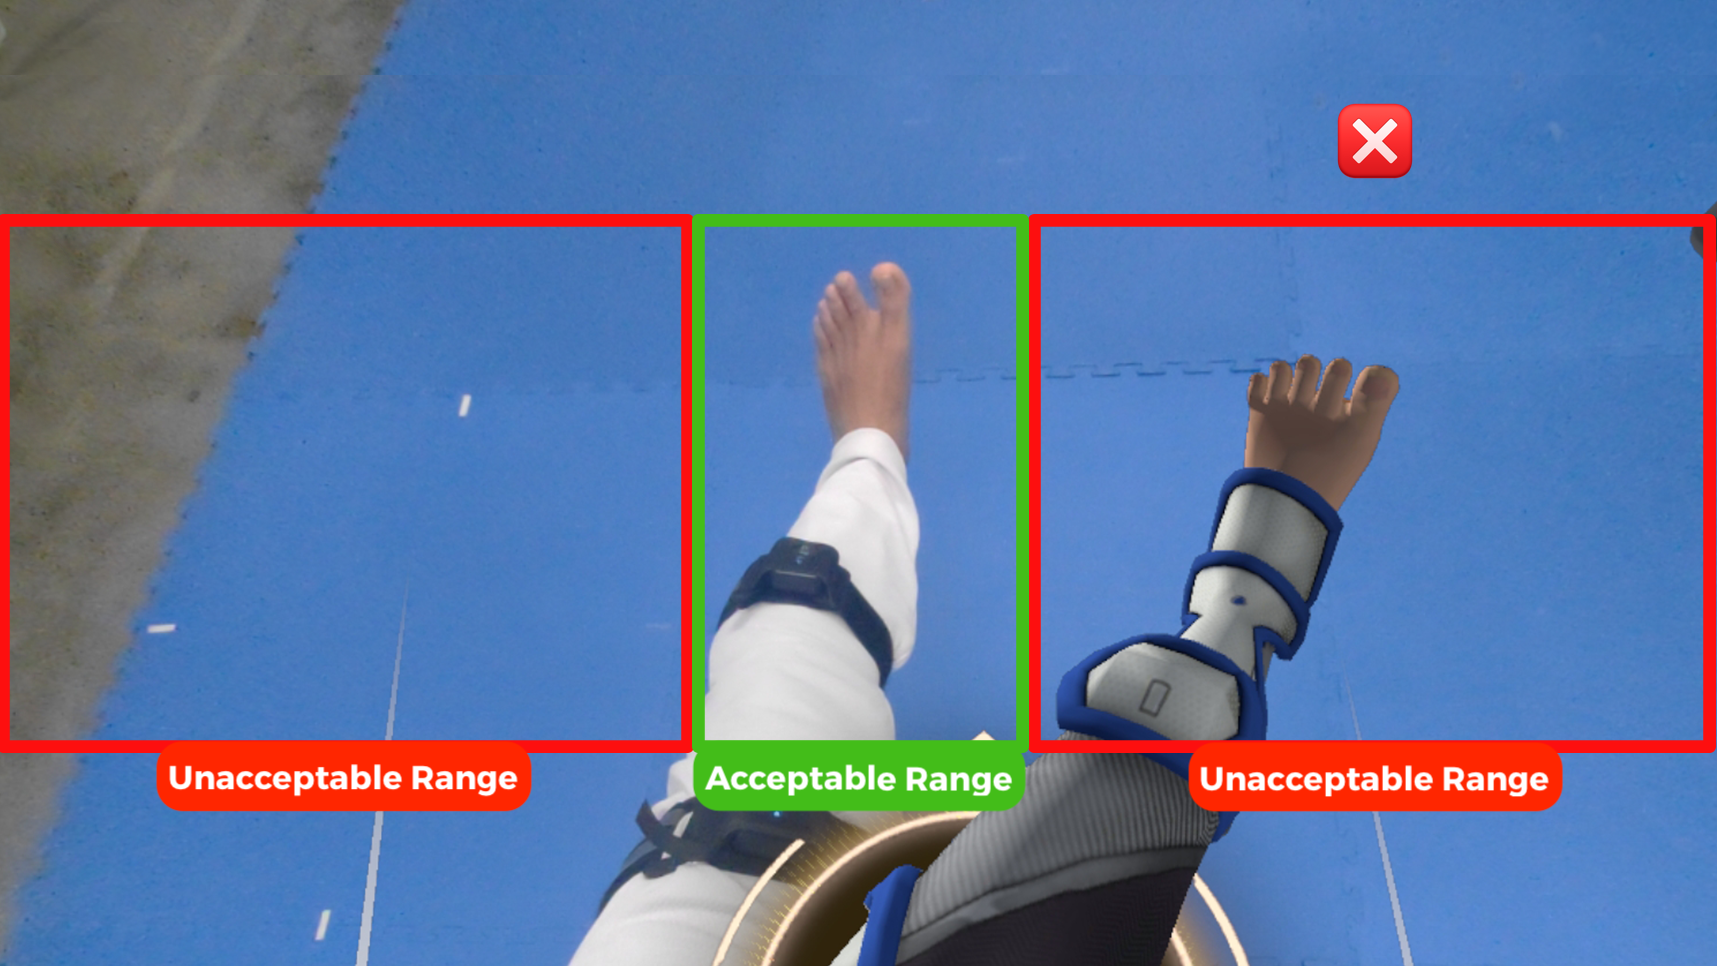
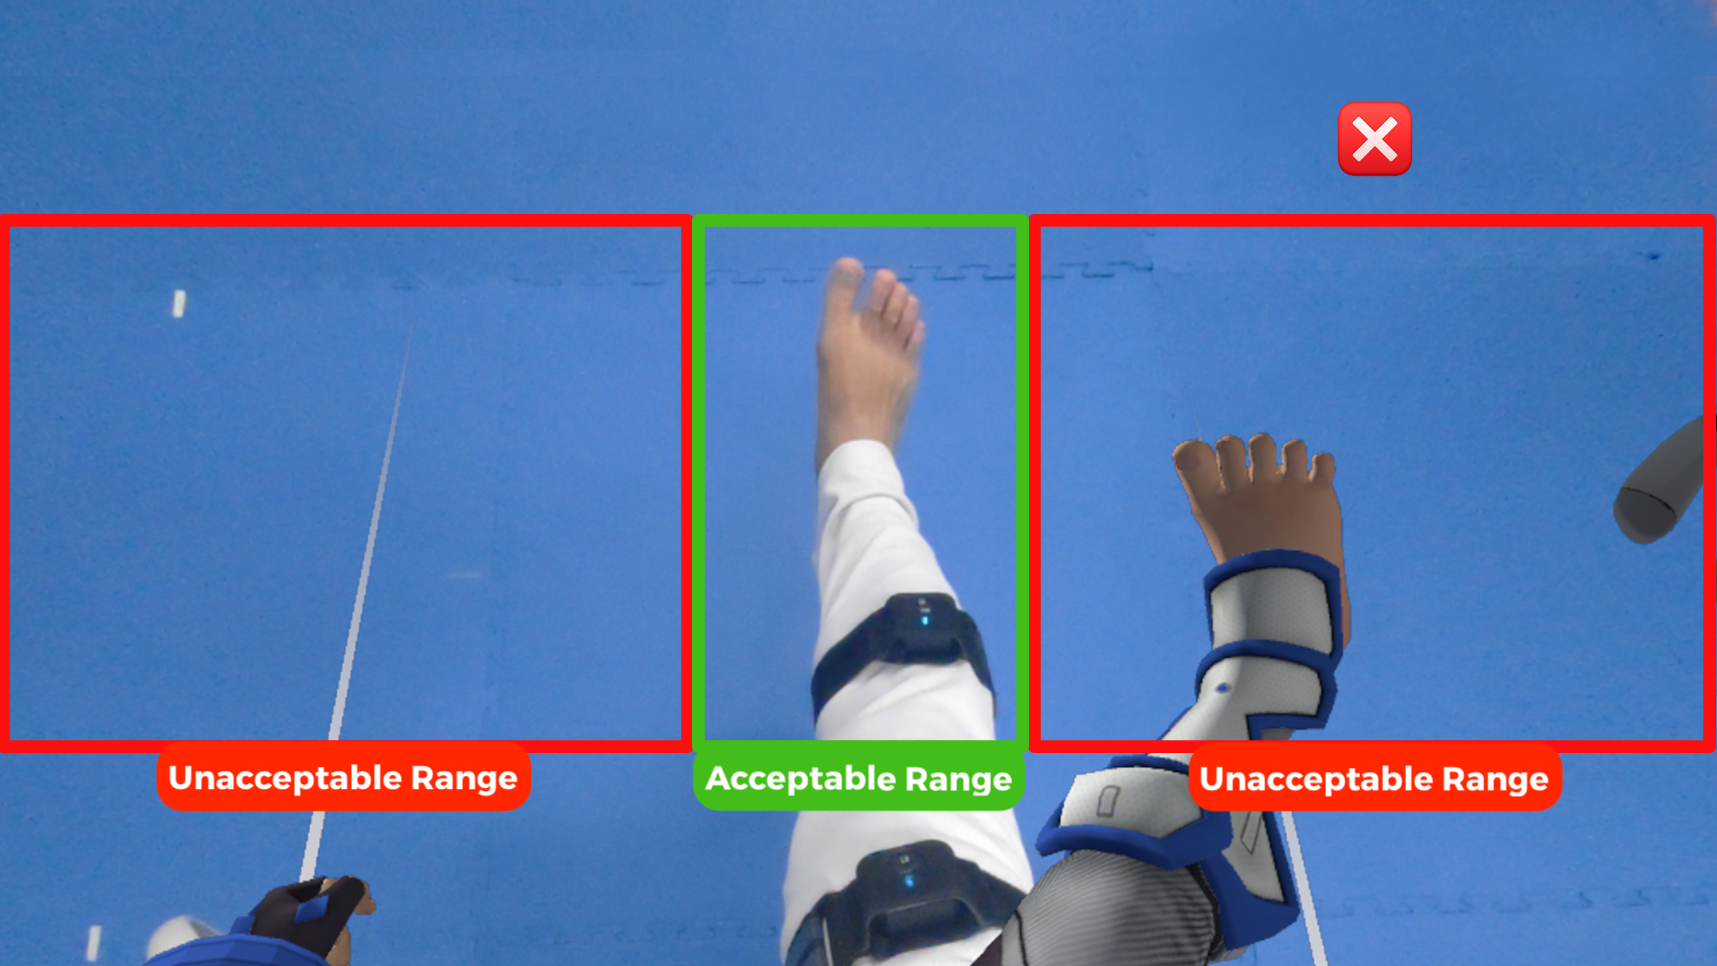
Surface Calibration is likely NOT working when:
- Immediate visible offset after calibration (e.g., one leg rotated/angled incorrectly).
- Legs go 'haywire' (rapid twisting, drifting, snapping) when you start moving.
- Tracking desync (your real legs move correctly, but avatar legs rotate/move incorrectly).
- The issue is location-specific (e.g., worse near certain mats or zones).
Important warning about Legacy Calibration
Legacy Calibration refers to the in-game calibration method used in the waiting room in VTKD V1.2.33, before Surface Calibration was introduced in VTKD V1.2.34. In V1.2.33, Legacy Calibration was performed by having the player wear all nodes, stand in a T-pose facing forward, then press and hold both controller triggers until vibration is felt (about 2 seconds).
Legacy Calibration mainly improves initial alignment
If your FOP has high magnetic-field fluctuation between mats (the same condition that can cause Surface Calibration to fail), the avatar legs may still show symptoms during movement, such as:
- Legs going 'haywire'
- Sudden twisting/drifting
- Tracking desync returning in certain zones
Important Note: Legacy Calibration can improve initial alignment, but it may not fully eliminate instability caused by the environment.
Workaround: Legacy Calibration (VTKD 1.2.34)
Legacy Calibration can be performed in-game on VTKD V1.2.34 (no downgrade needed). You may need to manually adjust strap fit to achieve better alignment.
Before you start (recommended checks)
- Wear AXIS nodes securely (no loose straps).
- Nodes should not slide when you move.
- Stand in your intended starting area inside the FOP.
Step-by-step: How to perform Legacy Calibration
- Get into T-Pose: stand upright, feet close together, facing forward. Keep your legs still.
- Trigger Legacy Calibration: on the Right controller, press and hold Right Trigger + B for about 2 seconds until you feel a vibration.
- Check alignment immediately: confirm the avatar legs match your real leg angles, and both feet look correctly planted.
- Fine-tune with strap adjustment (if needed): if there is significant leg offset (inward/outward), stand still and adjust AXIS straps, then repeat Right Trigger + B. Repeat until alignment looks acceptable. The correction steps are the same as previous builds.
- Validate with quick checks: small steps forward/back, light knee lifts, and a slow front kick. If legs remain stable, continue training.
Tips / best practices
- If legs become unstable mid-training (especially after fast evasions), stop, return to a stable spot, and repeat Legacy Calibration.
- Maintain consistent strap tension to reduce repeated readjustments.
7. Game Preparation
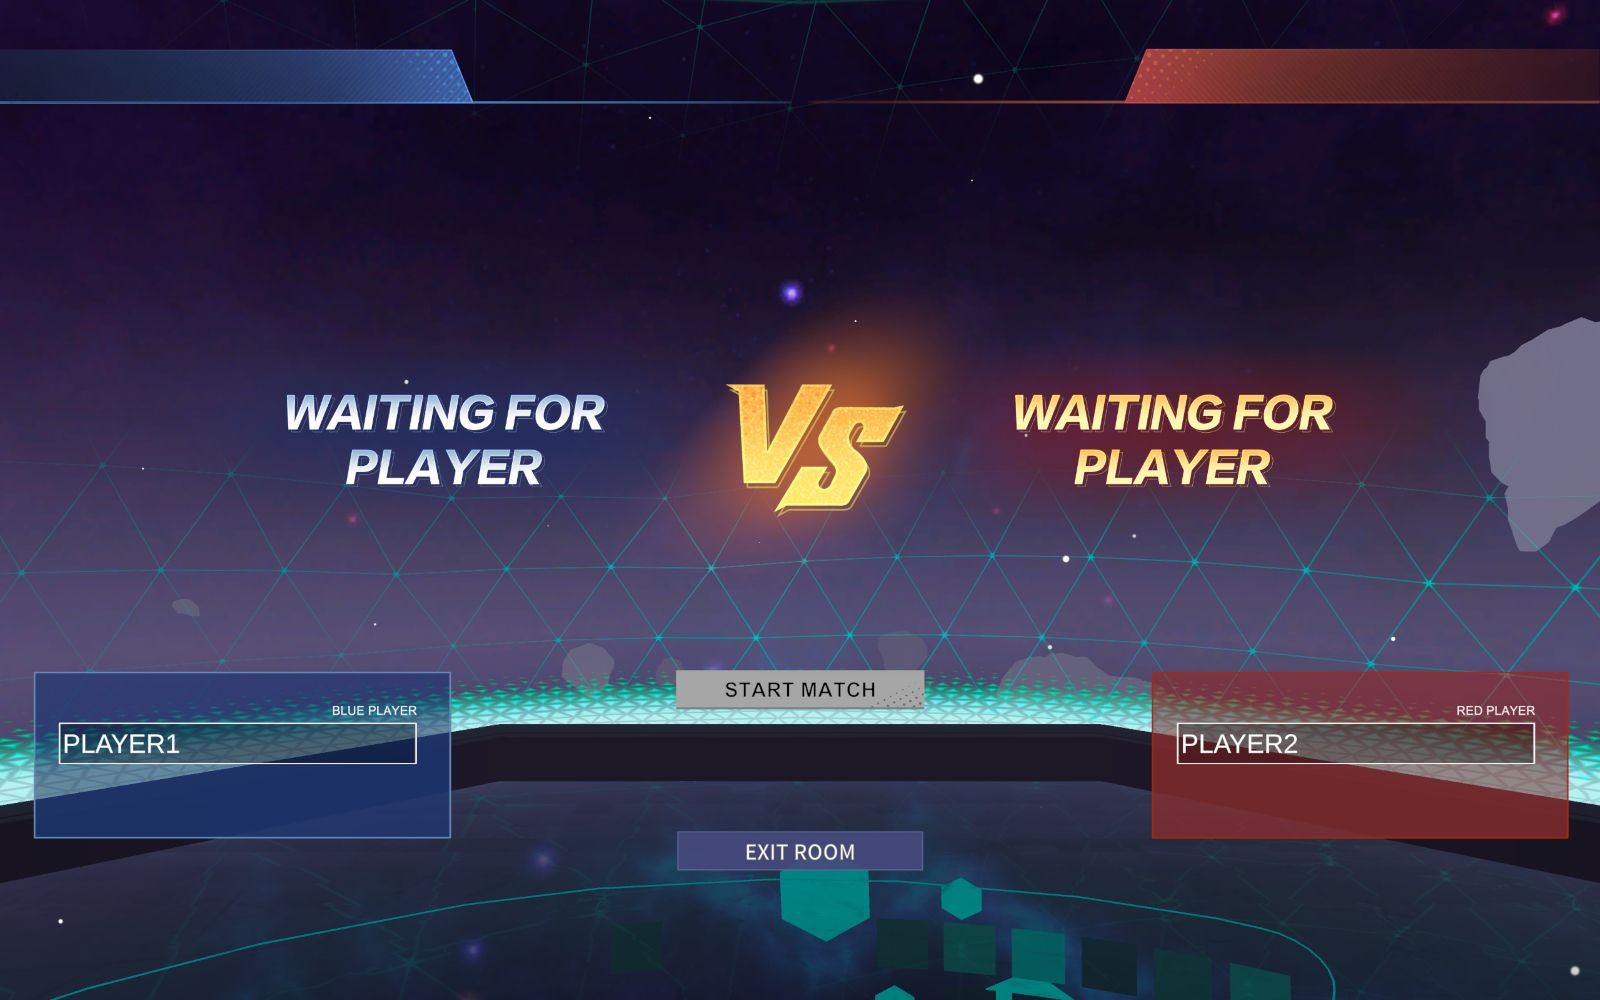
Creating Game Room (GM only)
1. Ensure the PC is connected to the internet (Wi-Fi or wired).
2. Open the “VTKDUPlayer” application that can be found on your desktop.
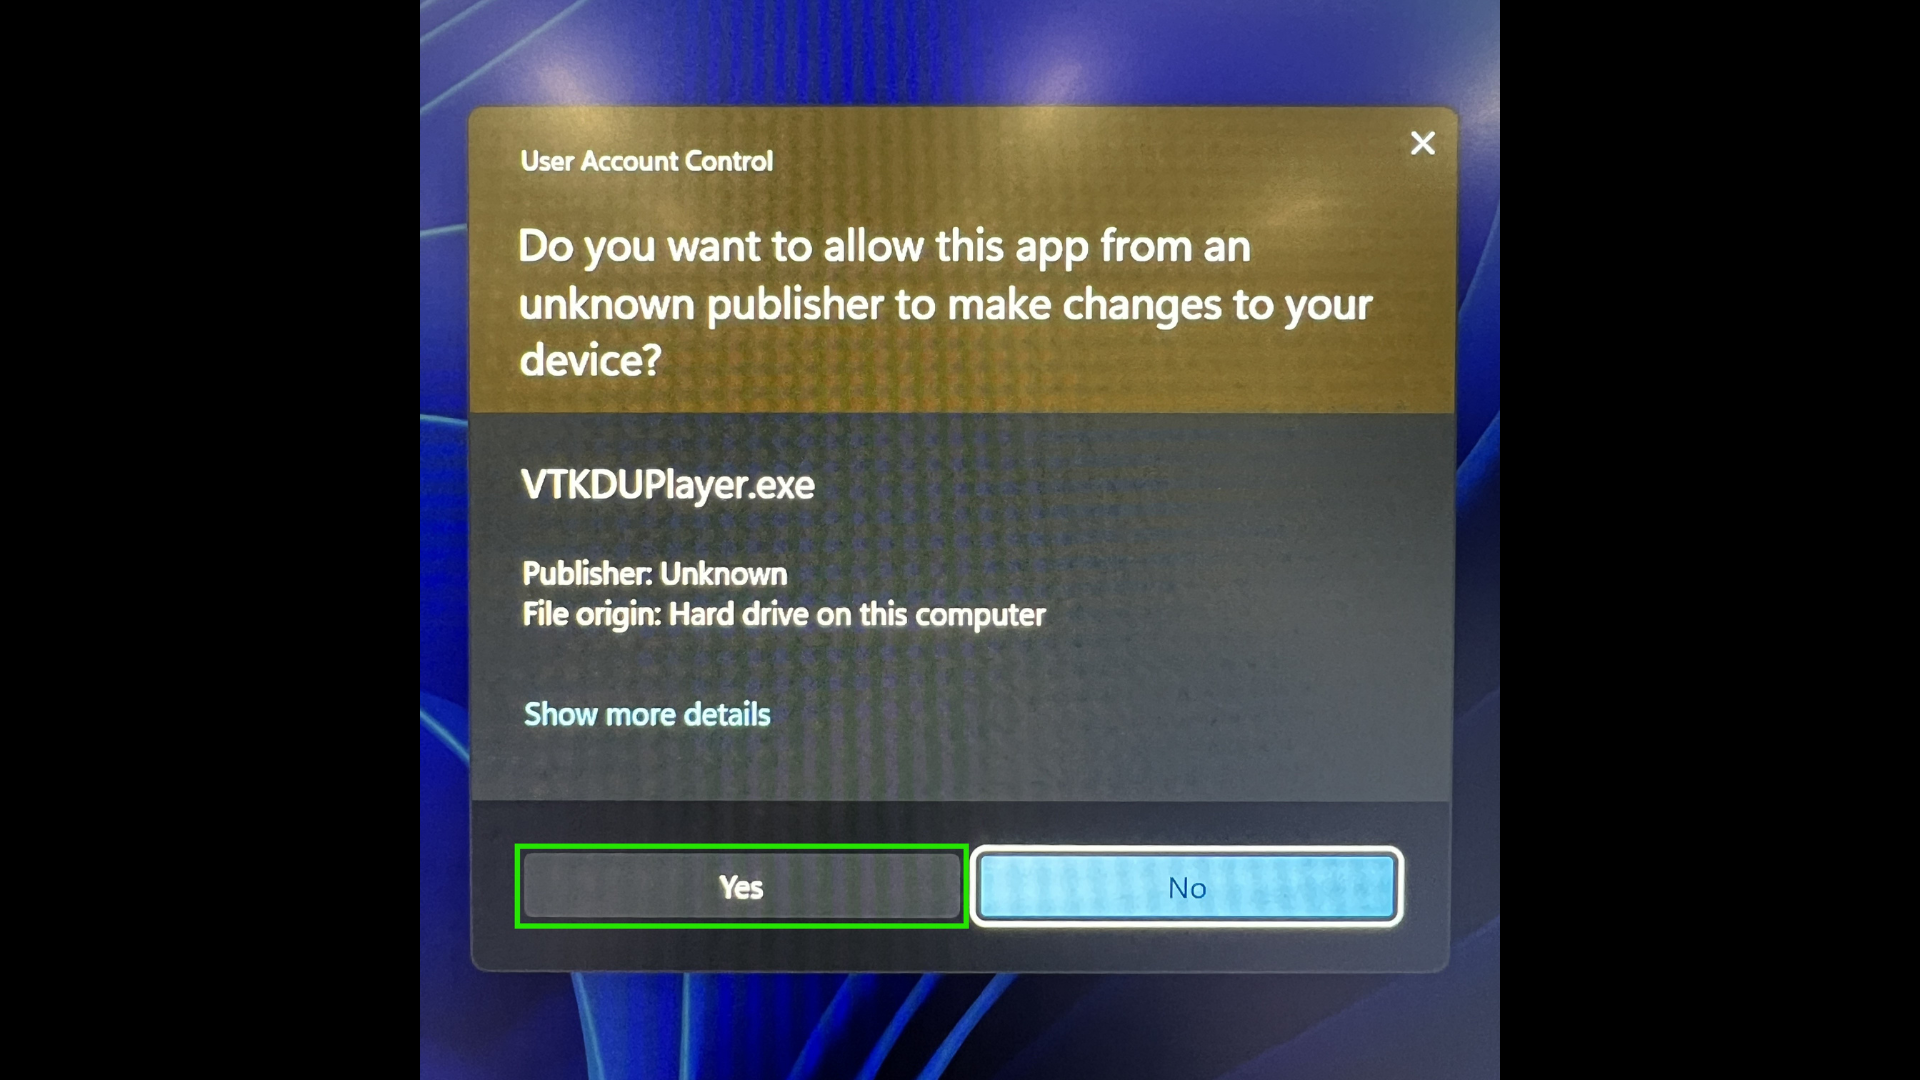
3. Click 'Yes' to allow the User Access Control pop up.
A game server will automatically start in the background (DO NOT close this window when the game is running).
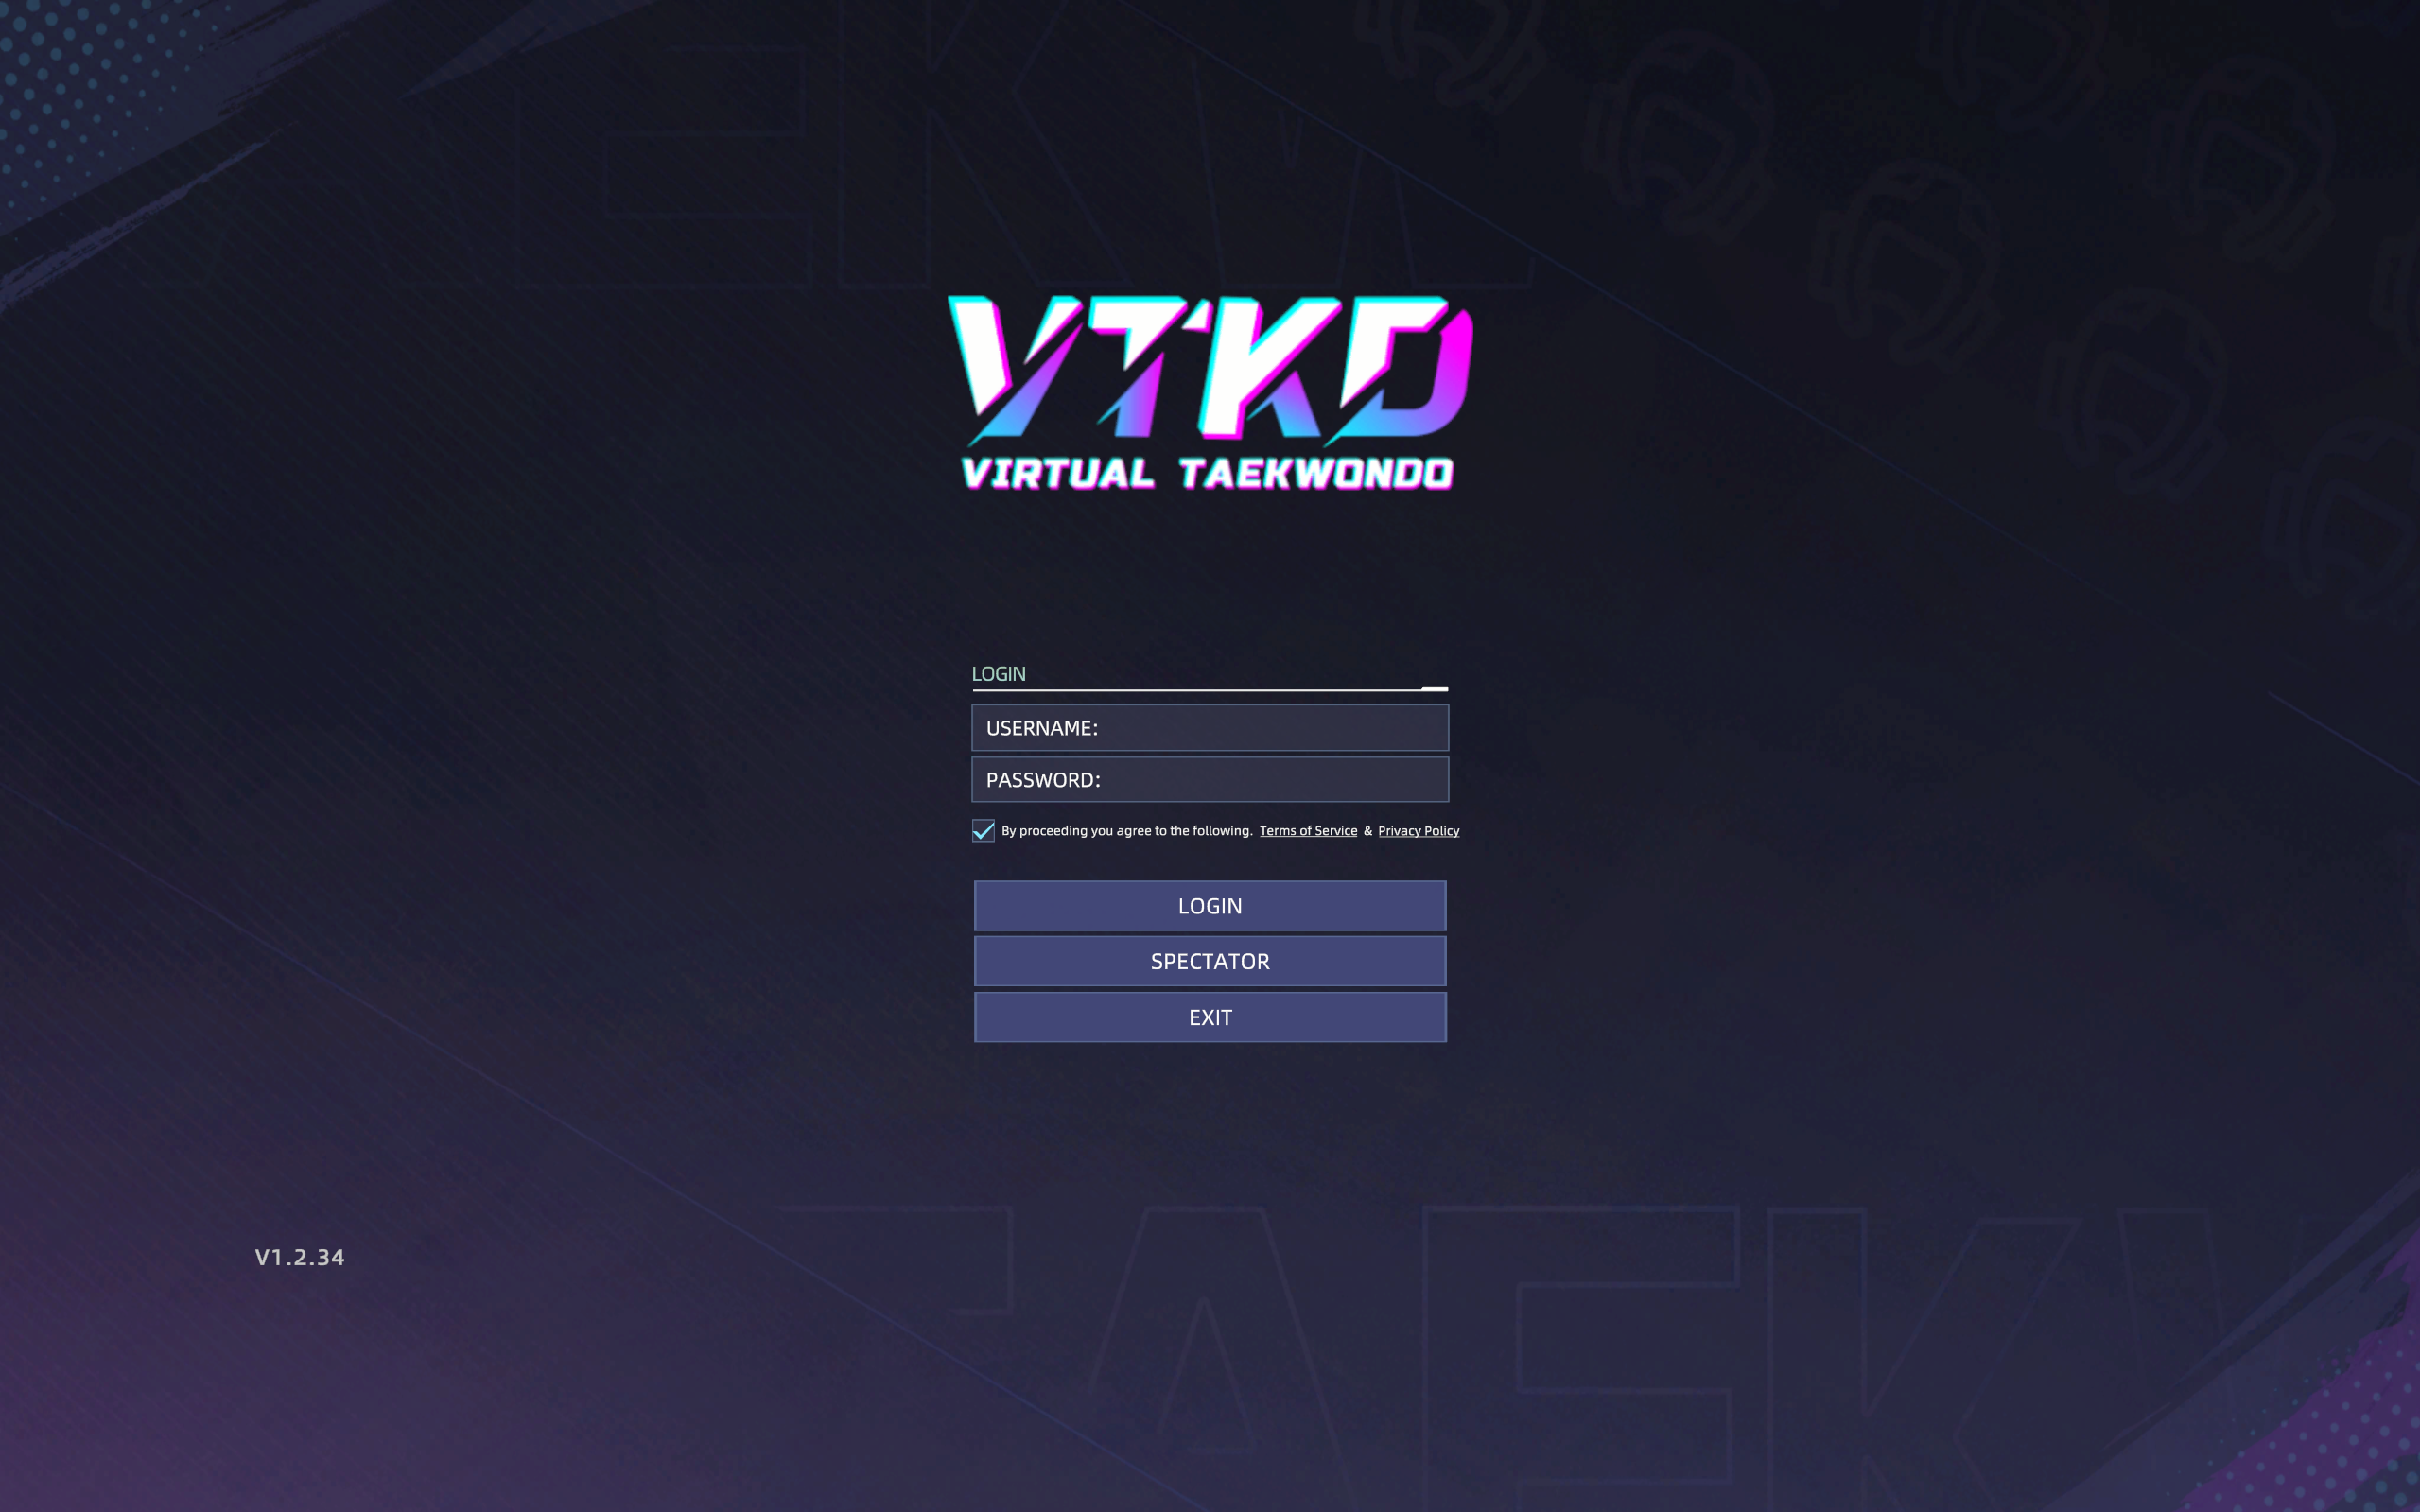
4. Read the Terms of Service and Privacy Policy before ticking the checkbox, followed by keying in your credentials and 'LOGIN'.
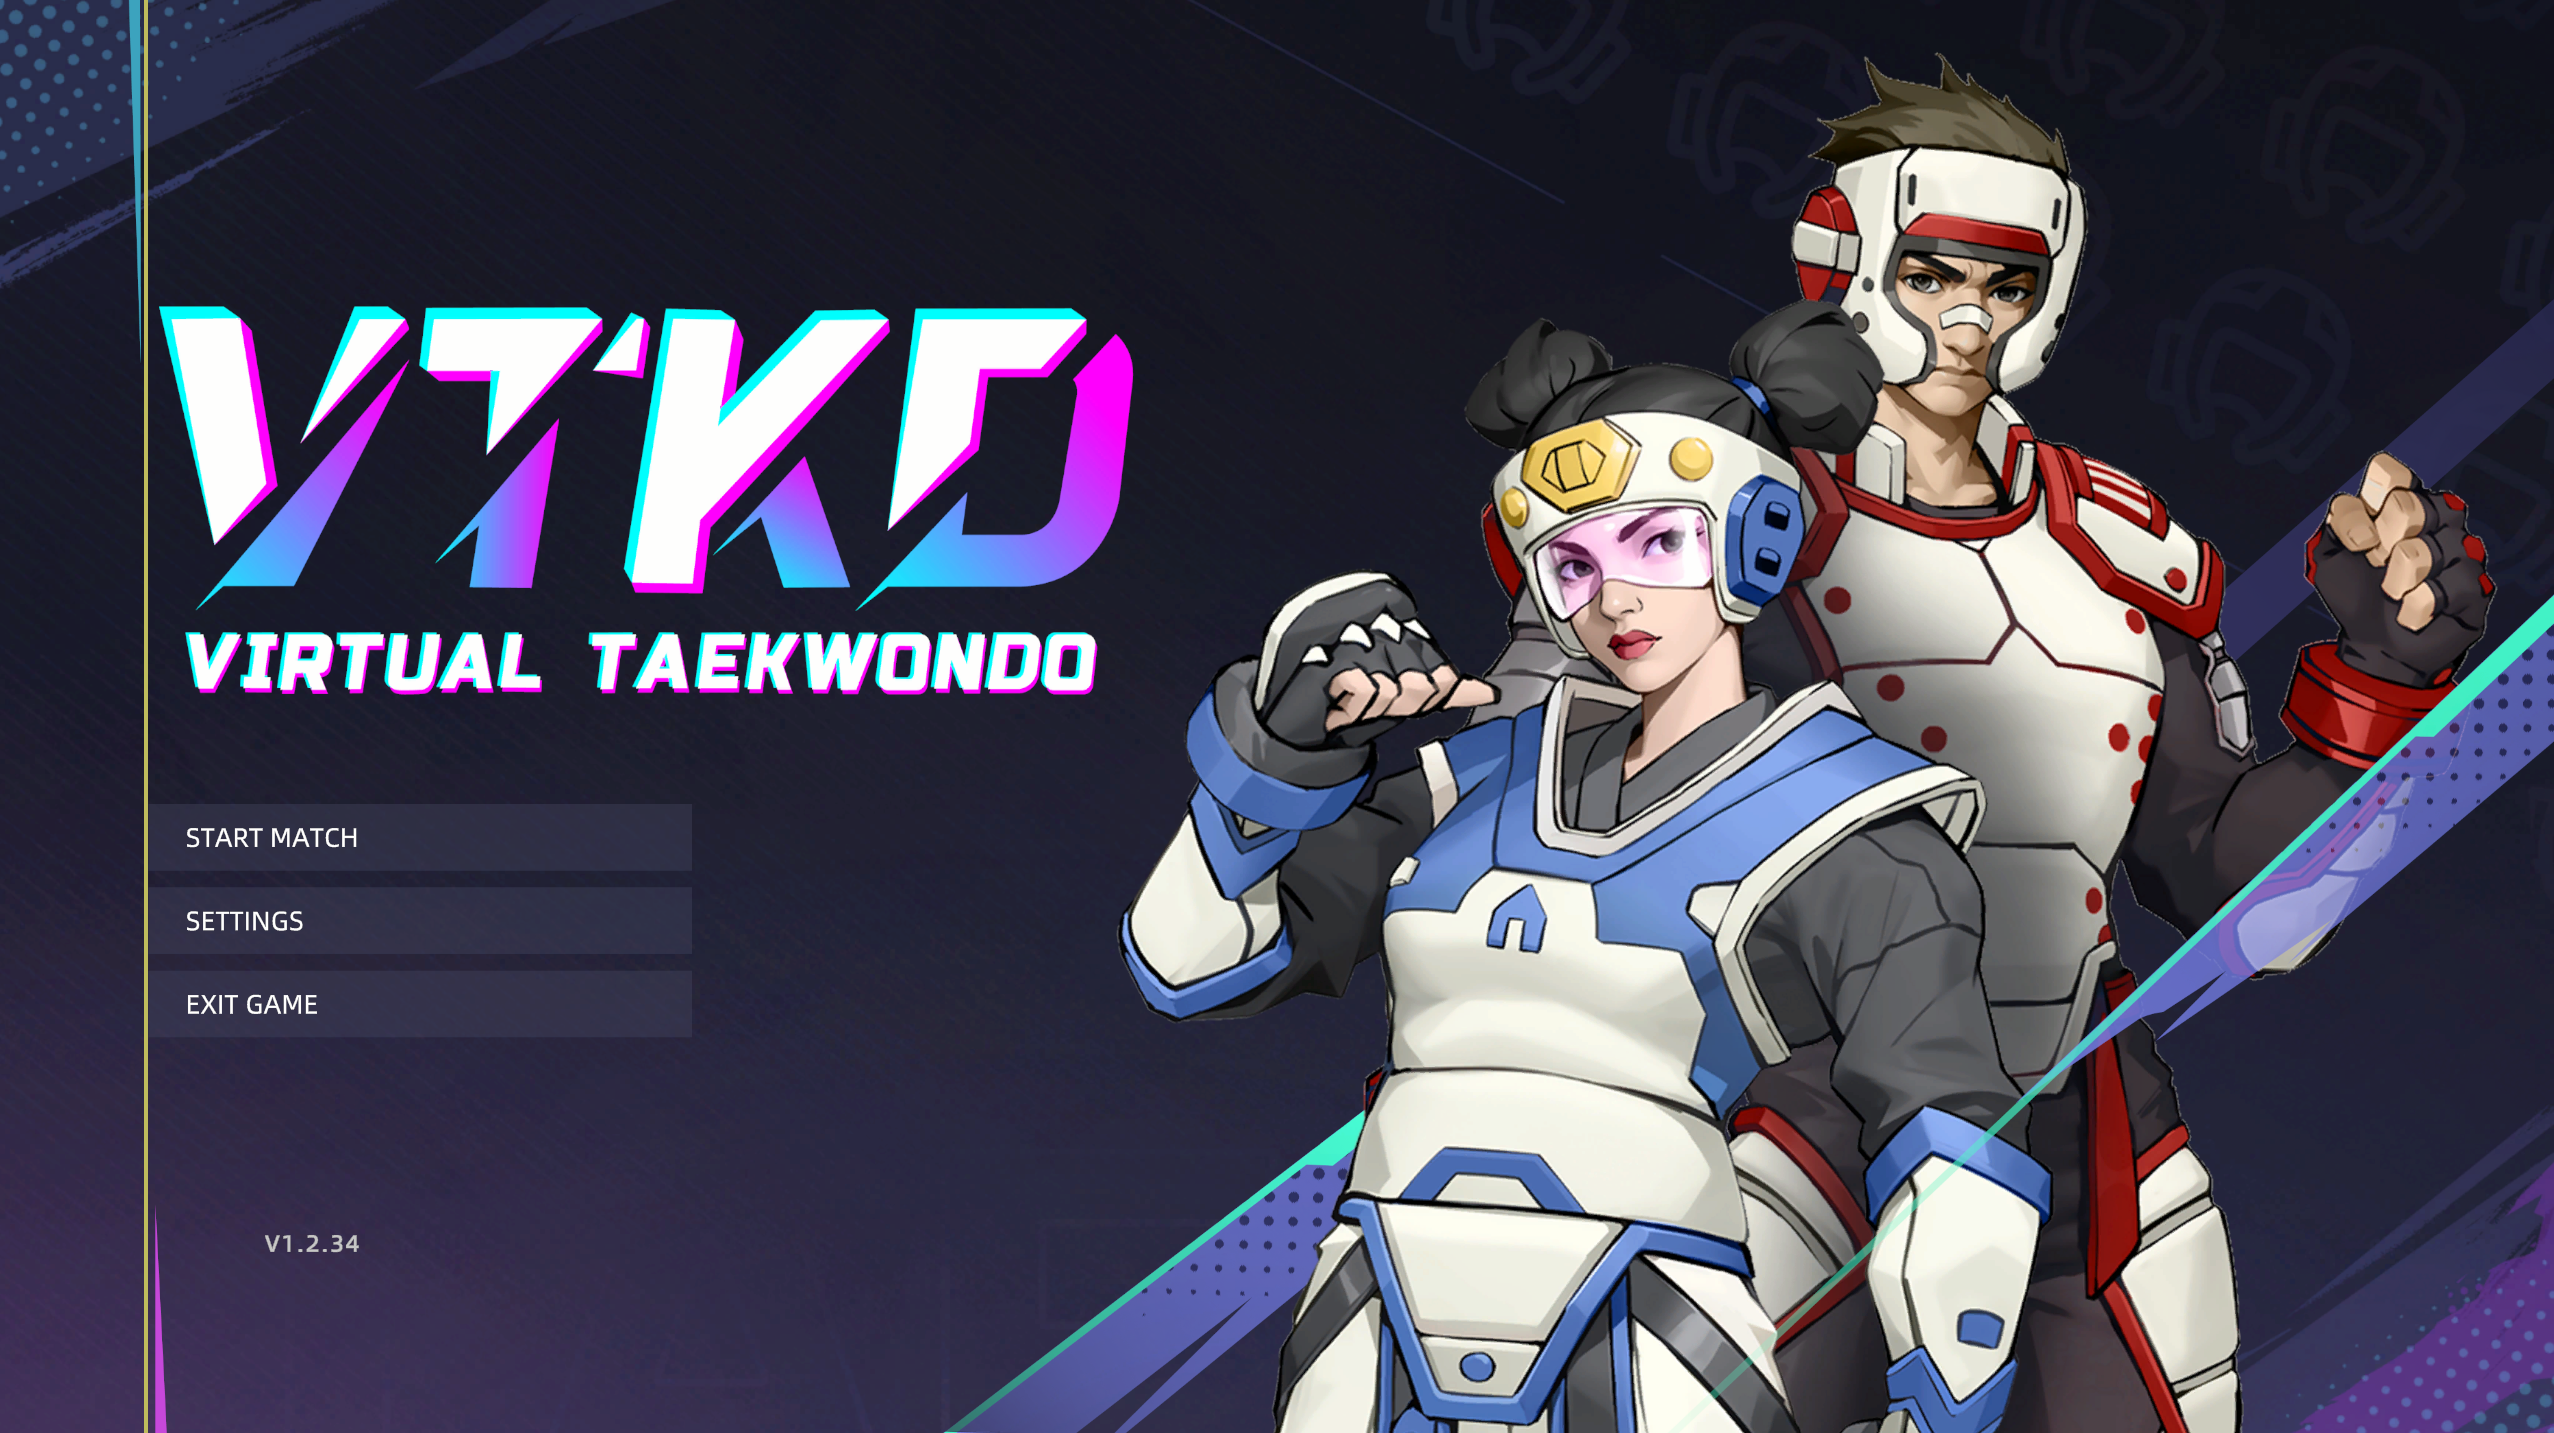
5. On the main menu, click on 'START MATCH'.
6. Select a game mode.
7. Amend room setup as needed and click on 'Create'.

8. Once the room is created, Players can now join the room (If the Red player joins the room first, remember to swap the players position).
Video reference:
Joining Game Room
Note before proceeding:
- Make sure there is sufficient space.
- Make sure you have drawn the custom boundary on.
- Make sure the AXIS receiver (dongle) is connected to the VR headset.
- Make sure all (5) AXIS nodes are worn at the correct placements on the body.
Players with VR headsets.
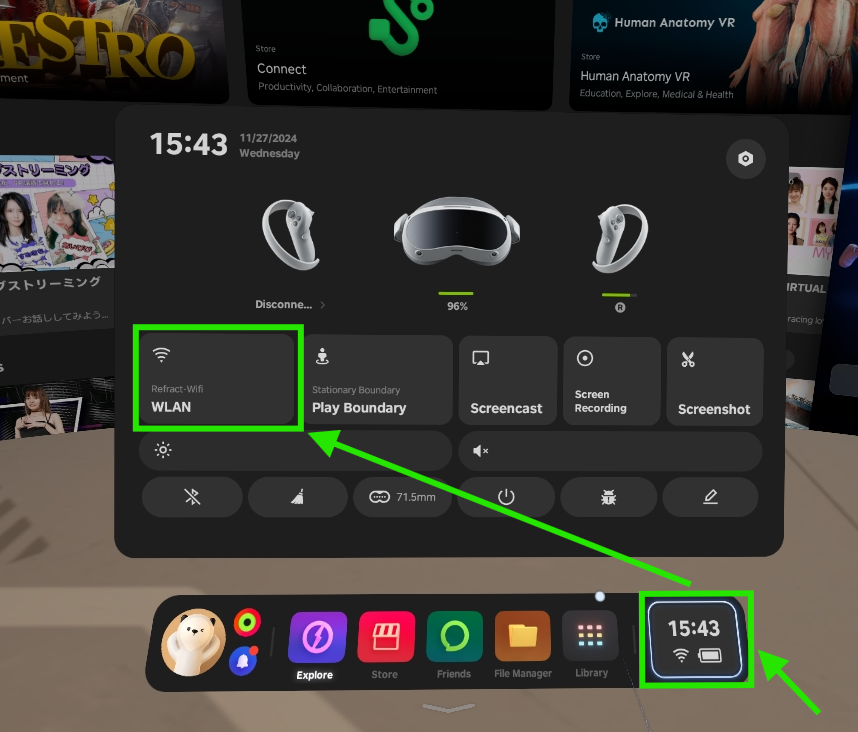
1. Startup your PICO VR headset and make sure to connect it to the same WiFi as the Game Master.
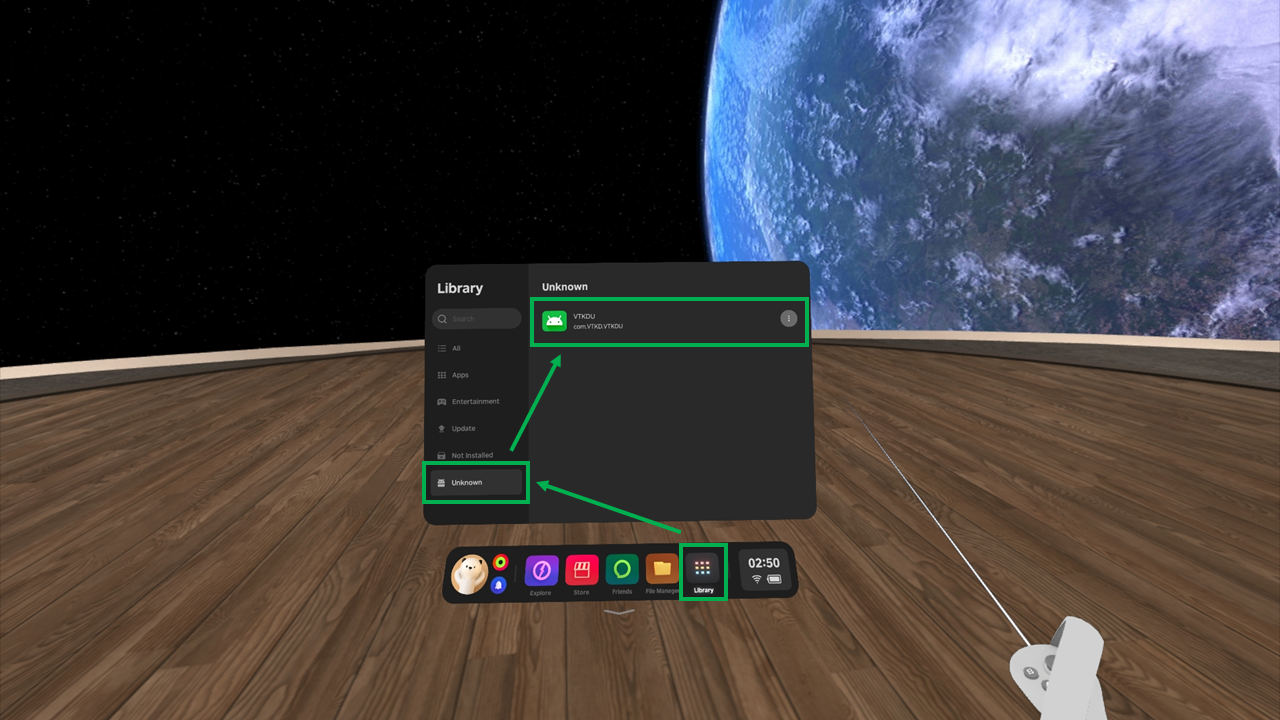
2. Once the WiFi is connected to the correct network, go to 'Library' -> 'Unknown' -> 'VTKDU'
3. When the game launches, you are required to do a calibration.
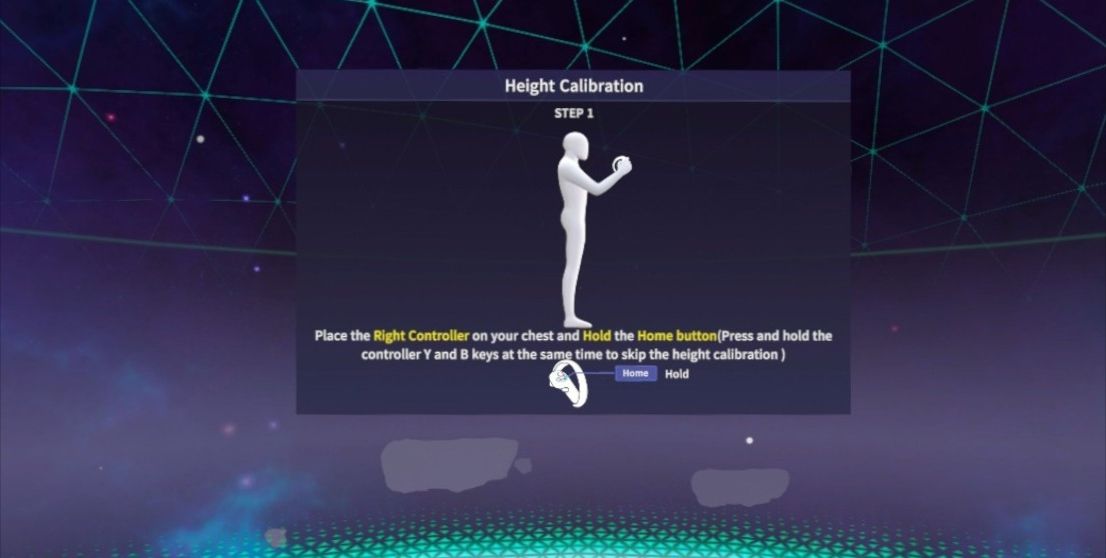
Step 1: Place the right controller on your chest and hold the home button.
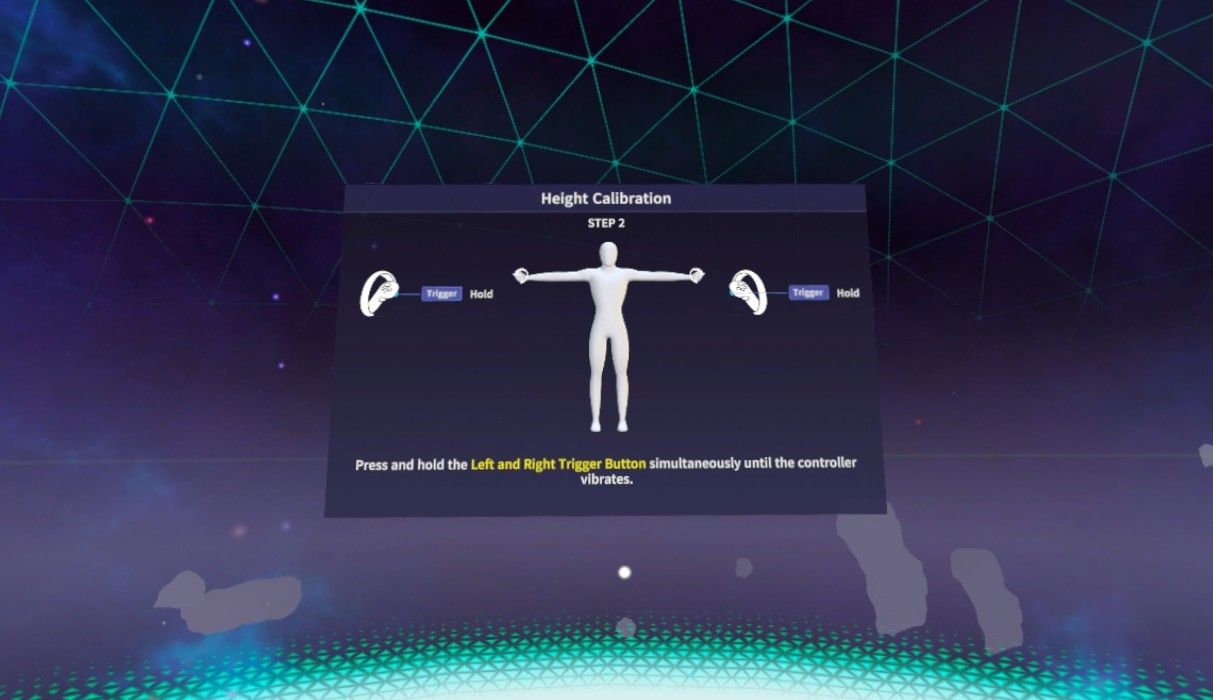
Step 2: Hold the left and right trigger buttons until the controller.
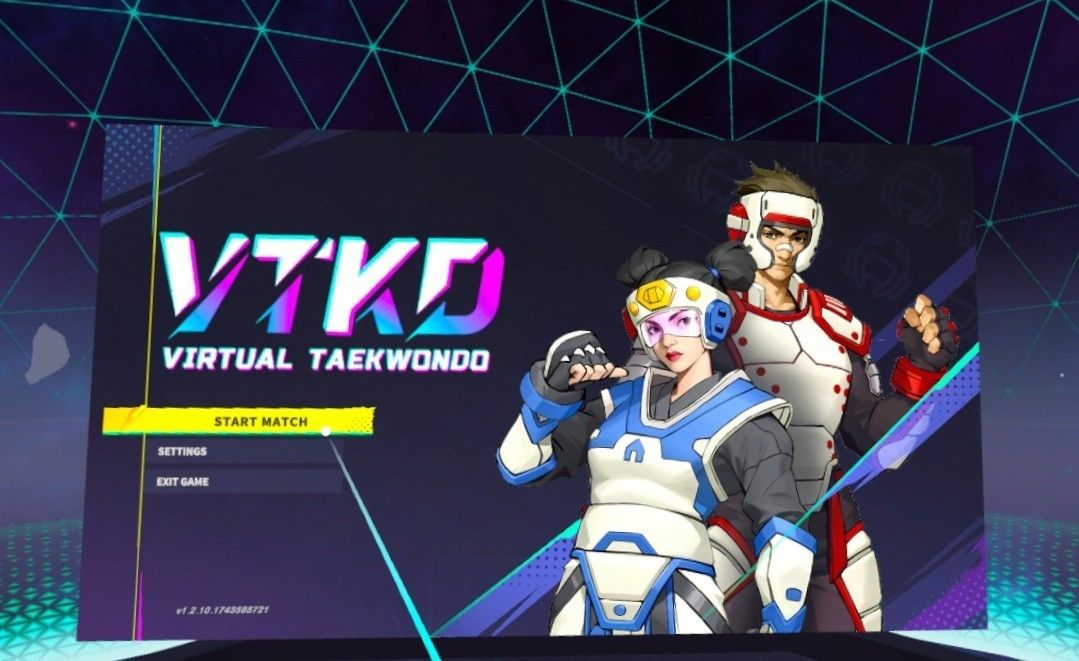
4. On the Start screen, click on 'LOGIN'.

5. On the Menu screen, click on 'START MATCH'.
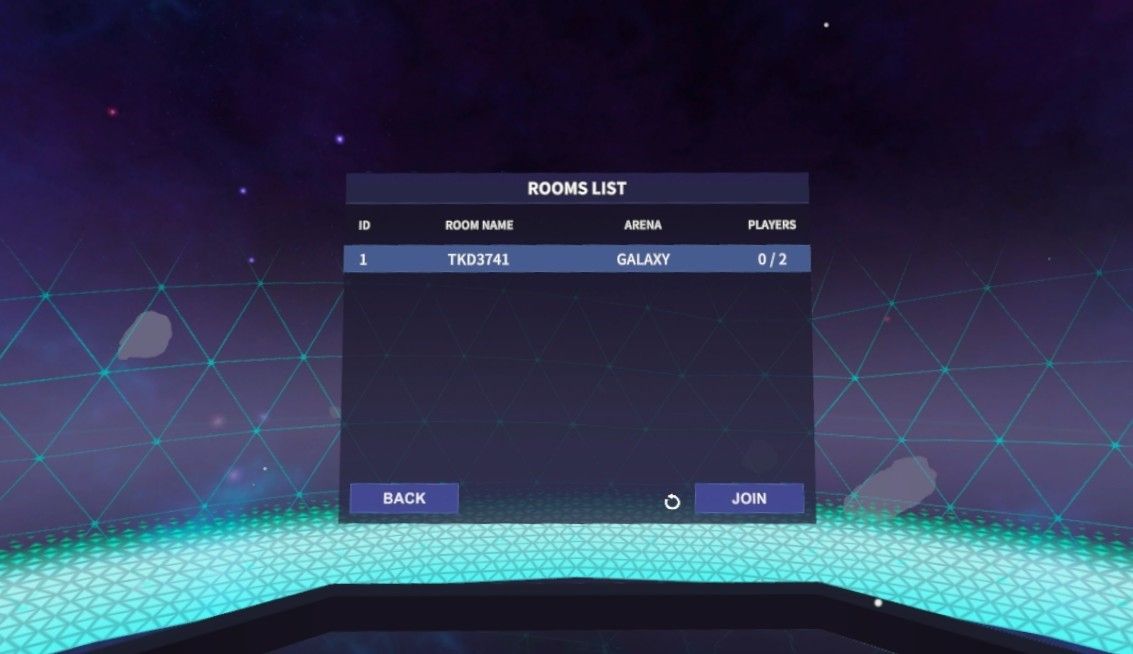
6. On the Rooms screen, select the room created by GM and click 'JOIN'.
Click on the 'REFRESH' button if you do not see a room.
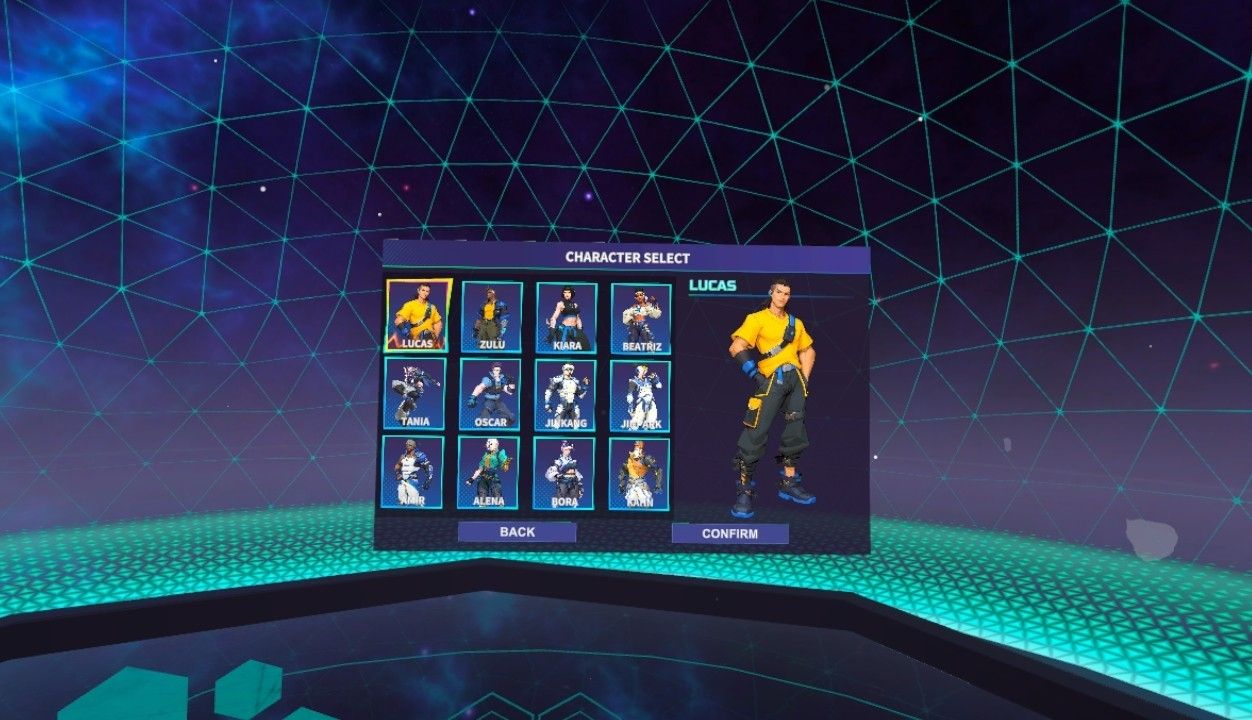
7. Select your character and click on ‘CONFIRM’.
Video reference:
In-Game Calibration (VR Headset + AXIS)
Note before proceeding:
- Make sure you have drawn the custom boundary and already joined a game room; you should be in the Waiting room for this section.
- Make sure you are in the passthrough mode, where you can see both your physical legs and avatar legs. If you only see your avatar legs, then switch to passthrough mode by pressing the [A] button on the right-hand controller.
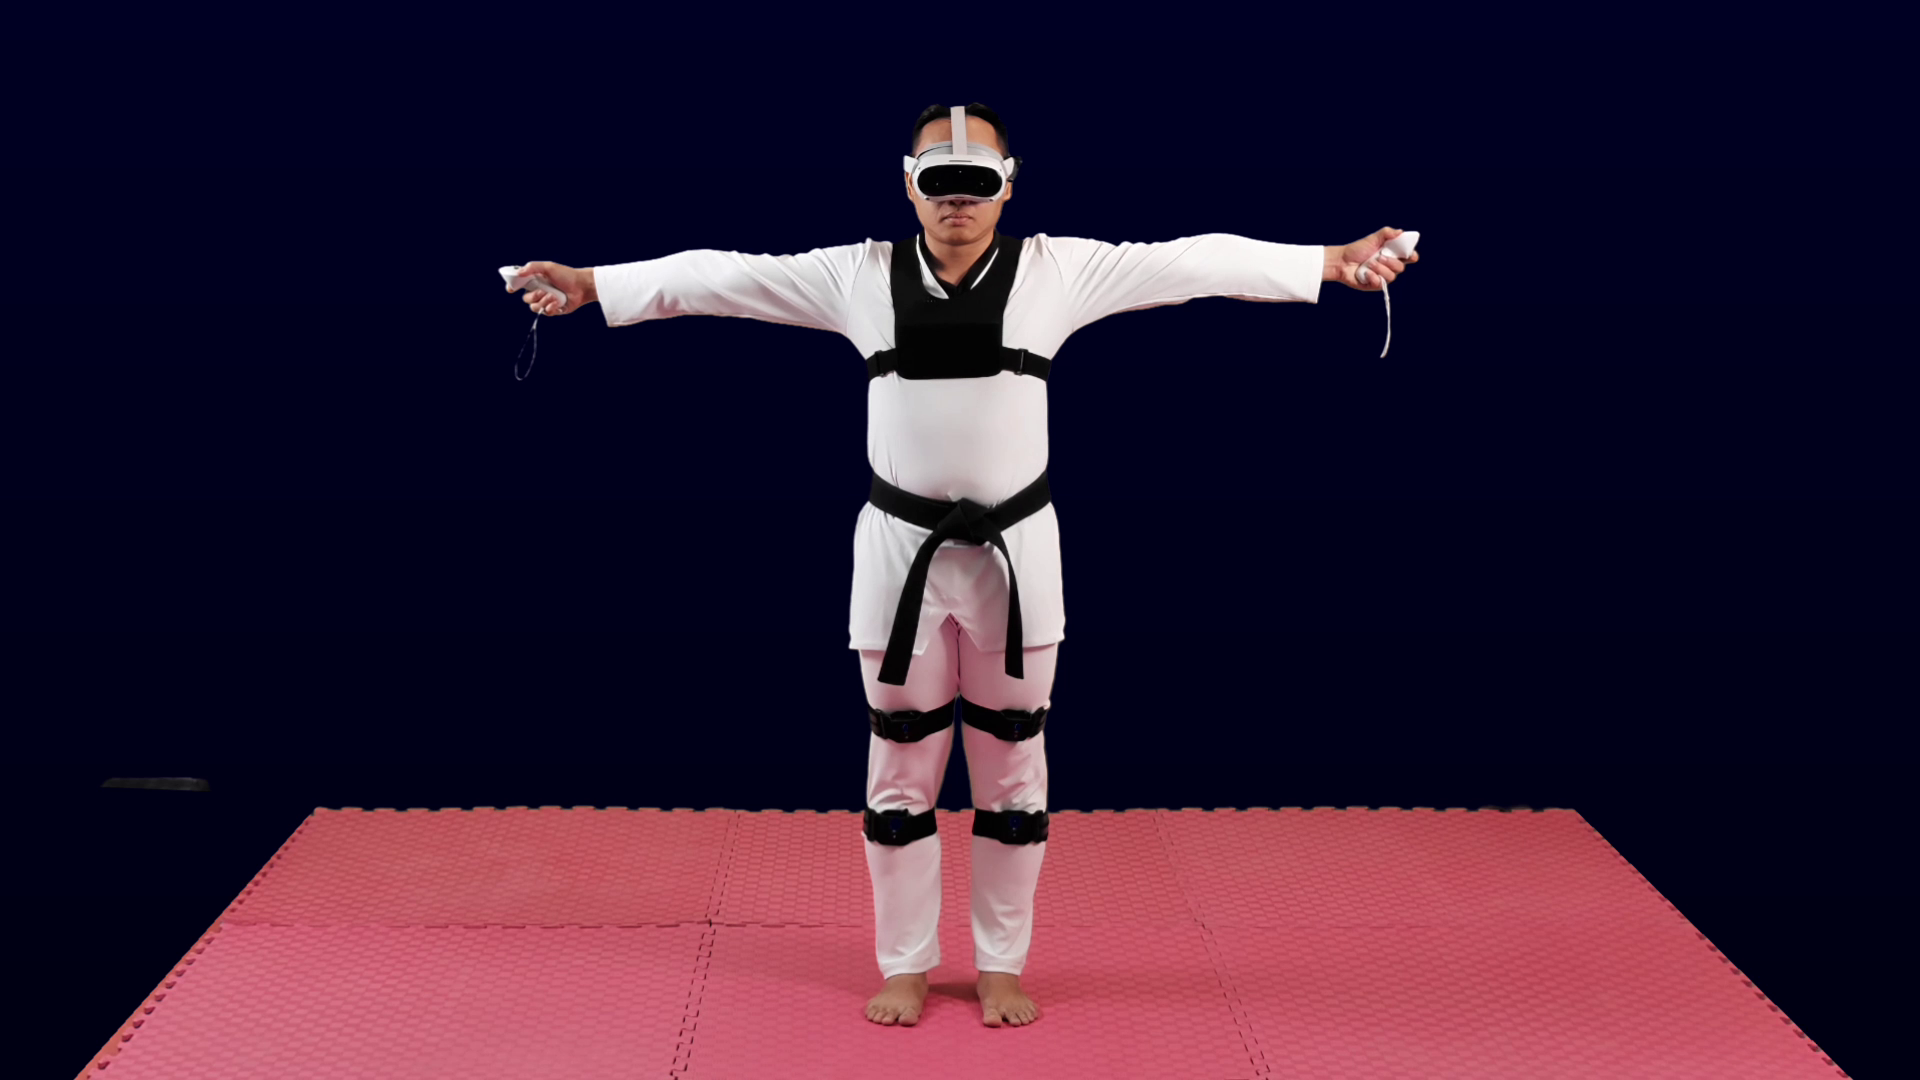
1. Stand on the start point marked with the arrow. The starting point must be set 1m from the middle of the play area.
2. Recenter VR view by looking forward and then holding on to the 'Home' button on either controller for 2 seconds.
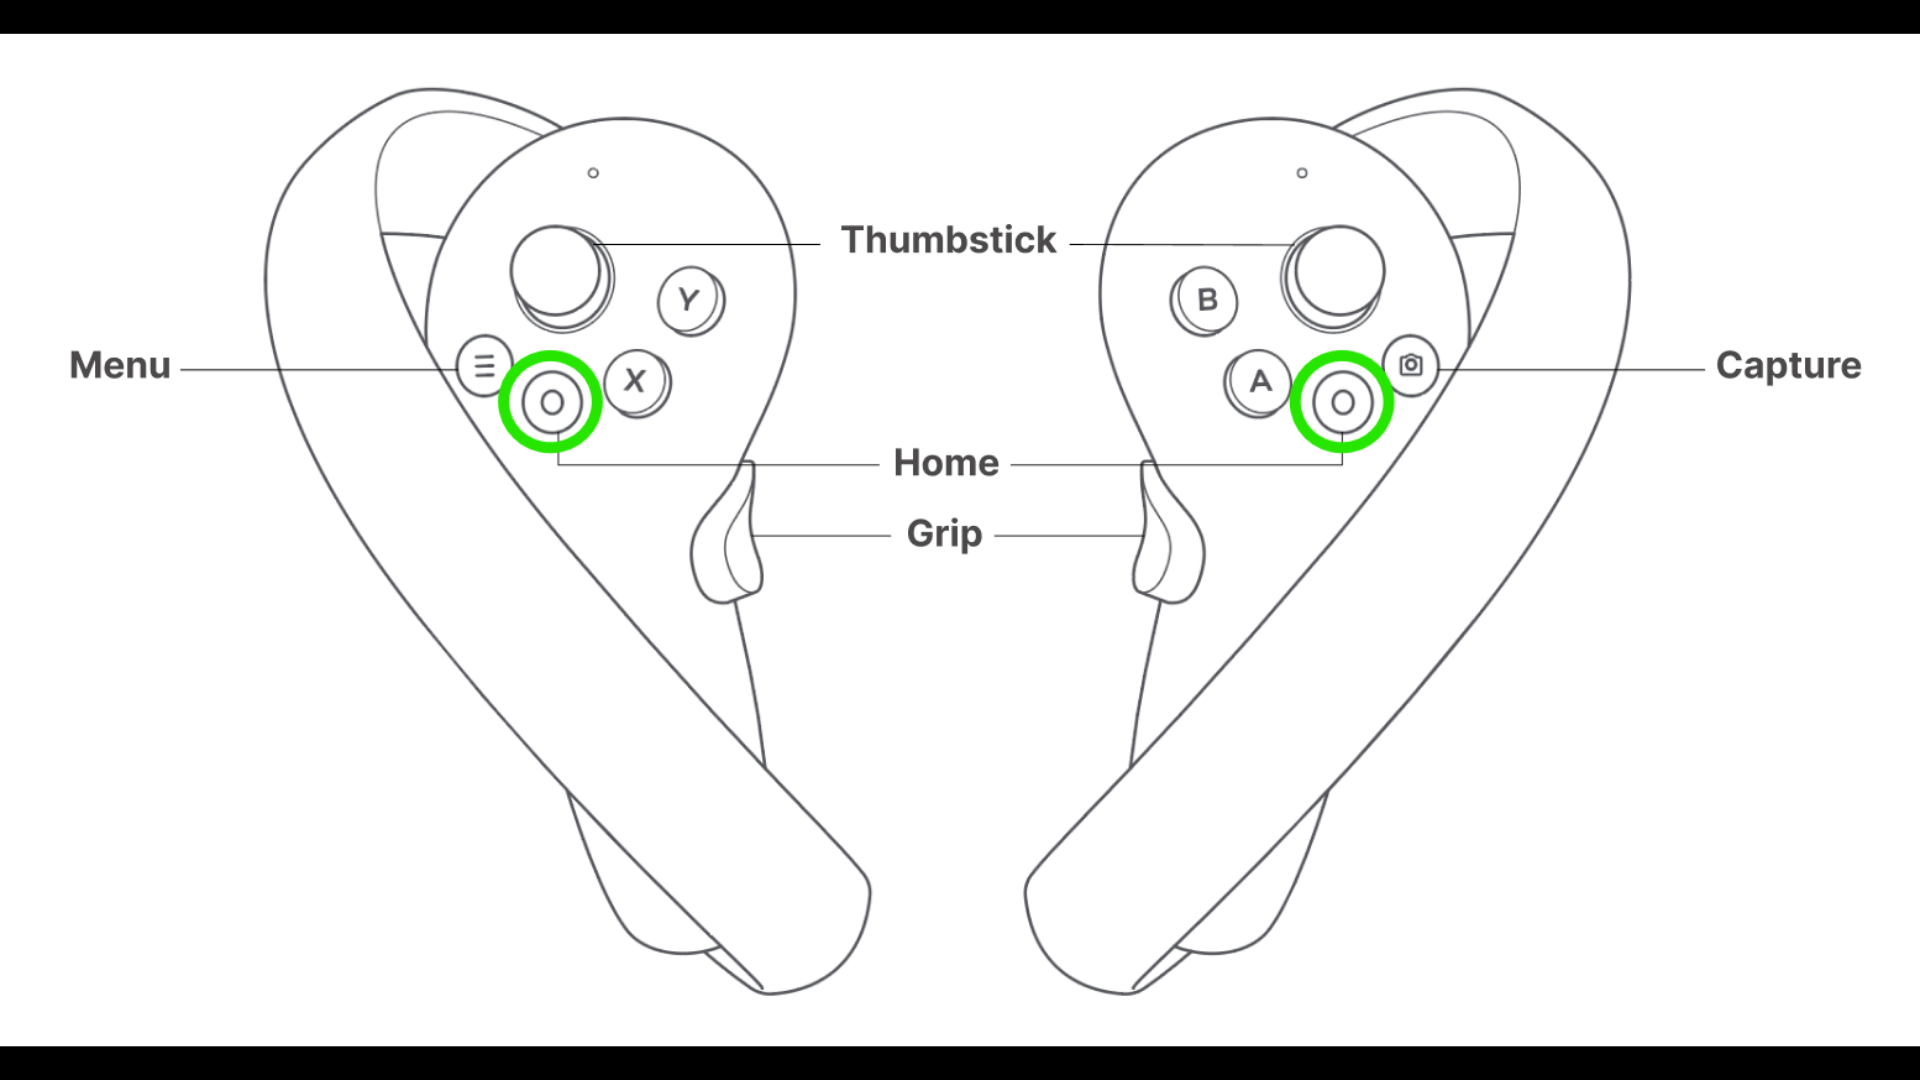
3. Do a T-pose with your feet put together, and your toes pointing forward; remain in this position until step 4 below is completed.
4. On both your controllers,
press and hold the trigger buttons until the controllers vibrates.
5. Minor leg offset is normal and may not match 1 to 1 in-game.
6. During a match, if alignment of the limbs are off, there is no need to re-adjust the straps. Simply re-do the In-Game Calibration (T-pose and hold down both triggers till you feel a vibration) and proceed as per normal.
8. Spectator PC
1. Ensure the PC is connected to the internet (Wi-Fi or wired).
2. Open the “VTKDUPlayer” application that can be found on your desktop.
3. Click 'Yes' to allow the User Access Control pop up.
4. Read the Terms of Service and Privacy Policy before ticking the checkbox, followed by 'SPECTATOR' (Spectator does not require login credentials).
5. Click on 'START MATCH'.
6. On the Rooms screen, select the room created by GM and click 'JOIN'.
Click on the 'REFRESH' button if you do not see a room.
7. Once you have joined the room and the players are ready, the GM will begin the match.
Video reference:
9. Recommended Layout
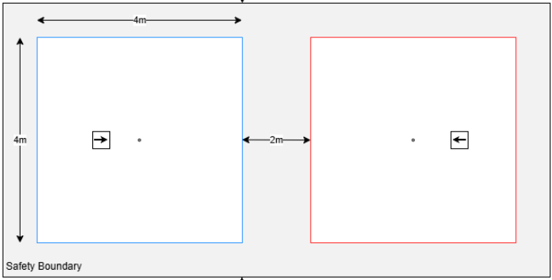
The size of each individual’s play area is 4m by 4m and the distance apart from each player must have a minimum of 2 mats (WT approved mats 0.8m or 1m).
The safety area must have a minimum of 1 mat from the play area.
The player start position on each mat must be marked 1m from the middle of the mat.
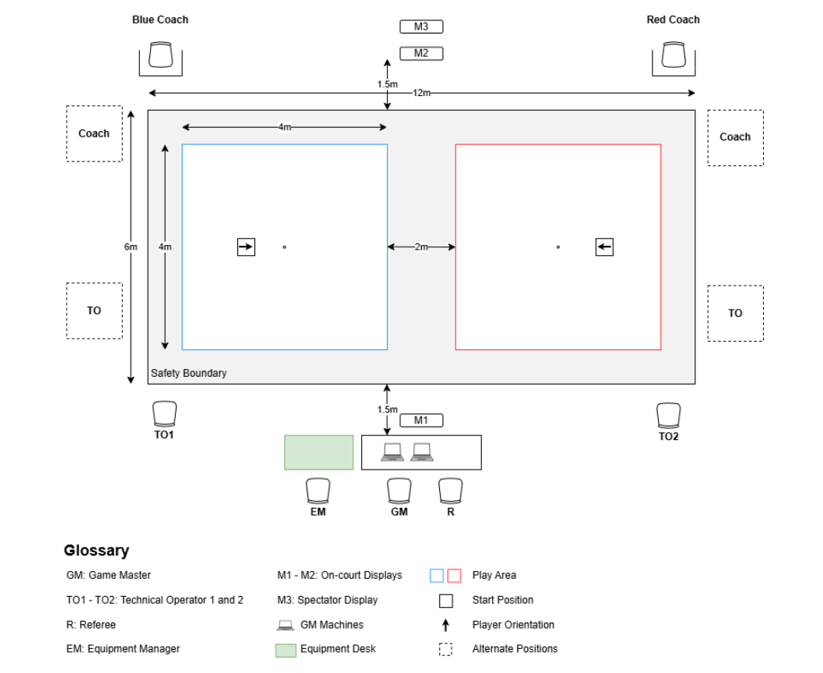
*The current maximum number of courts/FOP is 2, with a dedicated router needed for each.